MEGA65 Welcome Guide
Hello! You’ve reached the MEGA65 Welcome Guide. This Guide is intended for new owners of the MEGA65 personal computer. It contains answers to common questions, and recommends best practices for continued enjoyment of your new computer. It was written as an unofficial supplement to the MEGA65 User’s Guide included with the computer.
As of February 2024, most of this information has been added to the MEGA65 User’s Guide, 2nd edition. You can download the PDF, or purchase a professionally printed copy. The updated edition of the User’s Guide will be included with future MEGA65 shipments. I will try to keep this Welcome Guide up to date, especially with short-lived tips and advice that won’t be in the print guide.
I’m Dan, known as dddaaannn in the MEGA65 Discord. If you notice anything in this guide that needs updating, please report an issue. Thank you!

The contents of this Welcome Guide:
Welcome!
Congratulations! You are the owner of the MEGA65 personal computer, a modern recreation of the Commodore 65. The Commodore 65 was the unreleased successor to the highest selling computer of all time, the Commodore 64.
Tip
I have a MEGA65 newsletter! Subscribe by email or RSS for news, features, and activities you can do with your MEGA65.
Tip
Don’t own a MEGA65? Pre-order one from Trenz Electronic!
Your MEGA65 comes with an excellent User’s Guide that describes the machine’s features, including a command reference for its built-in BASIC programming language. This Welcome Guide is an unofficial supplement to the User’s Guide, intended for new owners.
By following this guide, you will:
Explore your MEGA65 right out of the box!
Learn important concepts for maintaining your MEGA65
Prepare a microSD card for storage and software upgrades
Open your MEGA65 to install and upgrade components
Update your MEGA65 to the latest versions of the software
Learn about features still in development and known issues with the hardware
Find out how to learn more and connect with the MEGA65 community
This Welcome Guide will refer to the official User’s Guide, so keep it handy!
Note
Your MEGA65 came with a User’s Guide that was printed in early 2022, even if your computer shipped more recently. The PDF version has been updated since then to describe features recently added to BASIC 65. Download the latest PDF, and see Recently added features in this Guide.
Why a Welcome Guide?
The MEGA65 is brought to you by the MEGA Museum of Electronic Games & Art e.V., a registered voluntary association and non-profit organization. The core team of talented engineers and a community of contributors and patrons made this possible. They continue to improve and refine the capabilities of your upgradable machine.
This unofficial Welcome Guide is intended to help new owners get up and running. It describes common issues that you may encounter and their remedies. These issues may not apply to future versions of the MEGA65 hardware or software, and may not be described by the official documentation. It is based on the author’s own experiences and discussions among new owners troubleshooting these issues.
If you notice anything in this guide that needs updating, or if you discover a topic not covered by the official manual that you feel new owners should know about, please report an issue, email me (I’m Dan), or DM dddaaannn#7325 in the MEGA65 Discord. Thank you!
Things you’ll need
The following items are included in your MEGA65 box:
Your MEGA65 personal computer
Power supply
The MEGA65 User’s Guide
Your personal registration code, on a piece of paper (possibly tucked into the User’s Guide)
The internal SD memory card (installed inside the MEGA65)
For this Guide, you will also need:
A monitor that supports either DVI (HDMI) or VGA, with an appropriate cable or adapter
If not using a monitor that supports audio over HDMI, speakers or headphones with a mini audio plug
A PC running Windows, Mac, or Linux, with Internet access
An Ethernet cable that can run from your MEGA65 to either your network router or connect directly to your PC
The following are optional but will be fun additions to your MEGA65 experience:
A joystick or gamepad compatible with Commodore computers, with a nine-pin (DE-9) connector
A Commodore 1351 mouse, an Amiga mouse, or a modern replacement such as a mouSTer USB mouse adapter
A watch battery: for MEGA65s made in 2022, use type CR1220; for MEGA65s made in 2024 or later, use type CR2032
3-1/2” floppy disks, either type DD or HD
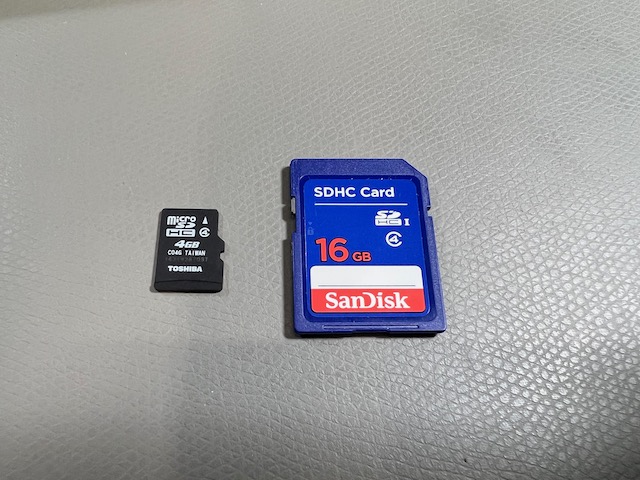
A microSD memory card, type SDHC, between 4 GB and 32 GB
An SD memory card reader for your PC, with microSD card support or an SD-to-microSD adapter
A Phillips head screwdriver
And if you want to get really serious:
Mini USB B to USB A cable, to connect between your PC and the JTAG adapter
Tip
As an alternative to a JTAG adapter, you can use a more common USB UART adapter, with important caveats. See Use of an USB UART adapter as alternative to a JTAG adapter. A misconfigured or mis-wired UART adapter may damage the computer.
Tip
A minority of MEGA65 units built in 2022 have an issue with the built-in Real-Time Clock (RTC). There is an official solution to install a replacement. See The Real-Time Clock doesn’t advance the time for how to test for this issue and request a replacement part if needed.
Try this first!
You don’t want to read stuff, you want to play with your new MEGA65! Well good news, there’s tons to play with, without ever having to download a file or crack open the case.
The fun is in the digging, so if you’re ready to go, stop reading now and dive in. Come back to this section for some things to try before going further. Have fun!
Tip
The User’s Guide, 2nd edition, covers many of the topics described here. See the Guide for more detail.
Your computer may have newer firmware and system software than was used to produce the screenshots in this section. The differences are minor.
Tip
Does your MEGA65 not boot when you turn it on? A small percentage of HDMI displays have a known issue, and there’s a workaround. See Failure to boot, and keyboard lights glow when off.
Connecting peripherals
Your MEGA65 only needs to be connected to its power supply (included) and a monitor (not included) to operate. The MEGA65 has two connectors for monitors: a VGA connector, and an HDMI connector. Both connections work simultaneously, showing the same display. See Video display compatibility later in this Guide for some notes on monitors.
The MEGA65 has two methods of producing sound: over the HDMI connection, or through the dedicated audio jack. You can connect headphones or speakers to the audio jack. To use a display that takes audio over HDMI, you must change a setting, which you’ll do in the next step.
If you own an Atari- or Commodore-compatible joystick, gamepad, or mouse with a DE-9 nine-pin connector, you can connect it to one of two nine-pin ports on the lefthand side of the machine. The MEGA65 supports both the Commodore 1351 mouse and the Amiga mouse. The Amiga mouse requires setting a configuration option. Modern mouse replacements such as the mouSTer adapter or the wireless Amiga tank mouse are expected to work. Personally, I use a 1351 mouse in port 1 and a modern Commodore-compatible gamepad in port 2.
Note
Before connecting a mouse, be sure to set the mouse mode in the configuration step, described later. If an Amiga mouse is connected while the port is in the wrong mode, it may interfere with the behavior of the keyboard.
On-boarding
When you turn your MEGA65 on for the first time, it prompts you for some initial settings. The most important setting is the video mode. Use the Tab key to cycle between digital video without sound over HDMI vs. with sound over HDMI (“enhanced”), and PAL 50Hz vs. NTSC 60Hz display modes. Press Space to test a video setting to make sure it works with your monitor.
Note
If your display isn’t working, you may need to adjust the video mode blindly until you find one that works. Older DVI monitors need the “without sound” mode, and monitors vary in their support for 50Hz and 60Hz refresh rates. Use the Tab and Space keys to try the different modes.
Use the function keys to adjust the date and time, as indicated. The MEGA65 includes a Real-Time Clock (RTC) that keeps track of the time for various purposes. If you have a 2022 MEGA65 (R3A, batch 1 or 2), you will need to install the watch battery before the RTC will function; you can skip this step and set the clock later after the battery is installed. If you have a 2024 MEGA65 (R6, batch 3 or later), the RTC will function without a battery for a day or so after the computer has been powered on for a few hours. The battery is optional on this model, for keeping the clock set for longer periods.
Take this opportunity to test your audio set-up. Press the A key to play a musical tone. If you are using audio over HDMI, make sure the video mode is set to “Enhanced (with sound).”
The “CRT emulation” option is a fun choice when using a modern flat panel display: it adds vertical gaps between pixels to simulate the CRT raster line. Try it to see if you like it: press the C key to toggle it on and off.
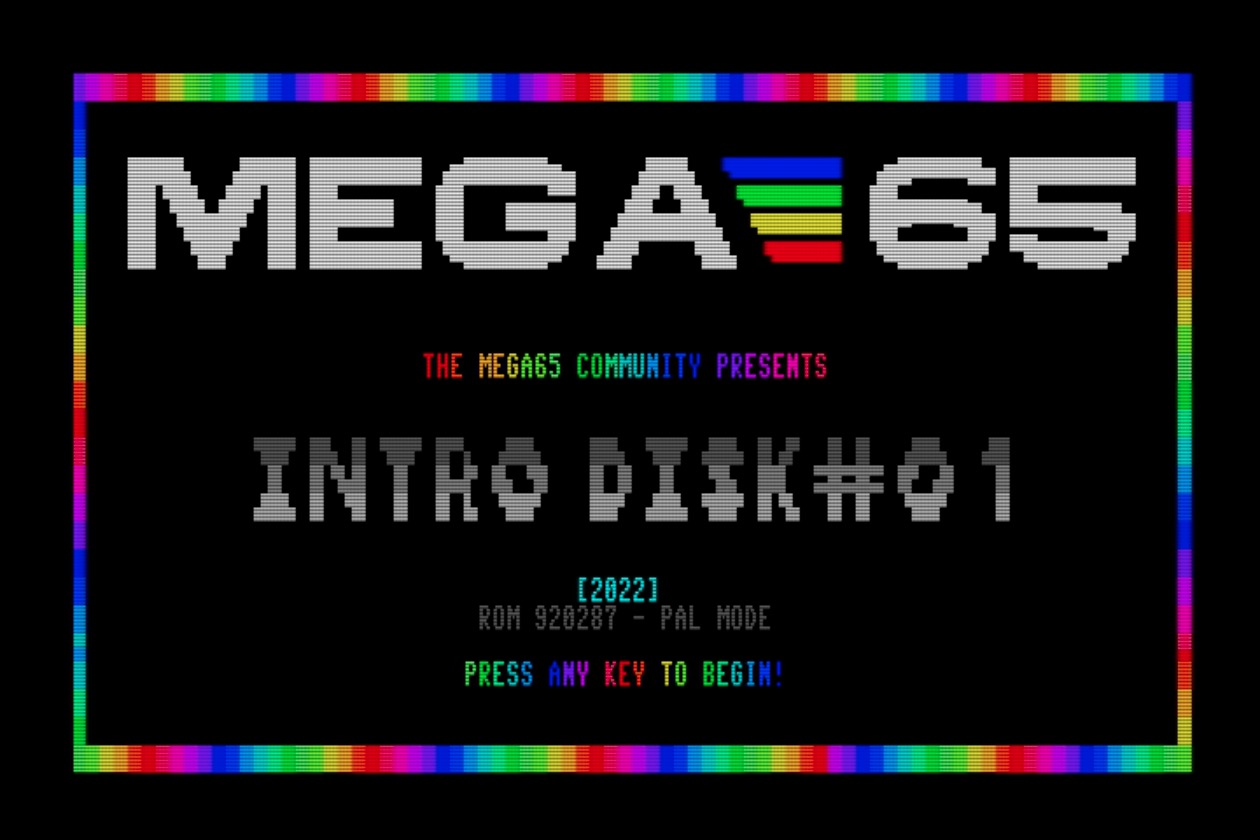
Demonstration menu
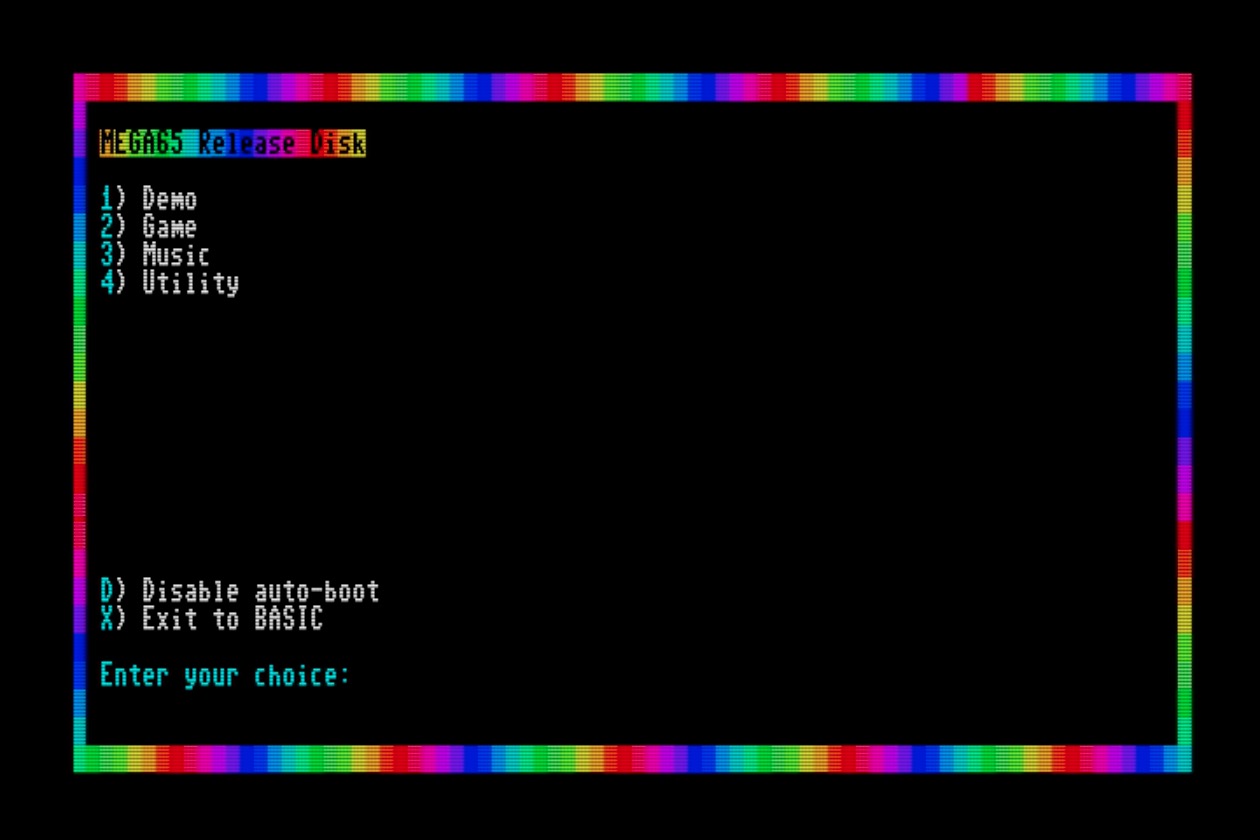
Your MEGA65 is configured to run a demonstration program when you turn on the machine. You can use this menu to launch games, utilities, and demos that show off the capabilities of the MEGA65. Try them out! Remember that you can use the reset button to start over.
Starting with the 2024 MEGA65s, your computer comes packed with 191 software titles across three “intro disk” menus. Use the on-screen menu options to navigate the complete selection.
You can exit from the menu to MEGA65 BASIC, the built-in programming and operating environment. This environment is similar to the Commodore 64 and 128, where you can give the computer commands, write programs in the BASIC programming language, and load and save programs.

The demonstration menu is itself a BASIC program. When you exit from the menu to BASIC, this program will still be in memory. You can use the LIST command to see its source code. If you want to clear memory to write a new program, use the NEW command before entering statements.
NEW
10 FOR X=1 TO 100
20 PRINT "MEGA65! ";
30 NEXT X
RUN
Once you have tried all of the demo programs, you will probably no longer want your MEGA65 to start the demonstration mode every time it turns on. Select the “Disable auto-boot” menu option in the top-most menu to disable it. You can get back to this menu later by loading and running the program with these commands:
LOAD "MENU"
RUN
If you change your mind and want your MEGA65 to automatically load the demonstration menu when it turns on, use this command to restore this capability:
RENAME "MENU" TO "AUTOBOOT.C65"
The Freezer menu
The MEGA65 spends most of its time behaving as a Commodore 65 computer would, either running a program or awaiting instructions in the BASIC environment. Your MEGA65 has additional features that were not part of the original C65 design. You can access many of these features from the Freezer menu.
To open the Freezer menu, hold the Restore key for a second or more, then release it. The MEGA65 will pause whatever it is doing, flicker the border color, then open the Freezer menu. Whatever program was running remains in memory and can be resumed by pressing the F3 key from the Freezer menu. You can also abandon the running program and reset the MEGA65 by pressing F5.
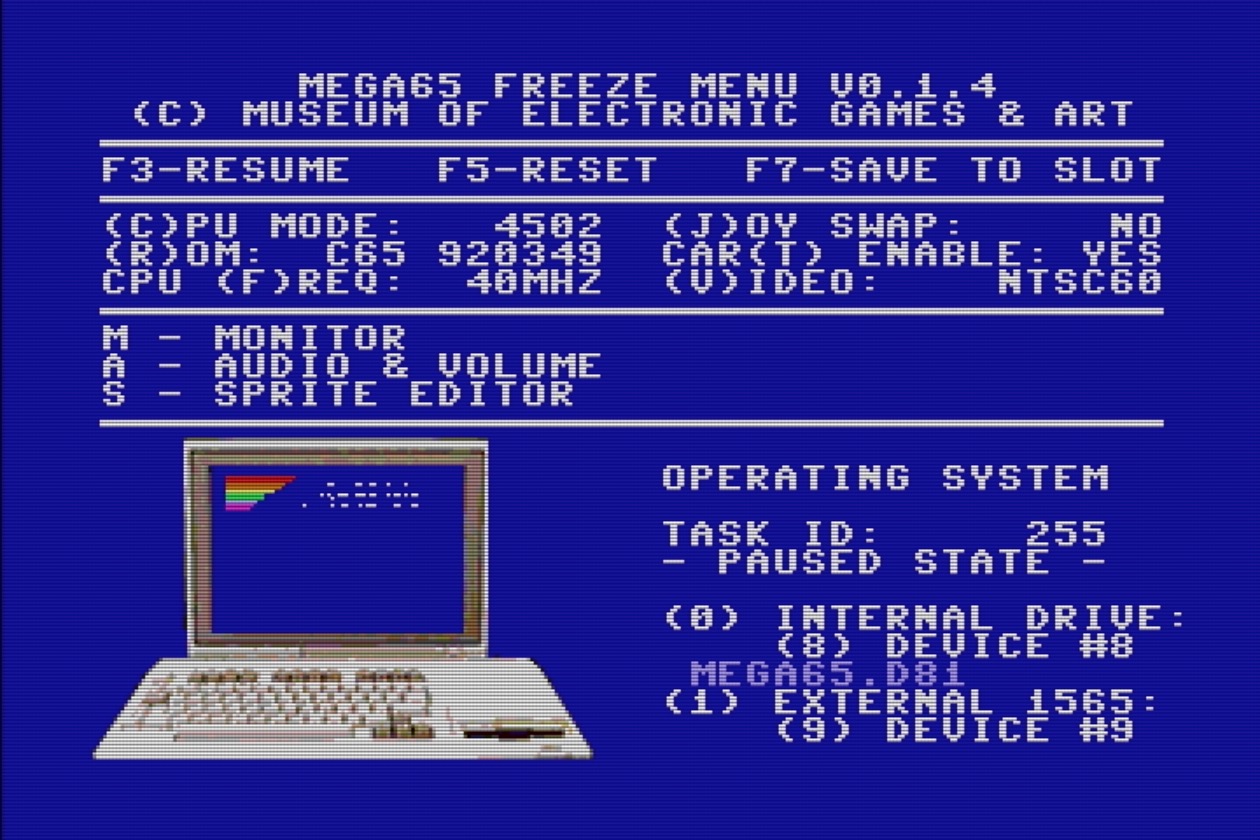
There are many useful features in the Freezer menu. Try them out!
One feature to remember when playing games is the “(J)OY SWAP.” This causes the two joystick ports to trade numbers. If you have a joystick in port 2 and you start a game that expects a joystick in port 1, instead of disconnecting and reconnecting the joystick, open the Freezer menu, press J to swap the port numbers, then resume your game.
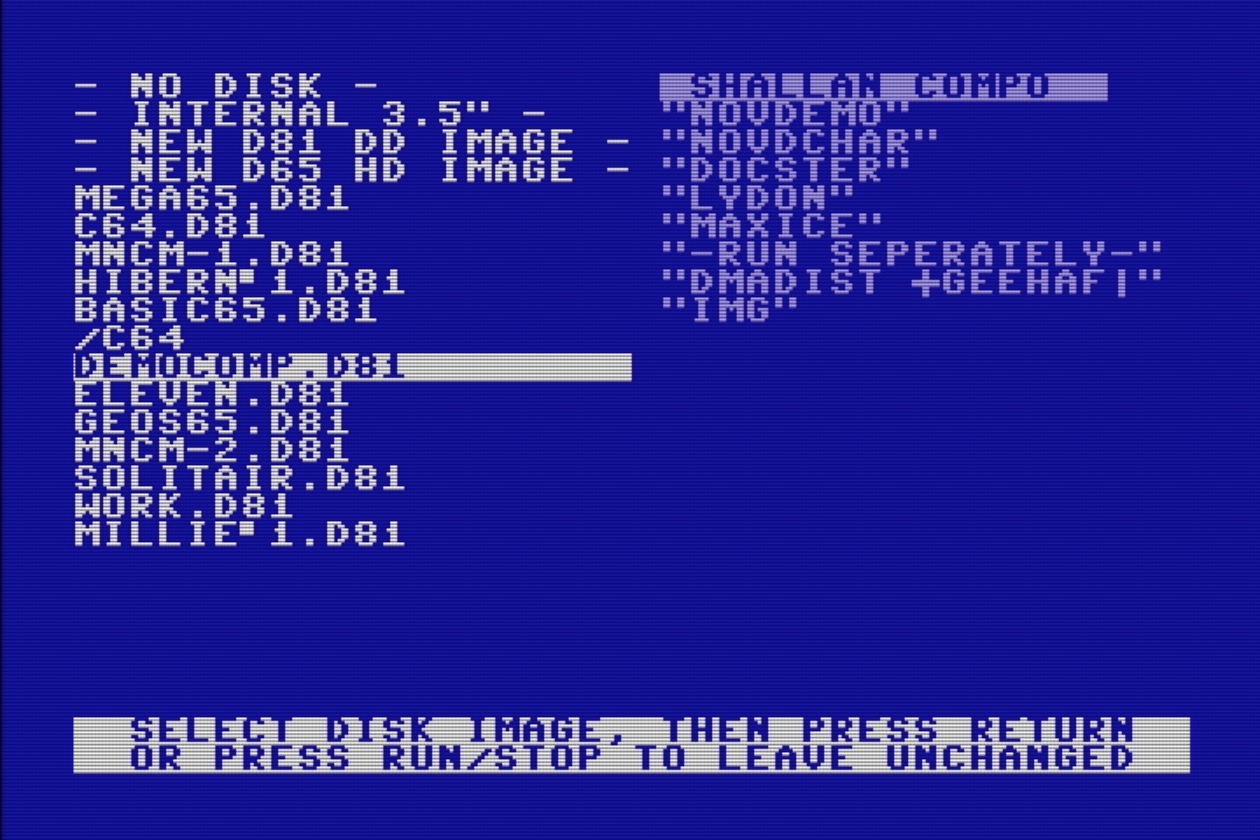
Disk images
One of the MEGA65’s most useful features is its virtual disk drive. Of course, you can use vintage 3-1/2” floppy disks with the MEGA65’s built-in physical drive. More often, you will use files that represent disks (“disk images”) that reside on a modern SD memory card. You can use the Freezer menu to tell MEGA65 whether to use the physical drive or a disk image file as a disk drive.
MEGA65 comes bundled with several disk images, including one named MEGA65.D81 that contains the demonstration menu. You can make your own D81 disk images, and can download MEGA65 software as D81 disk image files over the Internet using your PC.
Try browsing one of the disk images included with your MEGA65:
If the Freezer menu is not already open, hold the Restore key for a second then release it.
Press 0 (zero) to see the options for setting up the first drive.
Use the cursor keys to navigate to
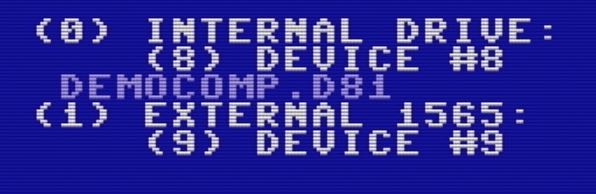
DEMOCOMP.D81. Press Return to select it.Notice that the disk image name appears under the “Internal drive” in the Freezer menu.
Press F3 to resume the MEGA65 with this disk image in the virtual drive.
Loading and running a program from disk
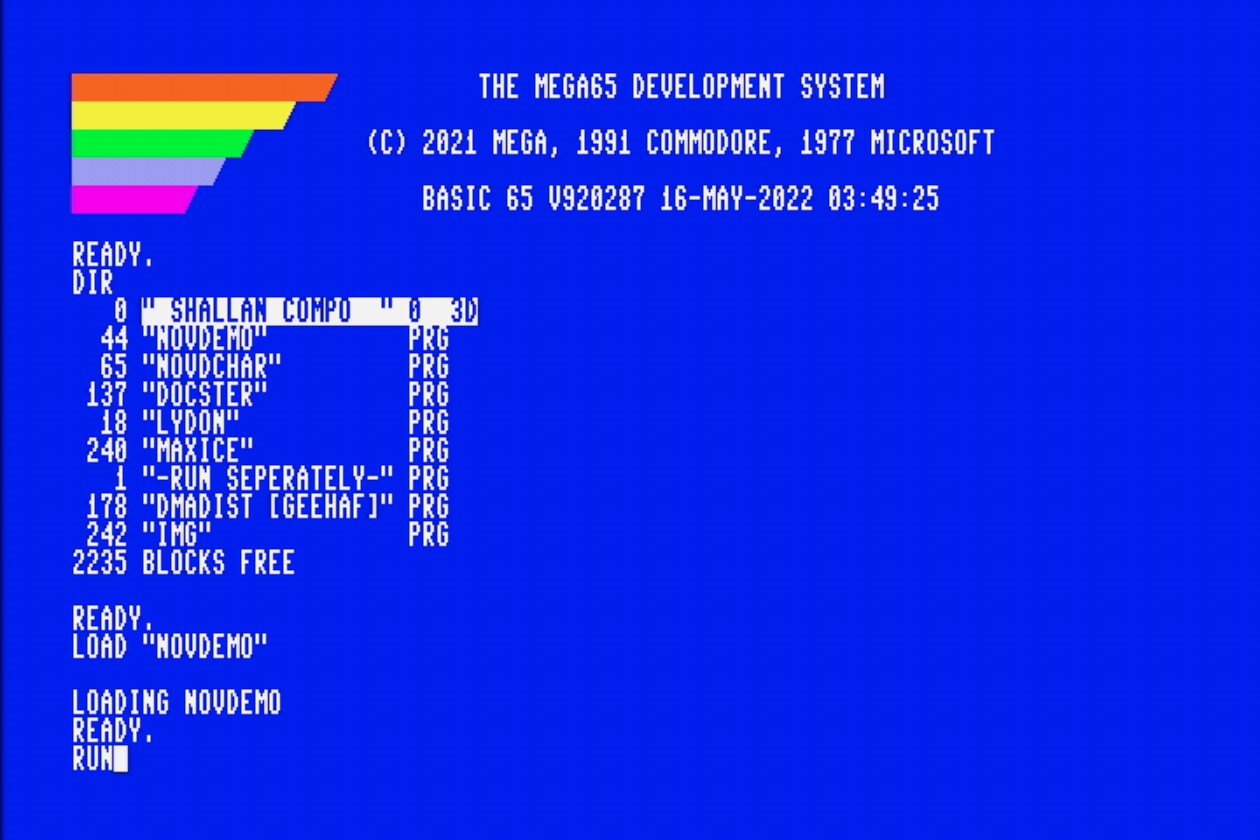
You now have the DEMOCOMP.D81 disk image mounted to device 8 (drive 0). Let’s see what’s on the disk! Enter the following command at the BASIC READY. prompt (type the command then press Return):
DIR
This lists all of the files on the disk, also known as the disk directory.
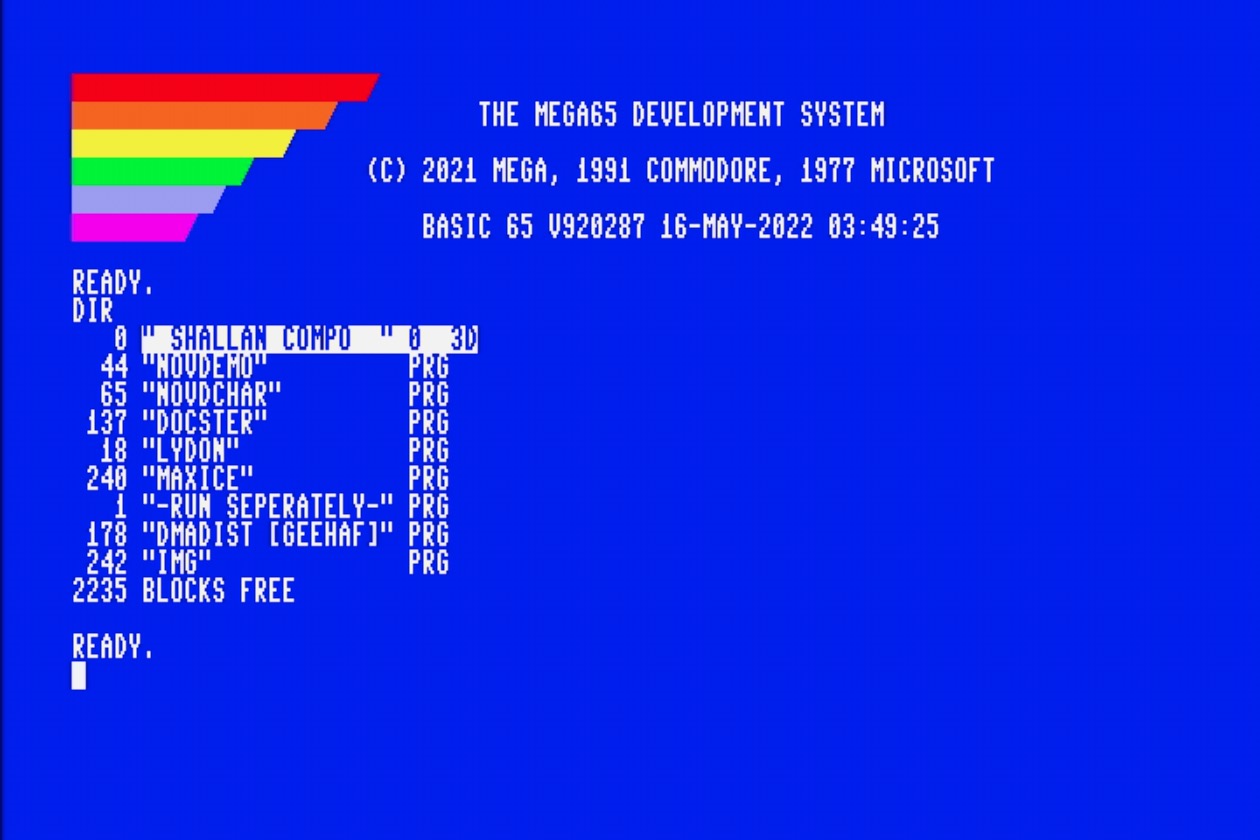
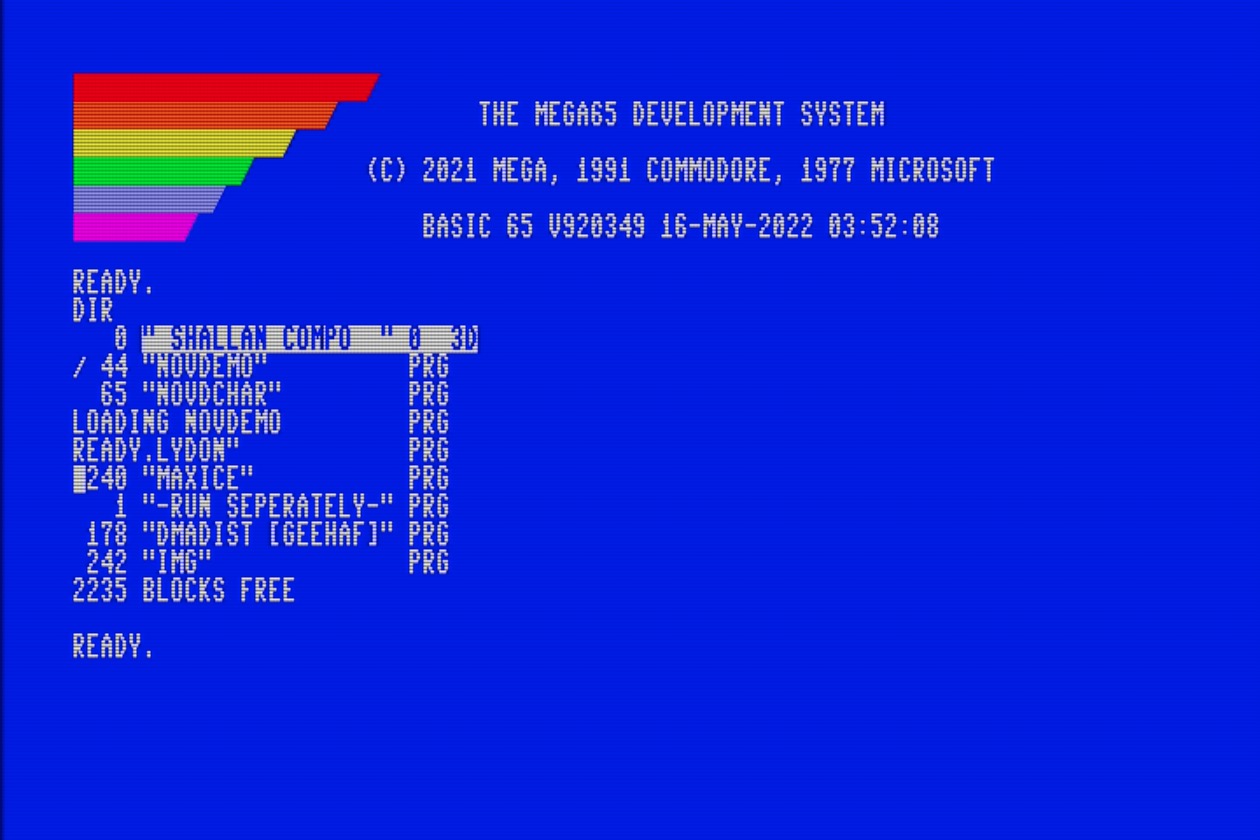
You can use the DLOAD command to load a program off of the disk by name:
DLOAD "NOVDEMO"
If you’ve used a Commodore 64, you may remember having to type ,8 or ,8,1 after a LOAD command when loading from a disk drive. With MEGA65, unit 8 is the default, so this can be omitted.
Enter the RUN command to start the NOVDEMO program.
RUN
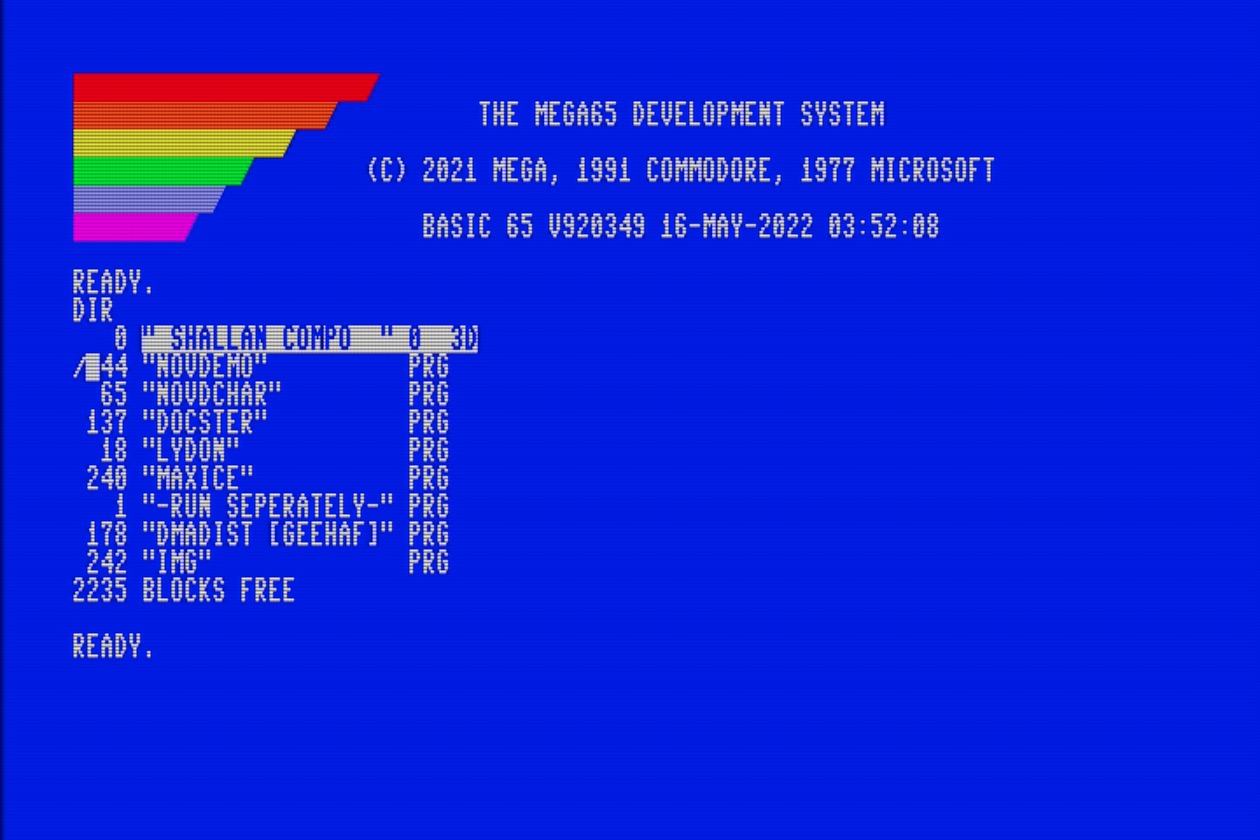
Tip
A common trick you may remember from your Commodore 64 is, instead of typing the full filename of something you wish to LOAD, you can list the directory of the disk, then move the cursor up to the line with the name of the program and type LOAD at the beginning of the line to form the command.
This works on the MEGA65 too, but MEGA65 has a faster way: just type / (forward slash) at the beginning of the line, then press Return. Unlike with LOAD, you do not need to clear away the extra characters on the line for the / to work.
To load and run the program automatically, type the ↑ (up arrow) symbol at the beginning of the line, then press Return. This is the up-arrow key next to the Restore key, not the cursor-up key. (With a 2022 MEGA65, you may need to update your system software to get this feature.)
When you’re done enjoying the demo, you can press the reset button, or use the Freezer menu and press F5 to reset.
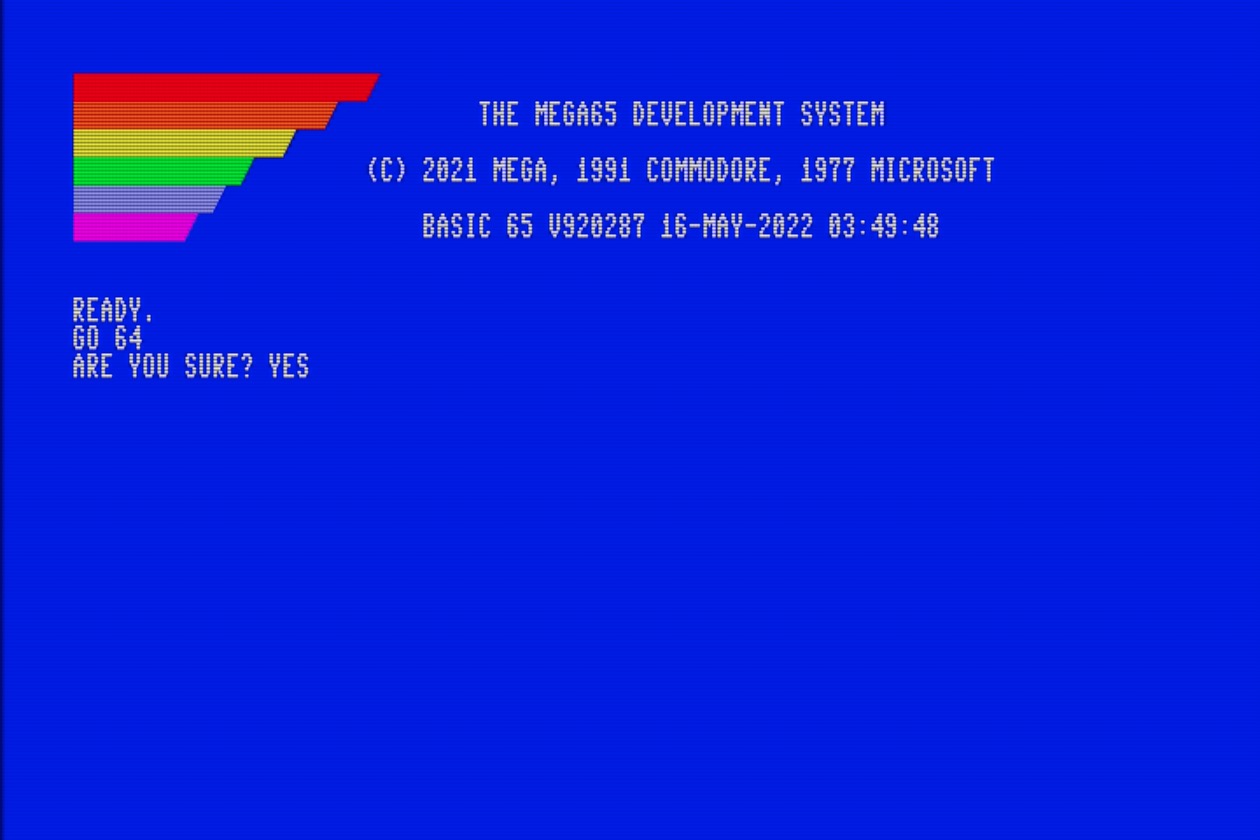
Commodore 64 mode
Like the Commodore 65 on which it is based, the MEGA65 can run in a Commodore 64 compatibility mode. From BASIC, enter this command, then type YES to confirm:
GO 64

The Freezer menu is accessible when in C64 mode, and can be used to mount D81 disk images (or the physical disk drive) with disks containing C64 software.
MEGA65 includes a D81 disk image with C64 games and demos, named C64.D81. Use the Freezer menu to mount it to the first drive, then resume C64 mode. Use C64 commands to access the disk in unit 8.
LOAD "$",8
LIST
LOAD "DIGILOI",8
RUN
Some of the programs on the C64.D81 disk only work with the PAL video setting. If your monitor supports it, change this setting in the Freezer menu.
Note
MEGA65 currently only supports D81 disk images. Support for the more common D64 format that represents a Commodore 64 5-1/4” floppy disk may be added in a future update.
C64 mode is not to be confused with the C64 core, an alternate way to run C64 software on the MEGA65 which we will discuss later in this guide. The C64 core supports D64 disk images, in a different way.
Do not expect C64 mode to be compatible with all Commodore 64 software. Due to how the Commodore 65 was originally designed, GO 64 can never be fully compatible. In contrast, the C64 core reproduces the Commodore 64 hardware in the MEGA65 firmware and is expected to run nearly all Commodore 64 software.
Configuring your MEGA65
I mentioned that the settings from the on-boarding process can be adjusted later. These settings and more are available in the built-in configuration utility.
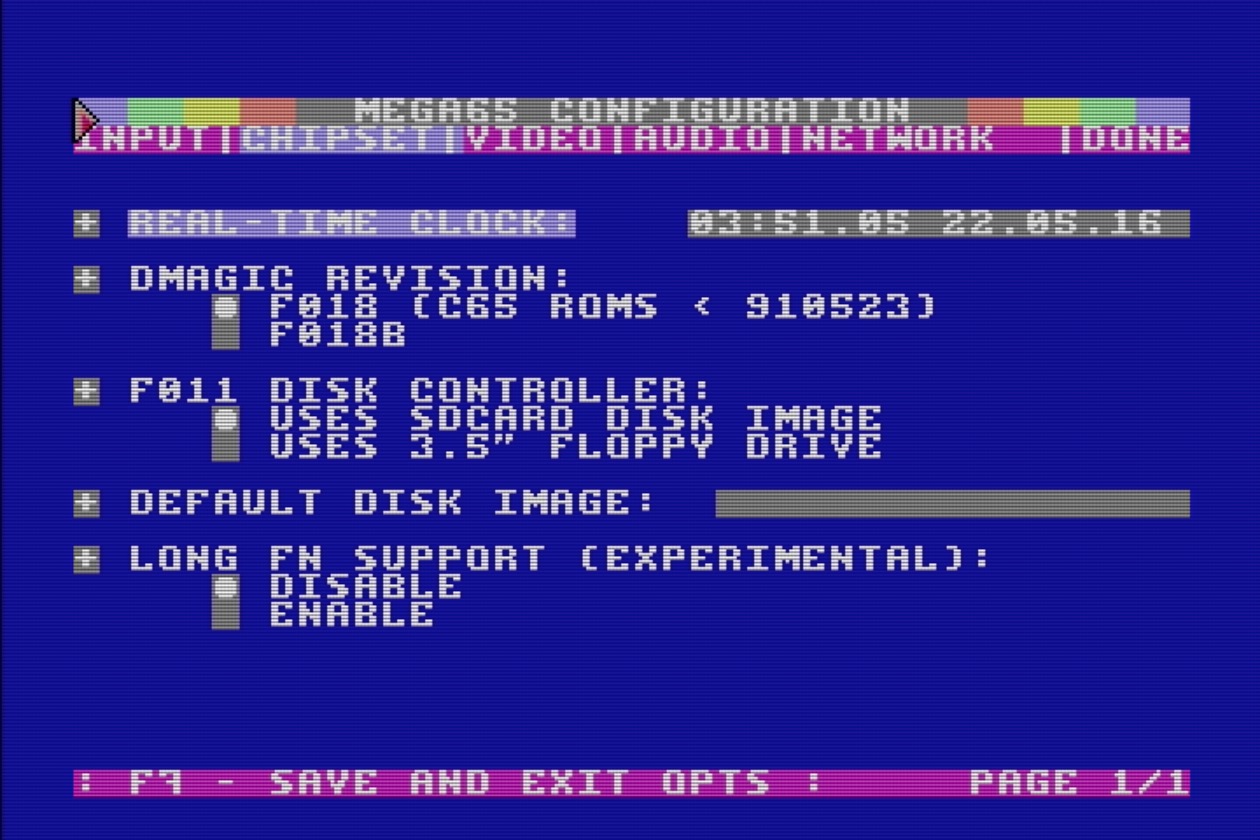
To start the configuration utility, turn off your MEGA65, then hold the Alt key (top row near the left) and turn it on. Select option 1: Configure MEGA65 (press 1).
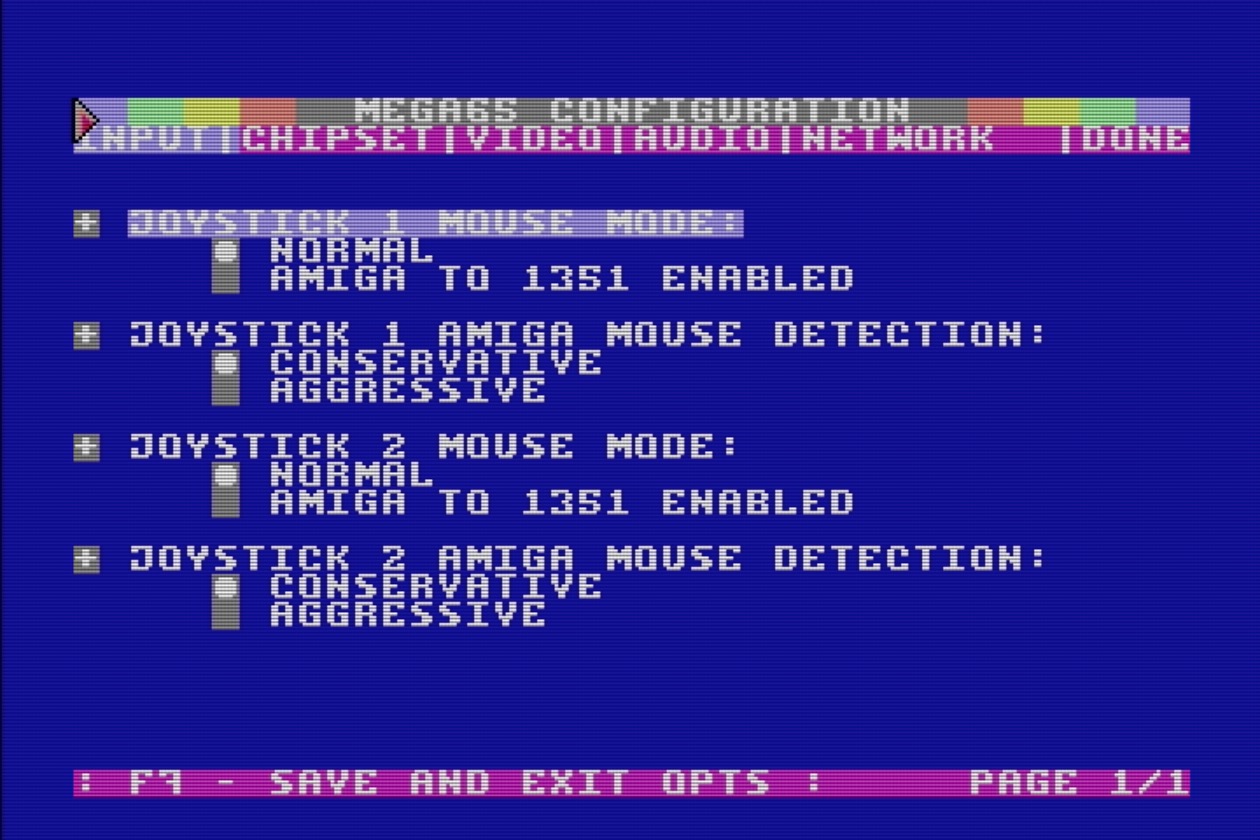
You can use the cursor keys or a mouse to navigate the configuration options. This is also a good way to test whether your mouse is working. Useful options include:
Input: mouse configuration. You can enable the use of Amiga mice on either port.
Chipset: Real-Time Clock. This is how you set the date and time, which I told you to skip during on-boarding because you haven’t installed the battery yet.
Chipset: Default Disk Image. Specify a D81 filename to load by default when you turn on the computer.
Video: All of the video options from the on-boarding screen.
Note
The time and date setting in the configuration utility has changed between the early 2022 and late 2022 versions of the MEGA65.
If you received your MEGA65 in early 2022, it uses the following time and date format: HH:MM:SS YY/MM/DD (That’s hours, minutes, seconds, the year, the month, and the day of the month.) It doesn’t prevent you from entering invalid numbers. Take care to use the correct date format.
If you received your MEGA65 after late 2022, the time and date are separate settings. You must press Return in these fields for each setting to take effect. It may look like nothing has happened. You can confirm that the setting was submitted correctly by selecting a different page of the Configuration menu, then switching back to the Chipset page.
Under “Done,” you can save these settings as defaults. These settings are stored on the SD card, except for the Real-Time Clock which sets the clock hardware.
Important concepts
Now that you’ve had a taste of what the MEGA65 can do, it’s time to prepare your computer for long term use. But first, let’s discuss some important concepts of how the MEGA65 works.
SD memory cards
The MEGA65 uses an SD memory card for its primary data storage. There are two SD card slots: a full-size SD card slot inside the machine, and a microSD card slot accessible on the back of the machine. The MEGA65 comes bundled with an SD card installed in the internal slot.
MEGA65 only uses one SD memory card at a time. If there is a microSD card in the external slot, it ignores the full-size SD card in the internal slot. The SD card contains the operating system software (“ROM”), firmware (“core”), the system utilities (such as the Freeze menu), and D81 disk images.
I recommend installing a microSD card in the external slot, and leaving the internal card with its factory-installed data intact. Following this Guide, you will set up a microSD card with all of the latest versions of the software. You will use this card to transfer software and data between MEGA65 and your PC.
Note
Many features of the MEGA65 expect short MS-DOS-style filenames for files on the SD card: a maximum of 8 characters, a dot, then a maximum of 3 characters (myprogra.prg).
Some features will handle files with longer names, but just not display the full name in menus. The Freeze menu and core selection menu (discussed later) do this.
Some features such as loading SD card files from BASIC (DLOAD "MYPROGRA.PRG",U12) will fail for files with longer names. The only solution is to rename the file to use a short name using your PC.
(This does not apply to files on CBM disk images, which have their own unrelated limitations on names.)
Cores
The MEGA65 is powered by a Field Programmable Gate Array (FPGA). An FPGA is a special kind of chip that can be programmed to perform the functions of most any integrated circuit (IC). Like an IC, it is fast, and interacts electronically with the rest of the hardware. Unlike an IC, it can be reprogrammed with new logic at any time. FPGA code is sometimes referred to as firmware, a term you may recognize from modern computers and other devices. MEGA65’s FPGA is programmed to behave like the complete collection of ICs you would find in a Commodore 65: the CPU, video and sound chips, and so on.
The MEGA65 team continues to make improvements to this firmware, and you will want to update your machine with new firmware as updates become available. Other contributors are developing alternate FPGA programming to simulate other computers, such as a Commodore 64.
To make managing multiple sets of firmware easy, MEGA65 describes each set as a core. You will download a core data file (described in the manual as a bitstream), copy the file to the microSD card, and follow a procedure to install the core in one of seven user-accessible slots. You can access a menu to tell MEGA65 which core to use.
The MEGA65 always retains a copy of its original factory core (in “slot 0”). If something goes wrong while updating another core, you can always go back to the original version.
ROMs
While the core recreates the hardware of the Commodore 65, the ROM recreates the built-in software of the Commodore 65. This software interfaces with the hardware and provides built-in functionality like BASIC programming.
The original Commodore 65 kept its software on a physical Read-Only Memory (ROM) chip. With MEGA65, this software lives in a file on the SD card named MEGA65.ROM. MEGA65 loads this into memory when you turn it on. This file contains the original software from the C65 ROM chip licensed from the copyright holder, with many fixes and improvements. You can upgrade the operating system by replacing this file on the SD card.
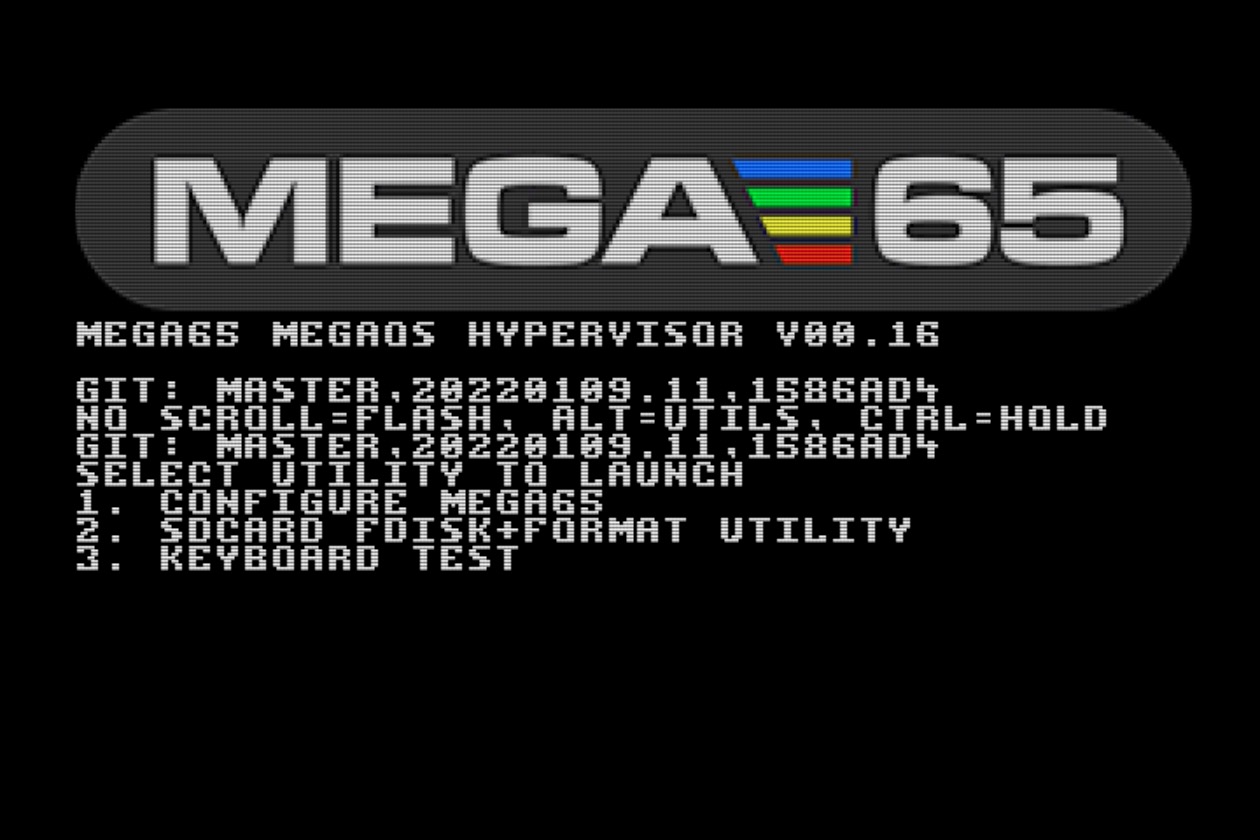
The Hypervisor
The MEGA65 has additional built-in functionality not present in the original Commodore 65, such as for managing the startup sequence, SD cards, cores, and configuration. This operating system is known as the Hypervisor.
You see the Hypervisor in action every time you turn on your MEGA65. Normally this screen displays some messages then quickly disappears. If you want to pause the Hypervisor to read these messages, hold the Ctrl key during startup. Release Ctrl to continue.
PAL and NTSC
Back in the day, PAL and NTSC were competing standards for analog video signals, used for both transmission and rendering on cathode ray tube (CRT) displays. They differed in two major ways:
The number of horizontal lines used to make the image. PAL uses a vertically dense 625 interlaced lines, compared to NTSC which uses 525 lines.
The number of times the screen is drawn per second, aka the refresh rate. PAL sweeps the screen top to bottom 50 times per second (50 Hz, or 25 interlaced frames per second), while NTSC refreshes at a faster 60 times per second (60 Hz, or 30 frames per second).
Commodore made different versions of its computers for each standard, and sold them in the countries where those standards were used: NTSC in the United States and Japan, and PAL in Europe.
Both the raster line count and the refresh rate affect the execution of computer programs written for vintage computers with analog video output. Software has to use precise timing to render graphics for each frame, and is written to expect the screen to be a certain number of lines tall. Games use the refresh rate to control the timing of other events like playing music. Without extra work by a programmer to account for the differing standards, a program written to be compatible with one video standard might run too fast or too slow, have erratic graphical behavior, or just not work at all on a machine built for the other standard.
The MEGA65 has an analog VGA video output and a digital HDMI video output. Both of these standards are newer than PAL and NTSC and can support multiple resolutions and refresh rates. The MEGA65 must still be set to either PAL mode or NTSC mode (in Configuration or the Freeze menu) to support the vintage software that might be expecting one or the other.
The chances are good (though not guaranteed!) that the monitor you are using with your MEGA65 can support the video signal it outputs in either mode, possibly with some manipulation of the image to account for the differing image heights. If you are having difficulty running a program, try switching to the other video mode. You may need to adjust your monitor’s picture settings.
What about SECAM?
The SECAM standard also competed with PAL and NTSC at the time. In countries that used SECAM, Commodore sold PAL machines with an additional device that converted the PAL signal to SECAM. Because they used a PAL video chip, they could run software written for PAL, so there was no SECAM-specific software.
Determining the versions of things
The MEGA65 internal hardware has minor differences between the models shipped in the year 2022 and the models that will ship in 2024 and later. It is important to know which model you have.
The MEGA65 core (which includes the Hypervisor), ROM, and Freeze menu are all upgradable components. It is often useful to know which versions of these components are currently operating your machine.
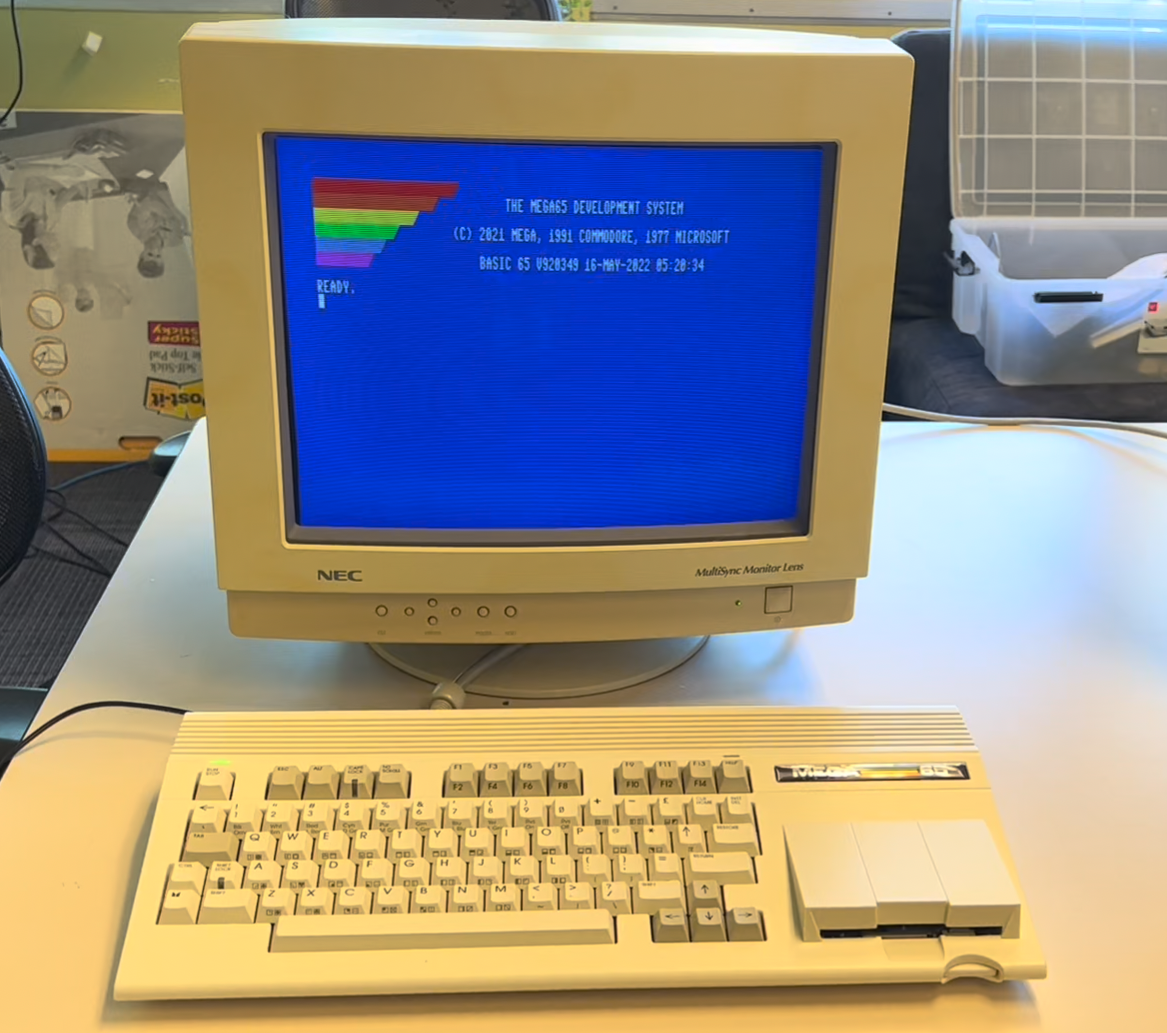
The MEGA65 Information screen
You can find out most of the information you need about the versions of various components using the MEGA65 Information screen.
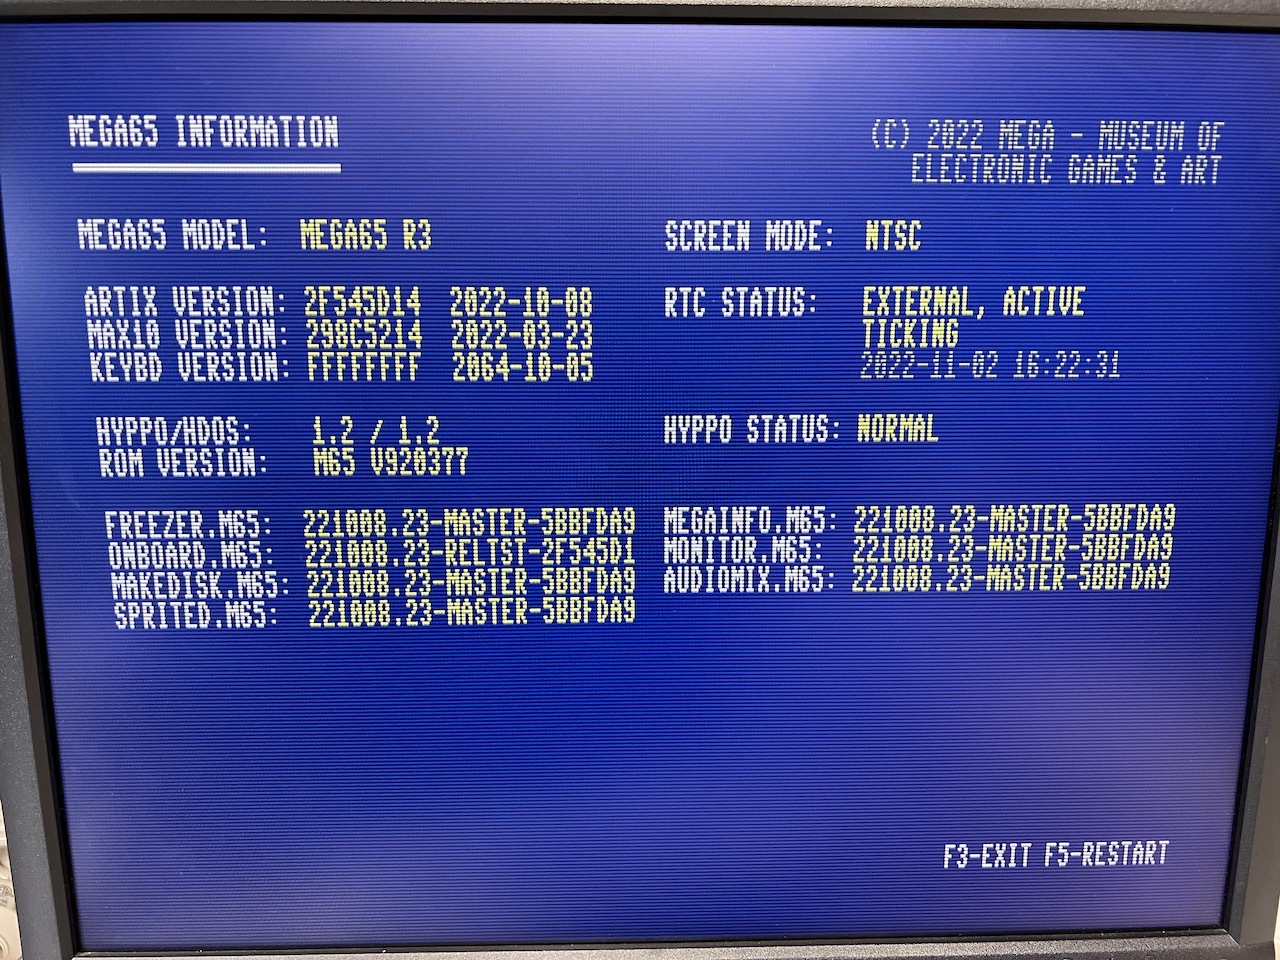
You can access the Information screen as follows:
Open the Freezer: hold Restore for one second, then release.
Press the Help key.
If pressing the Help key from the Freezer does nothing, you probably have the early 2022 model with the v0.9 firmware and system software. The Information screen was added in v0.95. (We will describe how to upgrade later in this Guide.)
Some important information on this screen:
MEGA65 Model: the hardware model, such as
MEGA65 R6Artix Version: the MEGA65 core version and date, such as
3C104883 2024-02-24ROM Version: the version of the MEGA65 operating system (known as the “ROM” or “KERNAL”), such as
M65 V920395
This Guide was originally written for the first MEGA65 model. I have left the instructions for finding this information in other ways below.
The MEGA65 core version
Another way to determine which version of the MEGA65 core is installed is to turn off the computer, then hold the Ctrl key while turning on the computer to pause the Hypervisor screen.
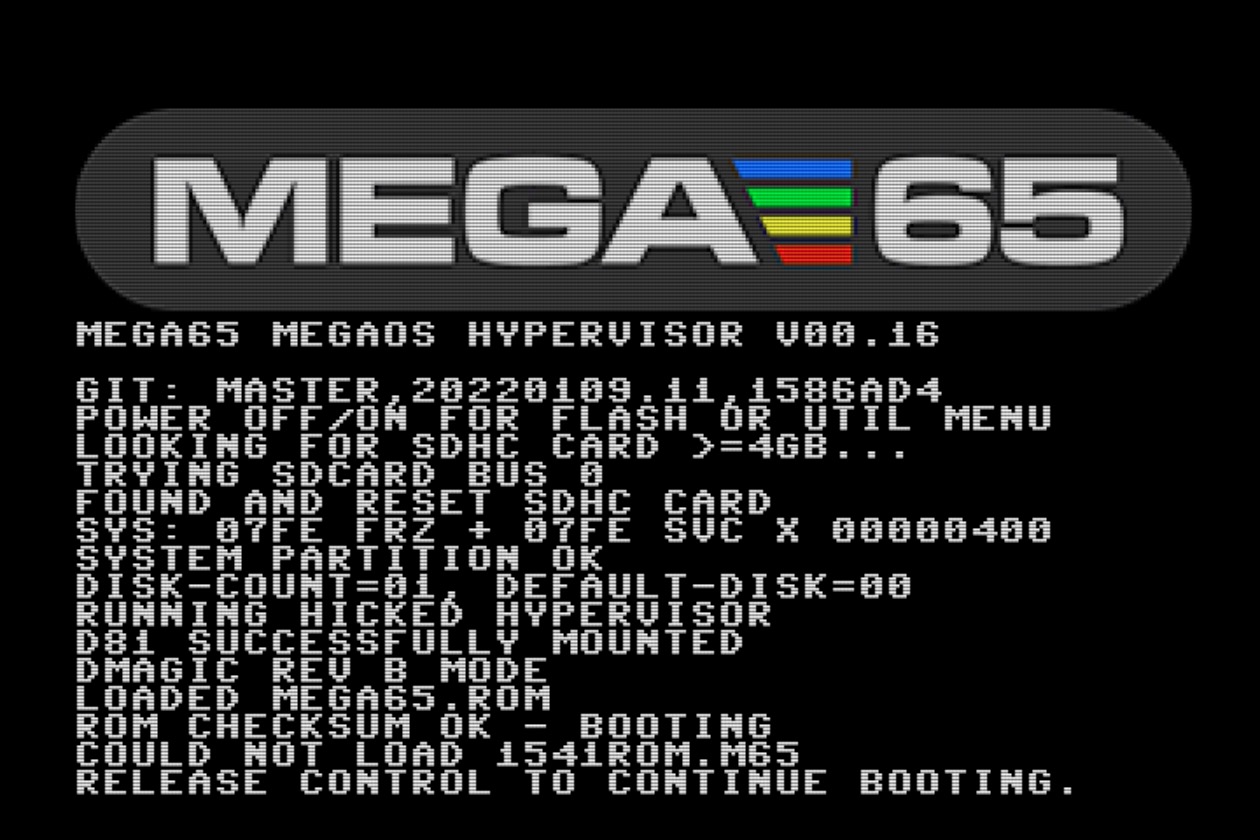
The core version is represented by the “GIT commit” string. For example:
MEGA65 shipment |
Core version |
|---|---|
Batch #1: early 2022 |
|
Batch #2: late 2022 |
|
Batch #3: mid 2024 |
|
These master releases have been tested and declared stable for widespread use by the MEGA65 team. You can also download development releases (sometimes called “experimental” releases) to help test newer changes made to the core. Experimental releases have a version string that begins with the word development.
The 20240224 portion of the core version is a date, with a four-digit year, a two-digit month, and a two-digit day. The 3c10488 portion is a hash code that represents the most recent change in the code repository (“GIT commit”). Hash codes are not in any order, so you can’t tell if one version is newer than the other by the hash code alone.
Tip
You can check the version of the MEGA65 core while the computer is running without turning it off. At any time with the MEGA65 core running, hold the Mega key (the fancy M in the lower left of your keyboard) and press Tab. Welcome to “Matrix mode!” This is a special mode used by the MEGA65 development team to tweak the memory of the computer while it is running, among other things. It also displays the version of the running MEGA65 core. Press Mega + Tab again to exit.
The MEGA65 ROM version
You can determine the version of the MEGA65 ROM that is running from the BASIC title screen.
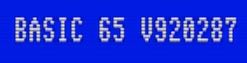
MEGA65 shipment |
ROM version |
|---|---|
Batch #1: early 2022 |
MEGA65 ROM v920287 |
Batch #2: late 2022 |
MEGA65 ROM v920377 |
Batch #3: mid 2024 |
MEGA65 ROM v920395 |
The original Commodore 65 ROM data used a number resembling a date to represent the software version, such as 910828 or 911001. The MEGA65 enhanced versions of the original ROMs continues the numbering sequentially from 92xxxx. A higher number implies a newer ROM.
Bundled releases
To make it easy to know which versions of these components are known to work well together, the MEGA65 team provides release bundles that have been tested as a set. These releases have version numbers.
Release bundle 0.9, factory-installed for MEGA65s delivered early 2022 (batch #1)
Core
master,20220109.11,1586ad4ROM
920287
Release bundle 0.95, factory-installed for MEGA65s delivered late 2022 and early 2023 (batch #2)
Core
master,20221012.18,93d55f0ROM
920377
Release bundle 0.96, factory-installed for MEGA65s to be delivered mid 2024 (batch #3)
Core
master,20240224.00,3c10488ROM
920395
The latest system software (.M65 files on the SD card) is always bundled with the core.
In general, the core, ROM, and system software tend to serve independent functions, and most versions of one are compatible with most versions of the others. This is not always the case! I recommend upgrading release bundle components all at once. If you wish to try a newer beta test version of a component, be sure to follow beta test instructions to assure you are using compatible versions of other components.
Opening the MEGA65 case
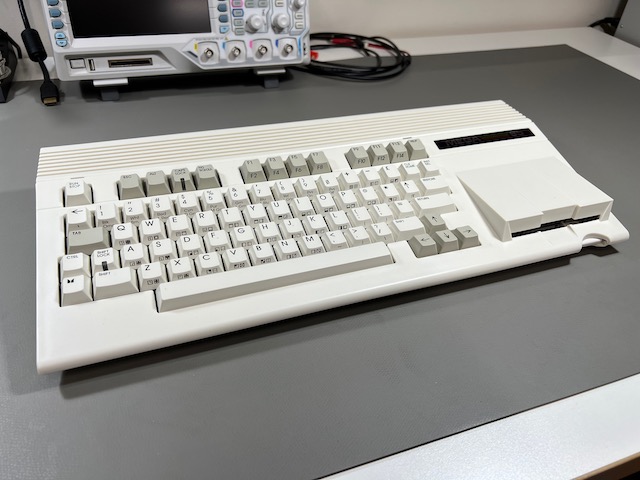
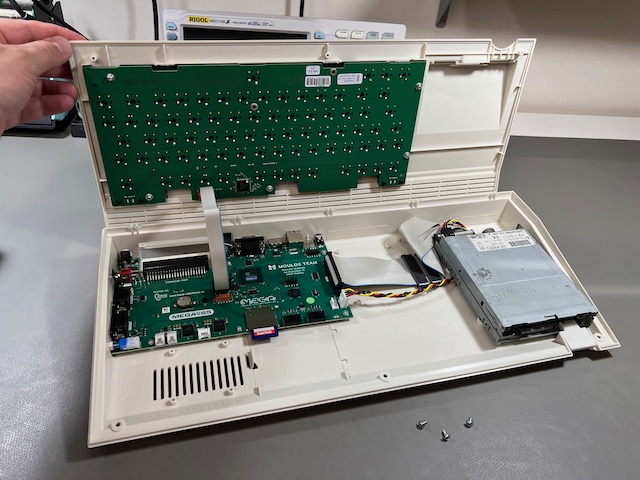
Your MEGA65 consists of an injection molded plastic case, built-in keyboard and disk drive, ports for peripherals, and internal components. The case is designed to be opened by its owner if needed.
You may not need to open the case at all! With the latest firmware, you can perform all file transfers using an Ethernet connection, without ever removing the SD card. If you have a 2024 MEGA65, you don’t even need a battery for the RTC: the R6 board includes a “super capacitor” that retains a charge for days at a time to keep the RTC ticking when not in use.
You may want to open the case for the following reasons:
To access the internal SD card
There is a small door in the bottom of the case that provides access to the internal SD card without opening the case, but I find it too difficult to access this way. If you use the external microSD card slot as I recommend in this Guide, you won’t need to access the internal SD card.
To install (or replace) the CR1220 or CR2032 battery for the Real-Time Clock
To resolve issues with the case by adjusting its assembly (see Known hardware issues)
To install a JTAG adapter (see Using the JTAG connector)
To install a replacement Real-Time Clock if the one built into the MEGA65 isn’t working (see The Real-Time Clock doesn’t advance the time)
To open the MEGA65 case, locate three screws along the bottom front of the case and remove them with a Phillips head screwdriver.
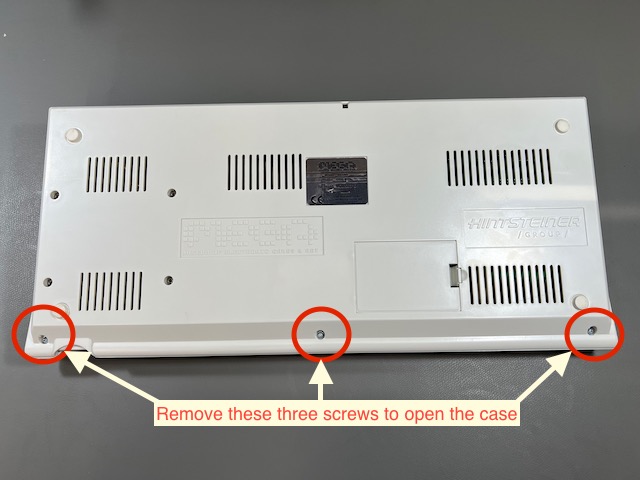
The case separates into a top piece and a bottom piece. The keyboard is attached to the top, while the disk drive, ports, and main board are attached to the bottom. The keyboard is connected to the main board with a ribbon cable.
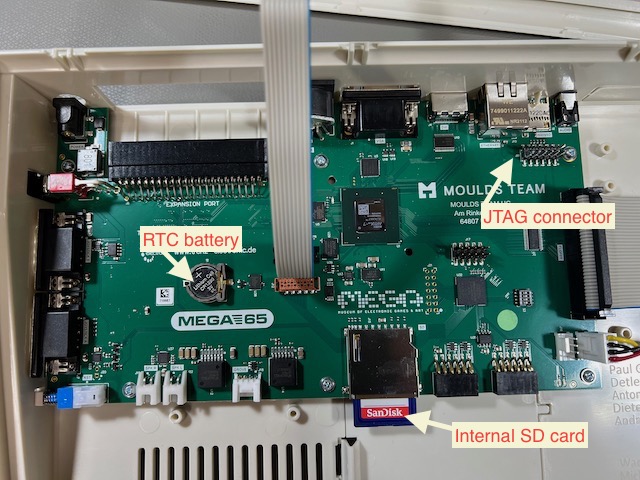
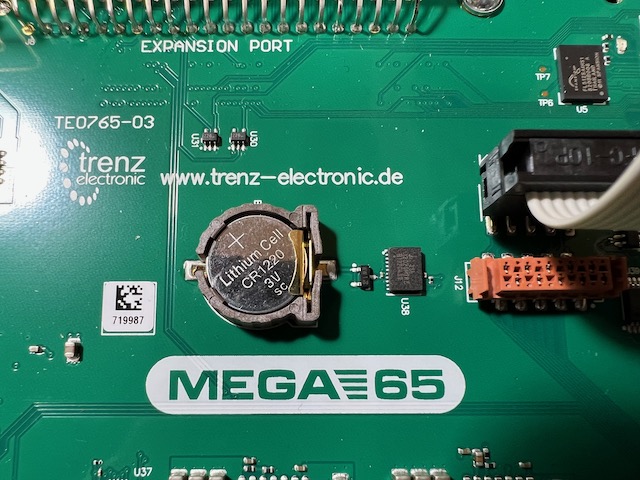
Install the battery: type CR1220 for R3 main boards (2022 model), type CR2032 for R6 main boards (2024 model). Locate the battery holder on the main board. Insert the battery under the tab, with the positive (+) side facing upward. Push down to secure it.
Tip
See Install battery CR1220 in MEGA65 for Real-Time Clock (RTC) for more photos and instructions. Remember that the R6 main board uses a CR2032 battery.
If you’d like to make a backup of the internal SD card for safe keeping, remove the full-size SD card from the internal slot. Connect it to your PC with an SD card reader. On your PC, copy all of the files to a folder. Eject the device from your PC, then return the card to the MEGA65’s internal slot.
With the new Ethernet file transfer feature of the latest firmware, you don’t need to remove the SD card at all: it can remain in the computer, and behave like an internal hard drive. Personally, I still like to add a microSD card in the external card slot, so I can keep the internal SD card in its factory condition. The MEGA65 only needs a memory card in one of the two slots.
To close the case, align the plastic tabs along the back of the top and bottom case parts, then replace the three screws.
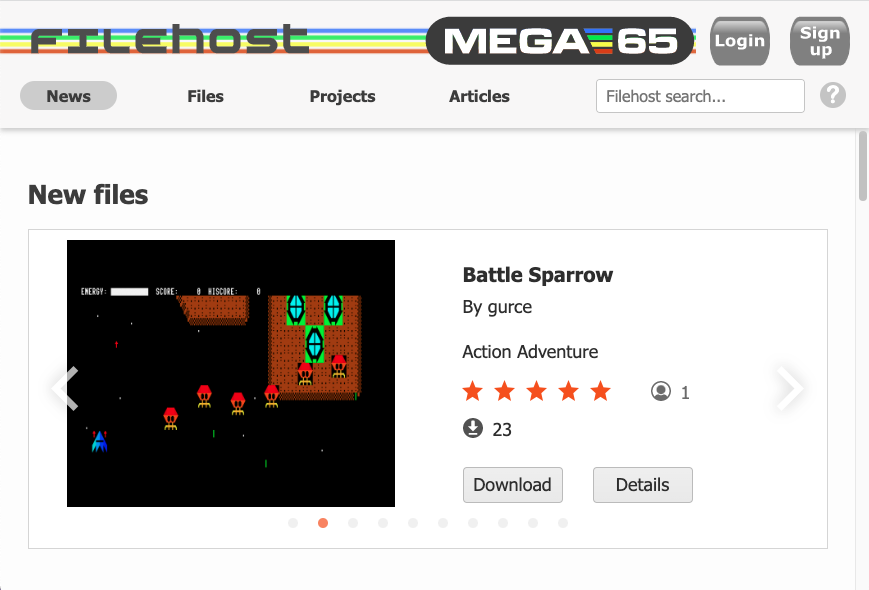
Accessing the MEGA65 Filehost
The MEGA65 Filehost website is the official repository for MEGA65 firmware and ROM updates, tools, games, applications, and documentation.
Most files are publicly available, but a few important files require an account and verification of ownership to access. Specifically, the ROMs based on the original C65 contain material that is only licensed to owners of the MEGA65. Creating an account also lets you post ratings and leave comments.
To create and account and register your MEGA65:
Visit the Filehost website: files.mega65.org
Click “Sign up” and complete the prompts. If you already have an account, click “Login.”
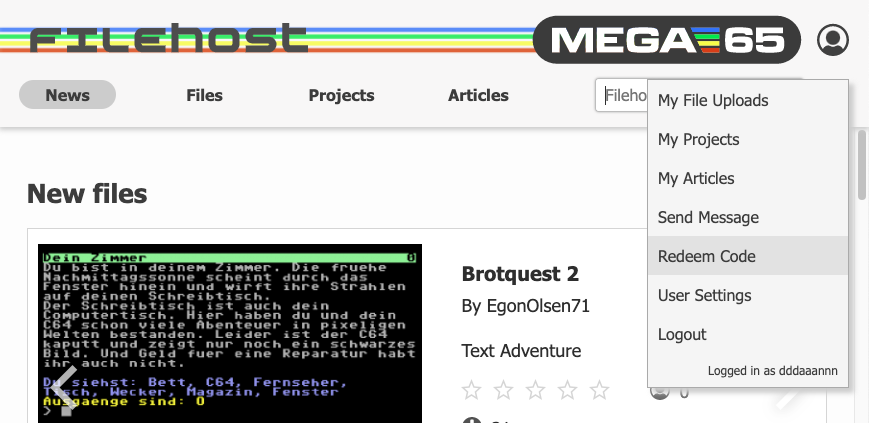
Once you are signed in, click the person icon in the upper right (where the sign up/login buttons were) to open the menu, then select Redeem Code.
In the dialog that opens, enter the nine-character registration code that was included with your MEGA65 on a piece of paper. It looks something like
123-ABC-456.Open the menu again and “Logout,” then “Login” again.
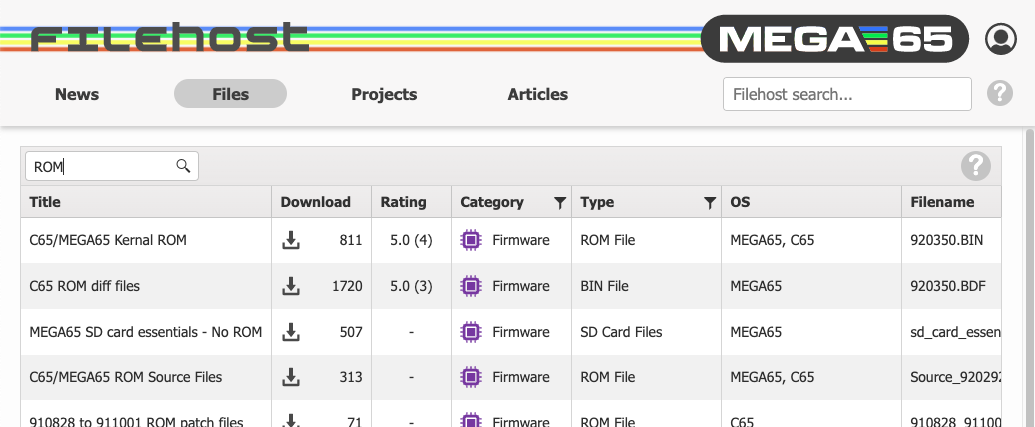
To verify that you can see the licensed files, click “Files,” click the search field, type “ROM” and press enter. If you are registered correctly, the file “C65/MEGA65 Kernal ROM” should be one of the results.
Tip
Not seeing the licensed ROM after registering? Try logging out, then log back in again.
Setting up the microSD card
The SD card that comes pre-installed in your MEGA65 can act as your computer’s internal storage. As an alternative, you can use a microSD card in the externally accessible slot on the back of the computer. This requires preparing the microSD card for use.
You will use the memory card to update the firmware and store updated system software and ROMs. You will also use it to manage D81 disk images and store applications you have downloaded.
Preparing the microSD memory card
To use an SD card with the MEGA65, it must be formatted (erased and prepared) using the MEGA65. The SD card works like a regular storage drive when connected to your PC, but it contains additional data not visible to the PC that is used by MEGA65.
To prepare a new microSD card for use, insert it into your MEGA65’s external microSD card slot. Turn off your MEGA65, then hold the Alt key (top row near the left) and turn it on. Select option 2: SDCard FDisk+Format Utility (press 2).
The SD card utility will look for cards in the available slots. Confirm that it has detected your microSD card correctly, then select option 1 for the external microSD slot (press 1).
Caution
The SD card utility will erase the internal SD card if you ask it to. Be careful to select the correct card.
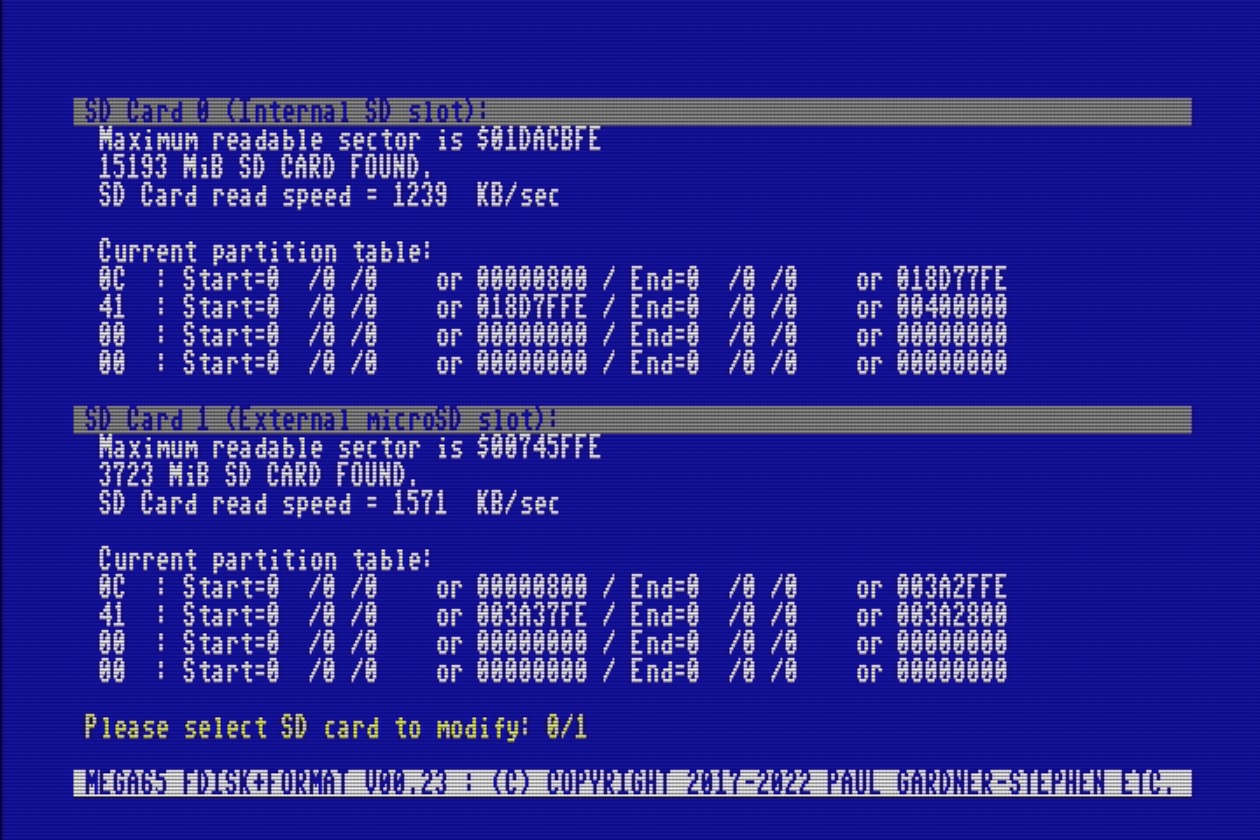
If prompted to do so, type the confirmation message, DELETE EVERYTHING, then press Return. Be sure to use uppercase (shifted) letters. The MEGA65 formats the SD card, erasing all of its data.
You will be prompted to “populate” the SD card using system files from the core. If you have not installed any other MEGA65 cores, it will use the factory-installed core for these files, including the system software and the MEGA65 ROM that were bundled with that core’s release package.
Tip
If you have installed an alternate MEGA65 core, you’ve been reading ahead! The SD card utility will ask you which core to use for the system files. Note that if you use a “development” version of the MEGA65 core that isn’t from a release package, the core will be missing the MEGA65 ROM (mega65.rom), and you will have to install it separately before the system will boot.
When the process is complete, you can switch off the computer, then switch it on again. Because the freshly formatted SD card is missing configuration data, this will restart the “on-boarding” configuration process mentioned earlier. After completing this again, you may want to open the Configuration utility again to reinstate more settings. Hold the Alt key and turn on the MEGA65, then select 1 to configure your MEGA65.
Restoring the Intro Disks
The freshly populated SD card contains the system software and ROM, but does not contain the demonstration software package that was bundled with the computer. You can download a fresh copy of this package from the Internet.
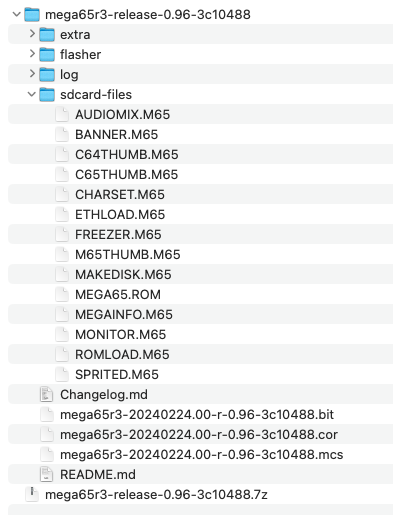
Make sure you are signed in to Filehost using your owner account, then visit ALL INTRO DISKS - Private. Download the package .zip file to your PC. Expand the archive and locate the sdcard-files sub-folder.
If you have the latest v0.96 release package installed, the best way to copy these files to the MEGA65 is with an Ethernet connection. See the User’s Guide, 2nd edition for instructions.
If you are using a previous release or would prefer not to use Ethernet file transfer, you can remove the microSD card from the MEGA65 and connect it to your PC with an SD card reader.
Copy the files from the sdcard-files sub-folder to the root of the SD card. If you moved the SD card to your PC, eject it properly using your PC’s operating system, then re-install it in the MEGA65’s microSD card slot.
A note about file fragmentation…
It is possible—and sometimes necessary—to remove the SD card from the MEGA65 and connect it to your PC to transfer files. This comes with a couple of caveats.
Files are stored on storage devices as blocks of data. With the FAT32 filesystem used by the MEGA65 SD card data partition, sometimes a modern operating system will store these blocks in multiple disconnected regions of the card, as a “fragmented” file. Modern computers are not bothered by fragmented files, but (as of the February 2024 firmware) the MEGA65 can’t support these. If a disk image file is fragmented, the Freezer won’t mount it. If a system file is fragmented, the MEGA65 might not work correctly.
If you believe you are having an issue due to a fragmented file, one way to fix it is to move the SD card to your PC, copy all of the files to a folder on your PC, delete the files from the SD card, then copy all of the files back to the SD card from the folder on your PC. As an alternative, this article recommends using defragmentation tools on the SD card, but I have not tested these.
You might also hear about a procedure for updating an existing file that involves renaming it, copying the new version, then deleting the old version. The idea is to force the PC to use an empty contiguous region on the card for the new version, and not try to reuse the blocks of the old version. I find this process cumbersome, but it’s worth knowing about.
The easiest way to avoid both of these issues is to use Ethernet file transfer for everything. You may need to connect your SD card to your PC in order to upgrade to the v0.96 release. Once you have v0.96 installed, you can use Ethernet file transfer for everything else. Ethernet file transfer never creates a fragmented file.
Note
Another caveat for Mac users: macOS Finder likes to install additional hidden files on external storage devices. These files are harmless, but will clutter file listings on the MEGA65, because the MEGA65 doesn’t know to hide them. There are quite a few tools available for macOS specifically that can clean up these files off of external storage devices automatically. I have personally tested and can recommend BlueHarvest.
I often just delete these myself with command-line tools, but this risks deleting something you don’t intend to delete, so I won’t describe that here.
Updating the core firmware
Your MEGA65 was shipped from the factory with the latest firmware (core) and system software available at that time. The MEGA65 project continues to make improvements to the platform, and a newer release may be available. It is recommended that you upgrade your MEGA65 to the latest stable version.
Downloading the latest release package
As of February 2024, the latest stable release is v0.96.
Identify the hardware version of your MEGA65, either “R3” (“R3A” is the same in this case) or “R6”. (See Determining the versions of things.)
Visit Filehost in a web browser, and make sure you are signed in with your owner account. You must be a registered owner to access the version of the release package containing the MEGA65 ROM.
Search or browse for “MEGA65 Core Release Package.” You will see multiple options. Select the option for your hardware version (“mega65r3” or “mega65r6”) that also says “with ROM.” (If only options that say “no ROM” show up, make sure you are signed in.)
Click “Download.” Your browser downloads a file in the .z archive format. Expand the archive. In the expanded folder, locate the mega65....cor file, and the sdcard-files sub-folder.
Copy the .cor file and the contents of the sdcard-files sub-folder to your MEGA65’s SD card. Replace the .M65 and .ROM files on the SD card with the files in sdcard-files. Eject the card, then re-install it in the MEGA65.
Note
The note about file fragmentation mentioned in A note about file fragmentation… applies here. The safest way to replace the .M65 and .ROM files on the SD card is to rename the old files (to any name), copy the new files onto the card, then delete the old ones. It’s a pain, but it’s just this once.
Once you have v0.96 installed, you’ll be able to use Ethernet file transfer for this instead of moving the SD card, avoiding the fragmentation issue. Look forward to a brighter future!
Upgrading to the v0.96 release
Tip
This Guide assumes you are upgrading to the v0.96 release. The core installation process has been improved in v0.96—but you have to upgrade to get the new experience. This Guide describes what you’ll see when upgrading to v0.96 from either v0.9 or v0.95.
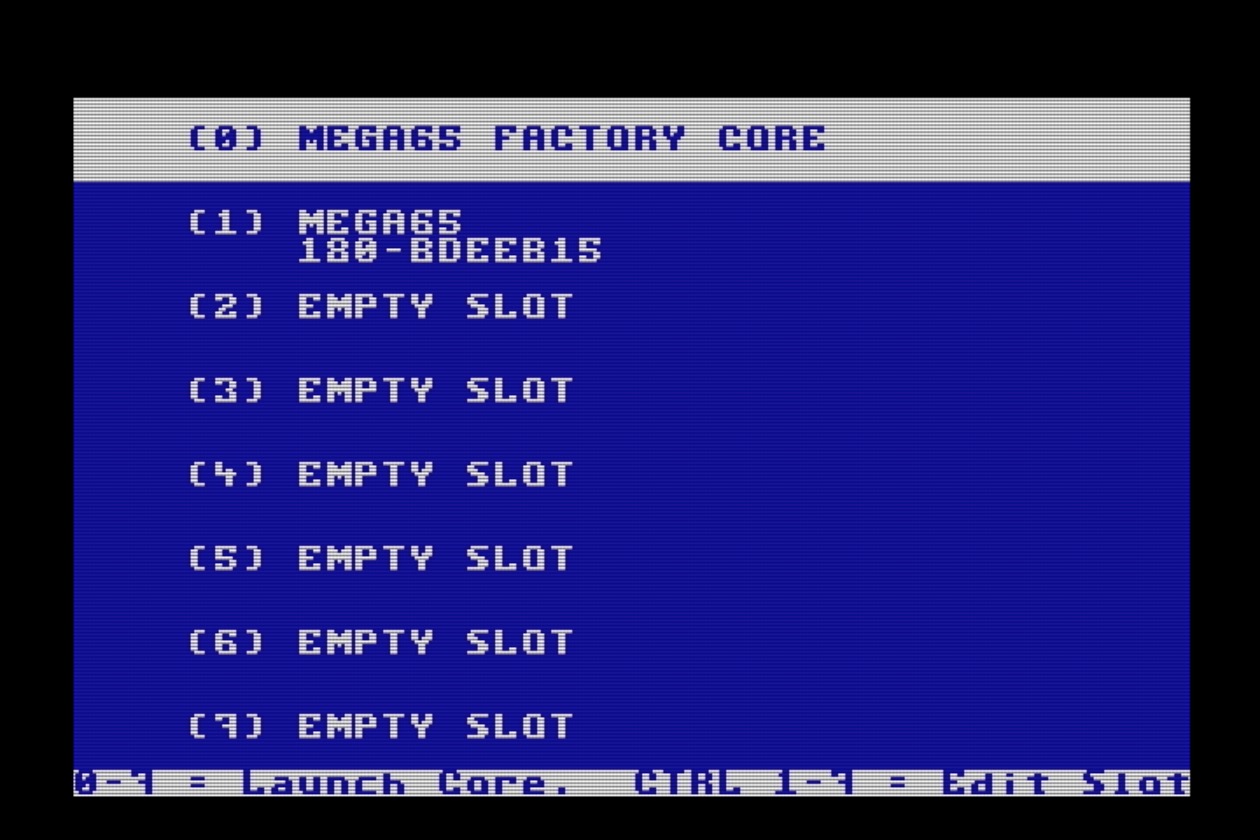
Make sure the MEGA65 is off, then hold the No Scroll key (in the top row) and turn it on. This opens the core selection and installation menu.
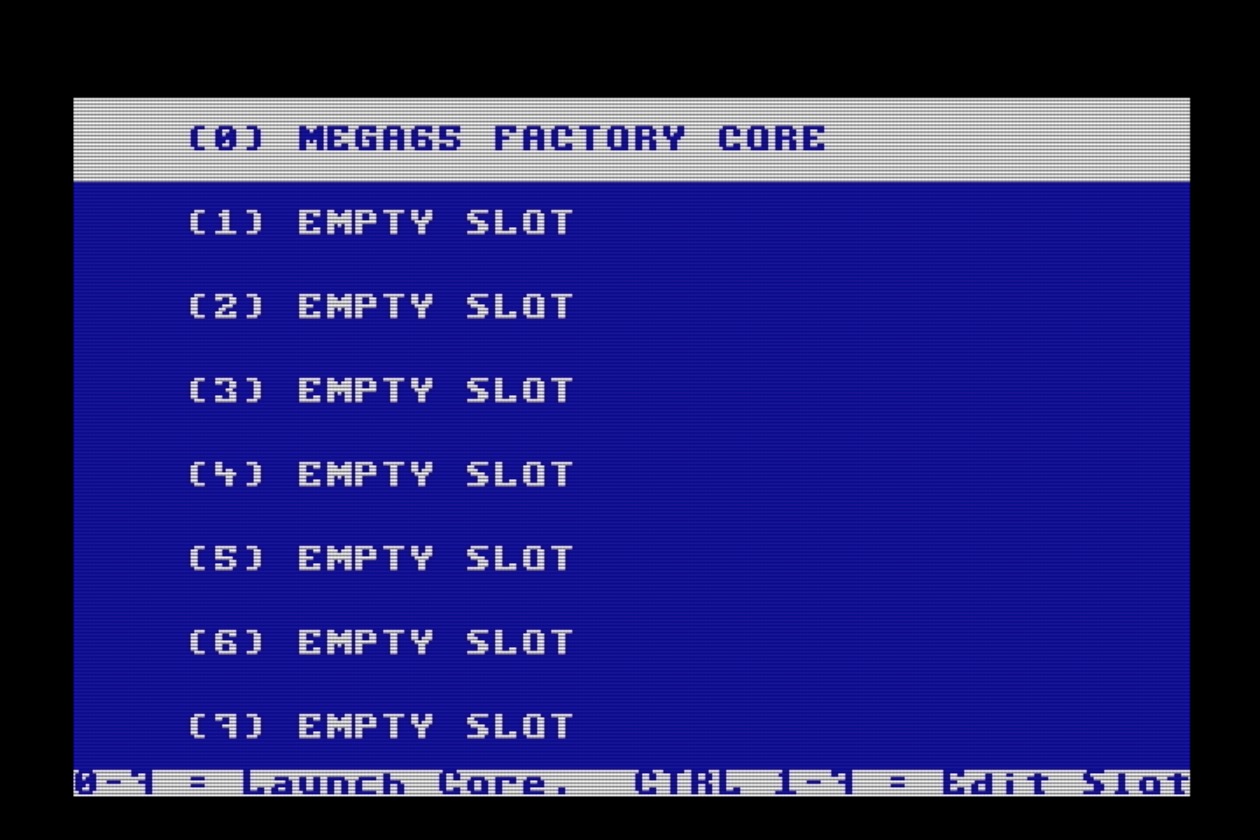
Core 0 is the factory-installed core. If this is your first time seeing the core selection menu, slots 1 through 7 should be empty. When you turn on your MEGA65 normally, it checks to see if slot 1 contains a core, and uses it if present. Otherwise it falls back to core 0. For now, you will put the new core you just downloaded in slot 1 for regular use.
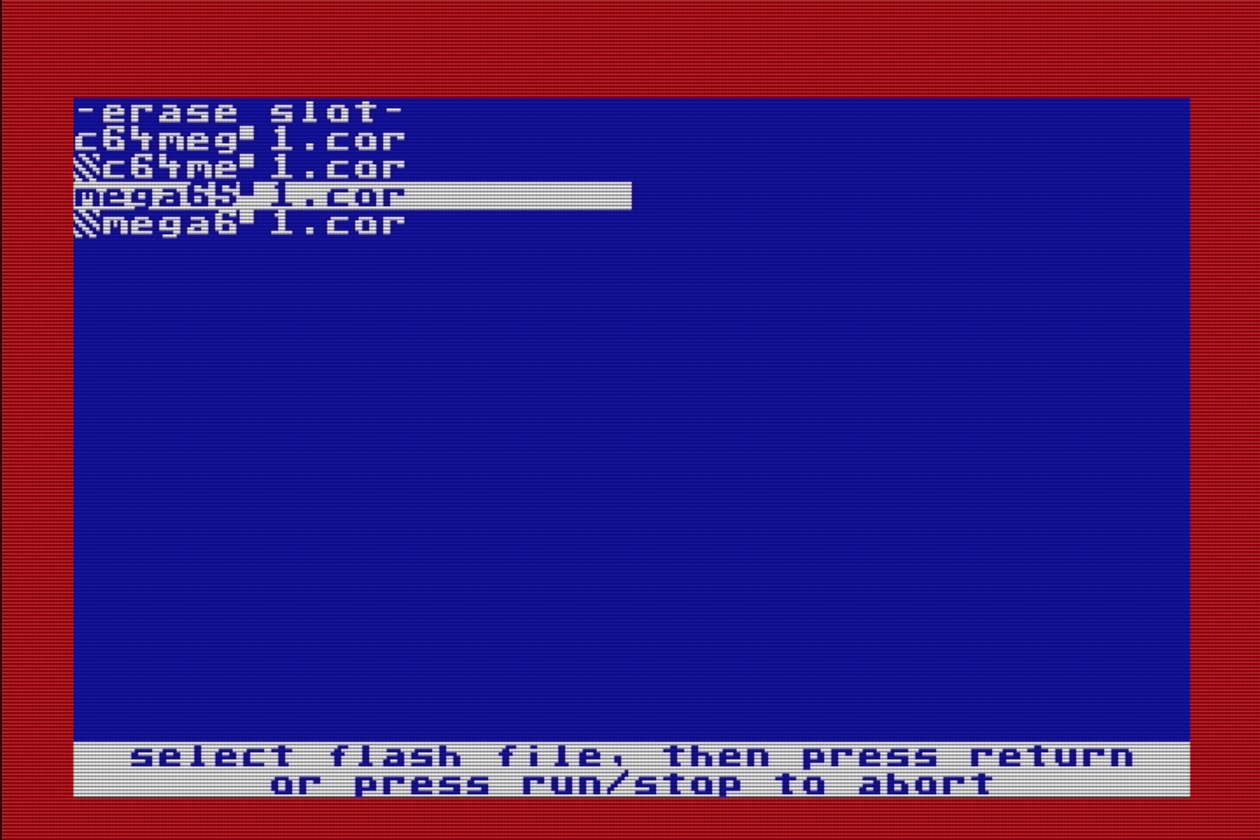
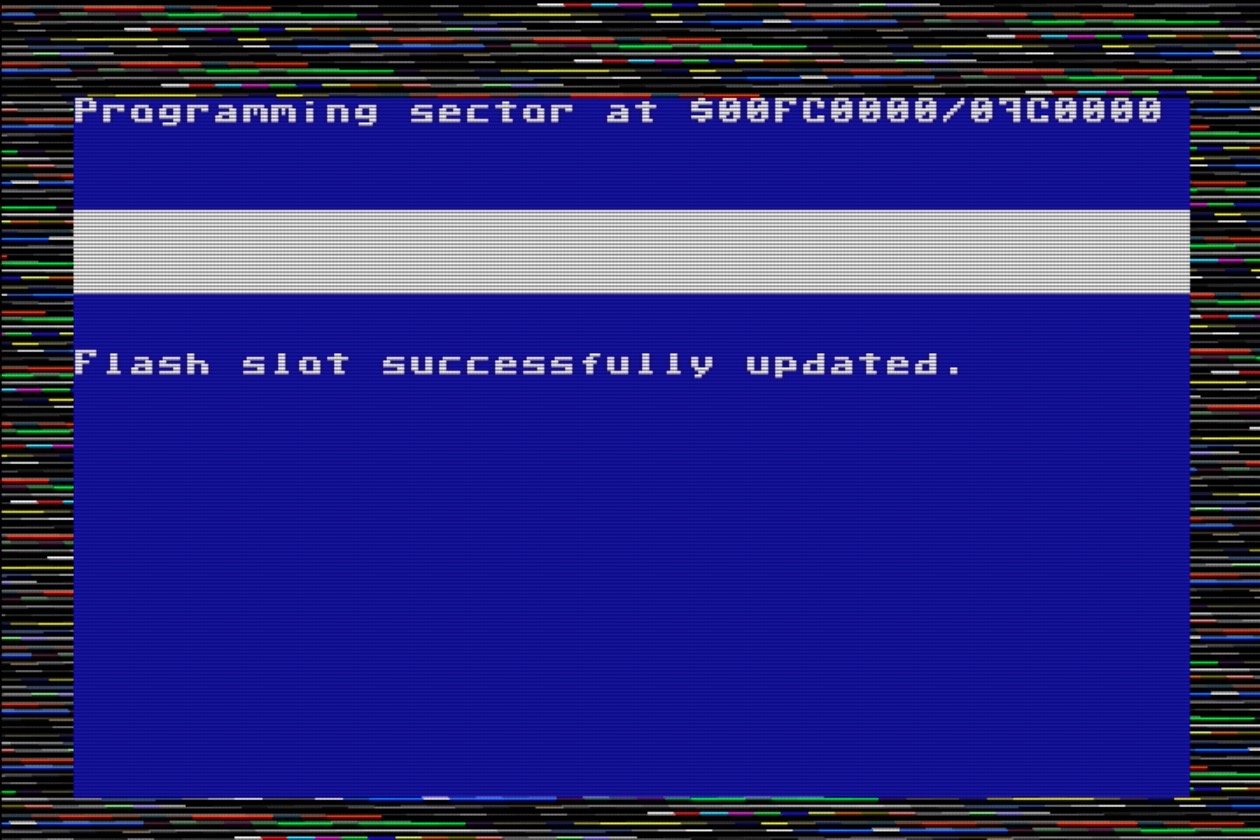
Hold the Ctrl key and press 1. Use the cursor keys to find the .cor file. When upgrading from an early version of the system software, this might appear as mega65-1.cor instead of its full filename. (Long filename support is new to v0.96.) Press Return, then press any key when prompted to install the core.
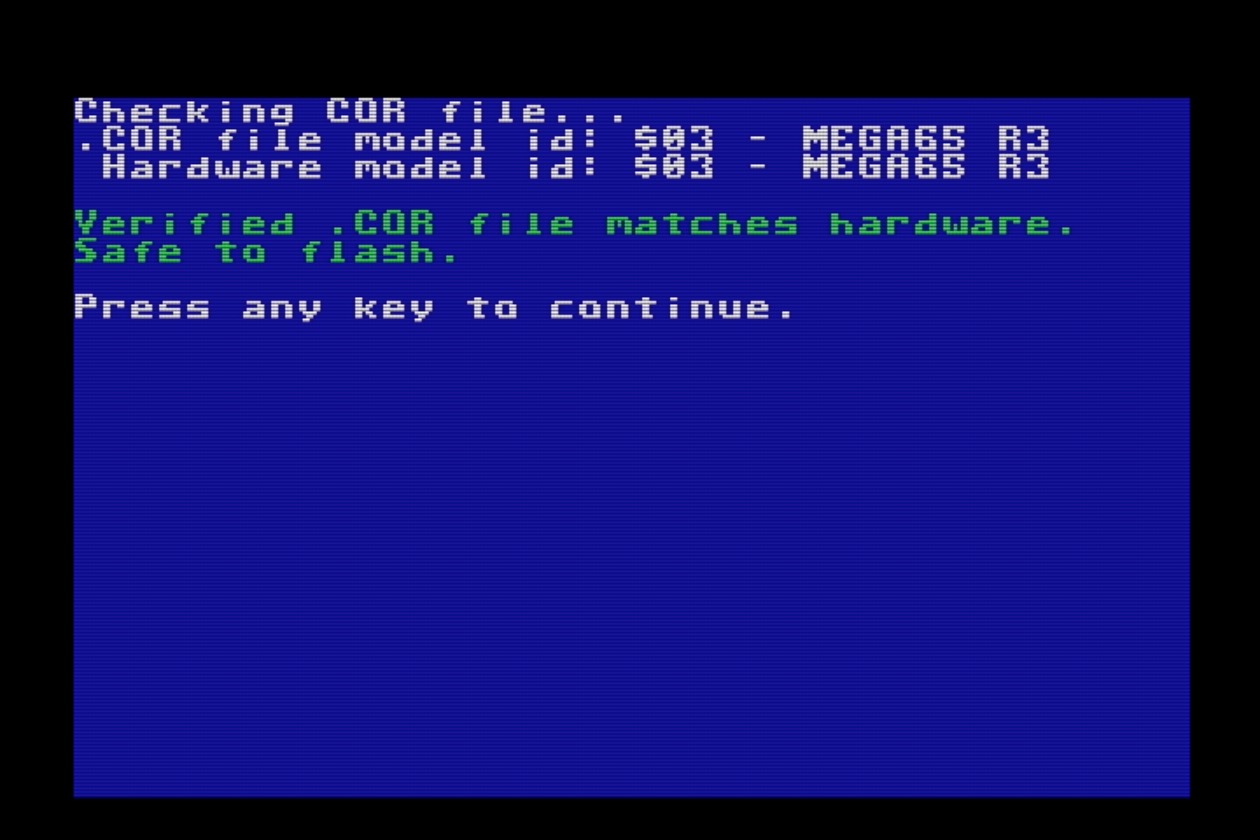
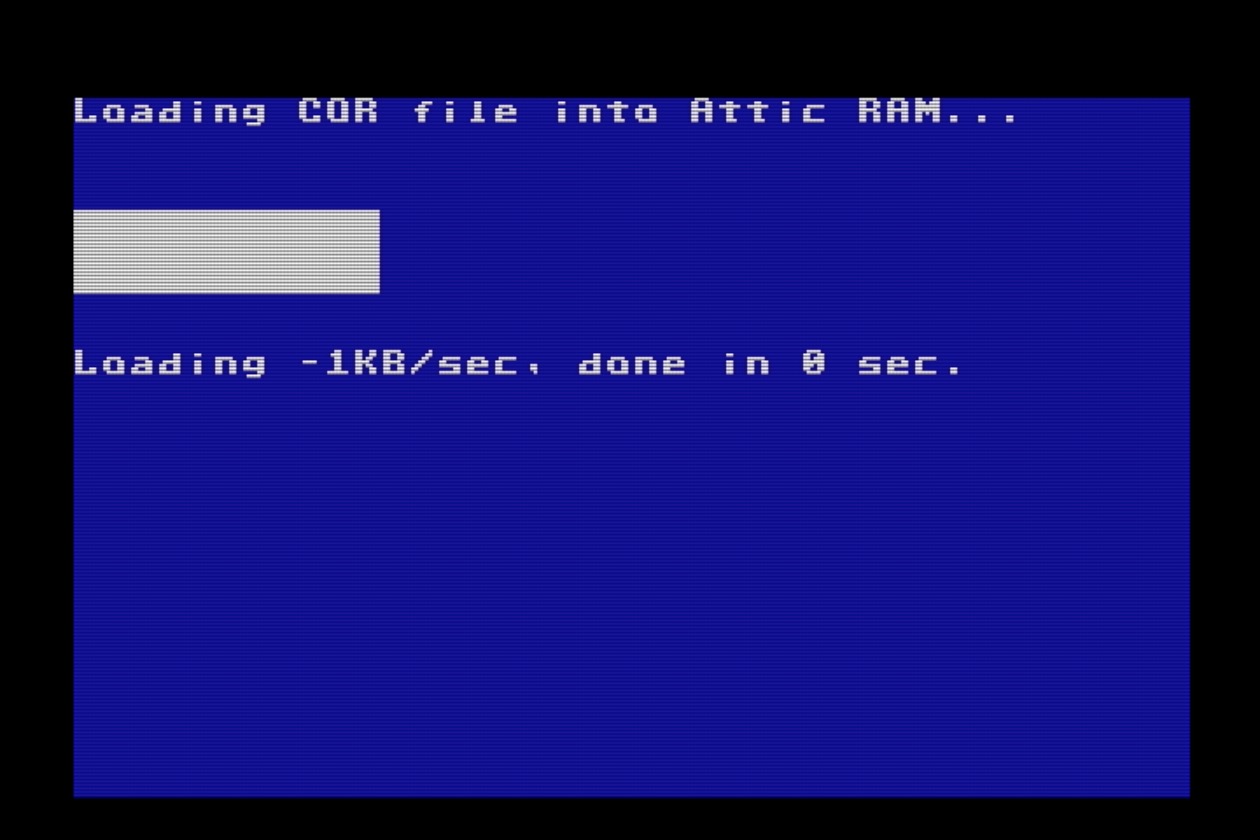
The flashing process takes a minute or so. When it is complete, you’ll see the message, “Flash slot successfully updated,” and the border will twinkle. Press any key to return to the core selection menu. Finally, press 1 (without Ctrl) to start the system with the new core.
Note
If you use a Mac computer to copy a file to a MEGA65 SD card, it creates another file with a name like ._filename to store the macOS resource fork. This appears in the core file selection screen as the original name with a stripey thing next to it. Be sure to select the original core file, and not the one with the stripey thing, when installing a core.
If you select the wrong one, MEGA65 will warn that the incorrect file does not have a matching device ID (because it isn’t a real core file). Press RUN/STOP to abort and try again with the correct file.
Upgrading slot 0
Normally, I’d recommend leaving core slot 0 alone so that it contains the factory installed core, and just use slot 1 for everything. In fact, the core selection menu makes it extra difficult to upgrade slot 0 for this purpose.
With the v0.96 release, there is a reason to upgrade slot 0: slot 0 is what powers the boot process, the Configuration and SD card utilities, and the core selection menu itself. Release v0.96 includes a new logic that’s worth having. So let’s upgrade slot 0.
With the v0.96 release in slot 1, switch off the computer, hold No Scroll, then switch it back on. This opens the slot 0 core selection menu, with your freshly installed v0.96 core in slot 1.
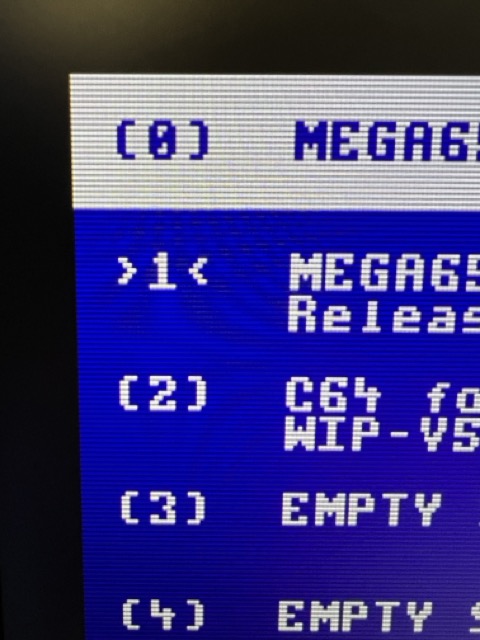
Prepare to hold No Scroll again, then quickly press 1 then hold No Scroll. If you’re successful, the core selection menu opens again, but this time it’s the new version. You can identify the new version by the distinctive angle-y things next to the “1”.
Now, press the secret keyboard command Mega + , (comma). Read the warning screen, then type CONFIRM using all capital letters, then press Return.
You are now looking at the new flashing procedure, with slot 0 selected. It looks different from the one you just used for slot 1, but it’s just as easy. Press F3, then select the .cor file. With the file in the “Replace” box, press F8 to flash. Watch the new animation!
When it says it’s done, you can safely switch your computer off then on again. From now on, whenever you need the core selection menu or Configuration utility, it will use the new versions.
The C64 core
I mentioned that the MEGA65 can run other cores besides the one that causes your MEGA to act like a Commodore 65. One such core is a Commodore 64.
The C64 core is not the same as the C65’s Commodore 64 mode, the one you start by typing GO 64 (see Commodore 64 mode). The C64 core completely transforms your MEGA into a Commodore 64, with no C65 or MEGA65 features. It strives to be as compatible as possible with C64 software. The current version supports PAL displays and timings, a simulated C1541 drive that supports D64 image files, and joysticks.
If you’d like to try the C64 core, go to Filehost, then locate and download “C64 for MEGA65”. Install it like you did the MEGA65 core update, using slot 2.
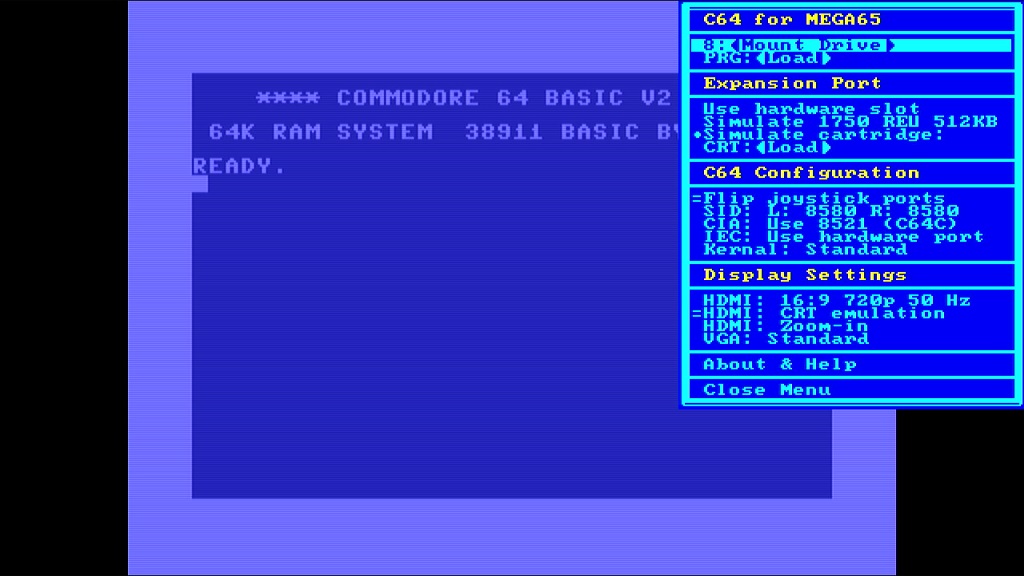
The C64 core has its own display configuration, separate from the MEGA65 core. It only supports PAL mode, and defaults to HDMI with audio. If your DVI display does not support audio, you may need to temporarily connect to a VGA monitor to change the setting. You can also follow this recipe to adjust these settings while not being able to see the screen. While the C64 core is running, press the Help key to open the menu, then cursor down to the video options and press Return to enable them, as needed.
The C64 core can read D64 image files off of the SD card. From the Help menu, press Return on the first line to browse the SD card, then select a disk image to mount to device 8. Press Help again to close the menu. The disk image you selected is now mounted, and you can execute C64 disk commands as usual (such as LOAD "*",8,1).
Tip
To avoid cluttering your SD card with D64 images, you can use your PC to create a folder named c64 and put the D64 files in there. The C64 core will notice the folder and limit its browser to just these files.
See the Commodore 64 for MEGA65 manual for more information.
To return to the MEGA65 core in slot 1, turn off the machine, then turn it on again.
Tip
For information on other cores that work with the MEGA65, see What are “alternative” MEGA65 cores?. You can use alternate cores to convert your MEGA65 into a ZX Spectrum or a Game Boy Color!
Transferring files
With the v0.96 release installed, you can now use an Ethernet connection to transfer files to and from your MEGA65. You can use an Ethernet cable to connect your MEGA65 to your local network router, or connect it directly to the Ethernet jack of your PC. This is also expected to work with Ethernet-to-USB adapters for laptops, and also Wifi-Ethernet adapters for connecting to a wireless network.
This feature is described in full in the MEGA65 User’s Guide, 2nd edition in chapter 7. Here’s a quick overview.
M65Connect
The M65Connect app runs on your PC, and is available for Windows, macOS, and Linux. It’s a windowed app, and also includes command line tools that perform similar functions.
Download:
Tip
Mac users: You will need to run a command to convince macOS Gatekeeper to allow the app to be run. Unpack the archive to produce the M65Connect.app. Open the Terminal, then change the current working directory to where M65Connect.app resides. Run this command: xattr -cr M65Connect.app You should now be able to double-click the app icon to run it.
Setting DIP switch #2
If you have a 2022 MEGA65, you will need to set a DIP switch on the main board to use Ethernet file transfer. If you have a 2024 MEGA65, this switch is flipped for you at the factory.
Open the case, then locate the four DIP switches on the main board. Examine the markings on the DIP switch and identify switch #2, as well as the On position. Notice that when facing the front of the machine, the switches are numbered from front to back, the On position is to the left, and all switches are Off by default. Flip switch #2 to On.
It is safe to leave DIP #2 in this position for regular operation.
Enabling network listening
By default, the MEGA65 ignores all attempts by other computers to connect to it over the network. Software running on the MEGA65 can listen for network connections, but the MEGA65 does not do this on its own.
To transfer files with M65Connect, you must tell the MEGA65 to listen for incoming connection attempts from M65Connect. To enable a network listening session, press Shift + £. The power light blinks between yellow and green when network listening is active.
Tip
If the power lights do not start to blink when you press Shift + £, double-check that you are running the v0.96 core, and that DIP switch #2 is set to On.
M65Connect should notice when you put the MEGA65 into network listening mode, saying it is connected. The “PRG” and “SD Card” buttons are enabled. You can now proceed to transfer files.
Transferring files with M65Connect
In M65Connect, click the “SD Card” button. This opens the file transfer utility, on the MEGA65 side and in M65Connect.
Note
Starting a file transfer session resets the MEGA65 to load the file transfer utility. Be sure to save any data on the MEGA65 before starting the session.
Use the pane on the left to navigate files on your PC. Use the pane on the right to navigate files on the MEGA65 SD card. To transfer a file, select the file, then click the arrow button. The button indicates the direction the file will transfer.
You can also use M65Connect to create D81 disk images, and copy files to and from D81 disk images. Locate a D81 disk image on your PC or click the + D81 button to create one, then click the ”Open” command in the file browser to open the disk image in the left pane. Transfer files to and from the image with the arrow button. Click the X button in the upper right to return to the file browser. Click the Close button to end the file transfer session and close the SD Card Manager window. This resets the MEGA65.
Using disks
We discussed using D81 disk images back in Disk images, including:
How to browse D81 disk images using the Freeze menu
How to mount a D81 disk image on drive 0 device 8 using the Freeze menu
How to get a directory listing with the
DIRcommandHow to load and run a program on the disk using the
LOADandRUNcommandsHow to use the
/and ↑ shortcuts to load or run a file within a directory listing
Disk-related improvements have been advancing quickly, and the latest ROM includes bug fixes and useful features.
Tip
Make sure you have the PDF or printed copy of The MEGA65 User’s Guide, 2nd edition, which describes features that were added more recently than the 1st edition.
Listing a disk directory
The DIR command lists all of the files on a given disk. Without arguments, it lists the files on the disk in device 8:
DIR
If there are too many files than fit on a single screen, the list will scroll off and you will only see the bottom of the list. You can use the W argument to tell DIR to show the listing in multiple columns, and to wait for a keypress to show more pages. (Try this with the MEGA65.D81 disk.)
DIR W
Hint
For more on the DIR command, see the User’s Guide, page 106.
One disadvantage of the W flag is that you cannot use the / shortcut to load a program into memory. There is another way to view the complete directory listing and still use this shortcut: load the listing into BASIC memory. Commodore 64 users are familiar with LOAD "$",8 followed by LIST. To do this with the MEGA65:
DLOAD "$$"
LIST
This still scrolls a long listing off the screen, but now you can use MEGA65 BASIC’s listing viewer features to scroll up to previous lines. Use the F9 and F11 keys to traverse the listing, then cursor up to a program you want to load and use the / or ↑ shortcuts.
Caution
Loading the directory listing with DLOAD overwrites any BASIC program that resides in memory. The DIR command does not overwrite BASIC memory.
Using the SD card from BASIC
Recent improvements added the ability to manipulate disk images on the SD card without using the Freeze menu. In general, device U12 is considered the SD card. Only some disk commands work with the U12 device.
To list all of the files on the SD card:
DIR U12
This does not yet support other features of the DIR command, such as filters or paging.
To mount a D81 disk image from the SD card directly from BASIC, use the MOUNT command:
MOUNT "DISKNAME.D81"
By default, this mounts the disk image to device 8 (U8). To mount to device 9, add an argument:
MOUNT "DISKNAME.D81",U9
You can load a program file (.PRG) directly from the SD card, without having to create a D81 disk image. To do this, use the DLOAD command with unit U12, and be sure to include the .PRG filename extension:
DLOAD "FILENAME.PRG",U12
(Loading a PRG file directly from the SD card does not work with the LOAD command.)
Using 3-1/2” floppy disks
Your MEGA65 includes a built-in 3-1/2” floppy disk drive for a complete retro experience.
If you don’t have 3-1/2” floppy disks lying around, you can still buy them new-old-stock at a reasonable price. I buy mine from FloppyDisk.com. You can also find refurbished floppy disks on eBay.
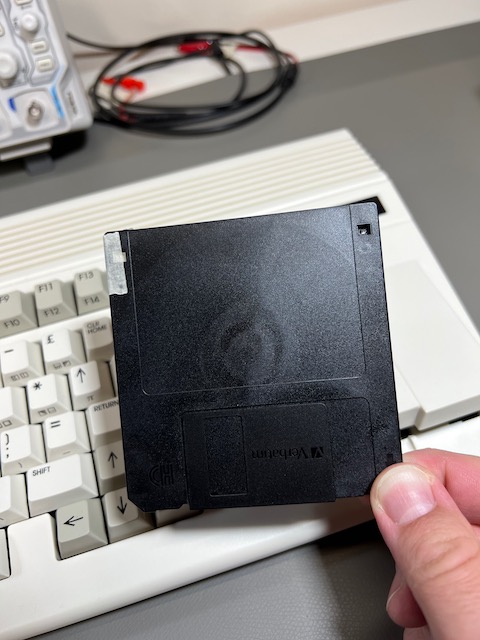
The MEGA65 floppy drive supports both double density (DD) and high density (HD) disks. However, as of this writing, the ability to use the larger capacity of HD disks is still in development. To use an HD disk with the MEGA65, you must apply non-transparent tape over the hole in the upper left (as shown). This convinces the floppy drive to treat the HD disk as if it were DD.
Tip
Until this is fixed in a future software update, an HD disk with the hole exposed will not work with the MEGA65. If your disk isn’t working, double-check that the hole is covered.
Using the physical floppy drive is similar to using a disk image. Open the Freeze menu (hold Restore, then release), then select drive number 0. (The internal drive can only be mounted to drive 0.) In the list of options that includes the D81 disk images, select - INTERNAL 3.5" -. Exit the Freeze menu (resume or reset).
Alternatively, you can mount the internal physical drive on device 0 with the MOUNT command, no arguments:
MOUNT
Insert a floppy disk in the drive. If you have not used this disk with the MEGA65 before, it needs to be formatted. This erases all data on the disk! Use the HEADER command, providing a disk name in quotes, and a two digit disk ID number preceded by the letter I:
HEADER "WORK FILES",I01
Enter YES at the prompt to confirm. Formatting a disk for the first time takes a minute or so.
Hint
See the HEADER command in the User’s Guide, page 135.
You can now use the floppy disk like you would a D81 disk image. Some things to try:
DIR

10 PRINT "HARD AT WORK"
20 GOTO 10
SAVE "HARDLYWORKING"

NEW
DIR
LOAD "HARDLYWORKING"
LIST
RUN
Booting from a disk
A disk (or disk image) that contains a program named AUTOBOOT.C65 is considered bootable. With such a disk mounted on unit 0, the MEGA65 will load and run this program automatically when it boots or resets. As we saw in Demonstration menu, this is how the demo disk starts automatically when you turn on your MEGA65.
Running the BOOT command with such a disk mounted also runs this program:
MOUNT "MYGAME.D81"
BOOT
By default, the MEGA65.D81 disk image is mounted on unit 0 when the MEGA65 is turned on for the first time. You can change which disk image is mounted in the MEGA65 Configuration menu. You cannot set this to be the physical drive by default; it has to be a D81 disk image on the SD card. If there is no setting in Configuration, it uses MEGA65.D81; to start with nothing mounted, remove or rename the MEGA65.D81 file on the SD card.
Using an external disk drive
Your MEGA65 has a 6-pin IEC serial port for connecting vintage Commodore disk drives. With a drive connected, you can use the Freeze menu to assign it to drive 1.
Commodore disk drives use a serial protocol that allows multiple devices to be connected in a chain. Each device must have a unique device ID. For disks, the available device IDs are 8, 9, 10, or 11. These old devices do not have a way to figure out their device IDs automatically. Instead, you use switches on the device itself to tell the drive its device ID. Each device ID must be assigned to a unique drive.
The MEGA65 can assign either device ID 8 or 10 to the drive connected as drive 0 (a disk image or the internal floppy drive), and can assign either device ID 9 or 11 to the drive connected as drive 1 (another disk image or the external serial port). You can toggle the device IDs for drive 0 or 1 in the Freeze menu by pressing 8 or 9, respectively. Make sure your external drive is configured to use the device ID you have assigned to drive 1 in the MEGA65 Freeze menu (either 9 or 11).
Any device that supports the disk serial protocol is expected to work, including new disk devices such as the Pi1541. Notice that some such devices like the SD2IEC need the C64 tape port to supply power to the device, and the MEGA65 has no such port.
Converting a D64 to a D81
You can find almost every game and application written for the Commodore 64 online in the form of disk images. However, these disk images are typically in the D64 format, which represents a 5-1/4” floppy disk. If you want to try running a C64 application on your Mega65 in its C64 mode, you must first convert the D64 image to a D81 image. (The D81 image represents a 3-1/2” floppy disk.)
One way to do this is with the cbmconvert command line tool. This requires your PC (Windows, Mac, or Linux) and familiarity with the command line (Terminal).
cbmconvert is only available as source code, so you will need the ability to compile software on your PC. Linux users typically already have compilation tools installed. Mac users can install such tools with the command:
xcode-select --install
cbmconvert version 2.1.5 requires cmake to build. On a Mac, you can install this with the Homebrew package manager:
brew install cmake
To build the cbmconvert tool:
Download cbmconvert’s source code. (See this Github repo for versions 2.1.5 and later, or the download site for links to other versions.)
Expand the archive:
unzip cbmconvert-main.zipChange to the expanded directory:
cd cbmconvert-mainBuild the tool:
cmake .; cmake --build .
The cbmconvert tool is now present in the directory. You can put this directory on your command path, copy the cbmconvert file to somewhere on your path, or use the path to this directory when running the tool.
To use cbmconvert to convert a D64 file to a D81 file:
cbmconvert -v2 -D8 filename.d81 -d filename.d64
(The order of arguments matters: -D8 filename.d81 is the D81 disk image to create, and -d filename.d64 is the D64 disk image that is the source of the files.)
Copy the new D81 file to your microSD card, then return the card to your MEGA65. Open the Freeze menu, then select the D81 image for drive 8. At the MEGA65 BASIC prompt, enter GO 64 and type YES to confirm. The disk is now available on drive 8 from C64 mode.
Note
Not all D64 disks can be converted to D81, especially software with copy protection.
Note
C64 mode is known to not be compatible with all C64 software. If you are experiencing difficulty, try using the Freeze menu to switch from NTSC to PAL video mode or vice-versa (assuming you have a monitor that can show it).
Tip
Remember that the C64 core (not C64 mode) supports D64 disk images directly without needing to convert them to D81 images. See The C64 core.
Using the JTAG connector
The MEGA65 main board has a 12-pin JTAG connector, a standard for connecting test equipment to devices. It is not intended for regular users of a device—but we MEGA65 owners are not regular users, are we?
With a JTAG USB adapter and software available on Filehost, you can connect your PC directly to the main board to:
Upload and execute programs being cross-developed on a PC
Transfer files between your PC and MEGA65 without removing the SD card
Perform remote debugging on programs and the built-in MEGA65 utilities
Upload ROMs and cores for testing
Use your MEGA65 as a SID music player (!)
The MEGA65 does not have a user-accessible port for the JTAG connection. You will have to acquire a JTAG USB adapter and a mini-USB cable, install it, and run the cable out the back of the MEGA65 case.
Tip
You can also use a more common USB UART adapter for most of the purposes described below (sending files and commands). The adapter must output 3.3 volts, not 5 volts. Test your adapter with a volt meter before using. See Use of an USB UART adapter as alternative to a JTAG adapter for instructions on how to wire a UART to the JTAG connector pins. See also this article by RetroCombs.
Photos below show how to connect the TE0790-03 JTAG adapter.
Tip
For another version of these instructions with more photos, see JTAG adapter, how to plug and DIP switch settings.
Acquiring a JTAG adapter
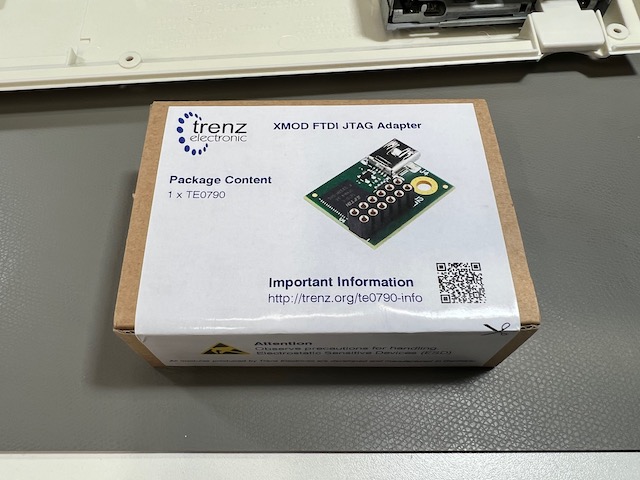
The XMOD FTDI JTAG Adapter TE0790-03L (Trenz Electronic) is compatible with the MEGA65. (The TE0790-03 is the same part with a Xilinx license, which you do not need to use MEGA65 tools.) You might also be able to order the TE0790-03 from DigiKey. As of this writing, this item is difficult to get due to supply chain issues. Trenz is accepting backorders (even though “in stock” says zero) and will be fulfilling them as parts become available.
Installing the JTAG adapter
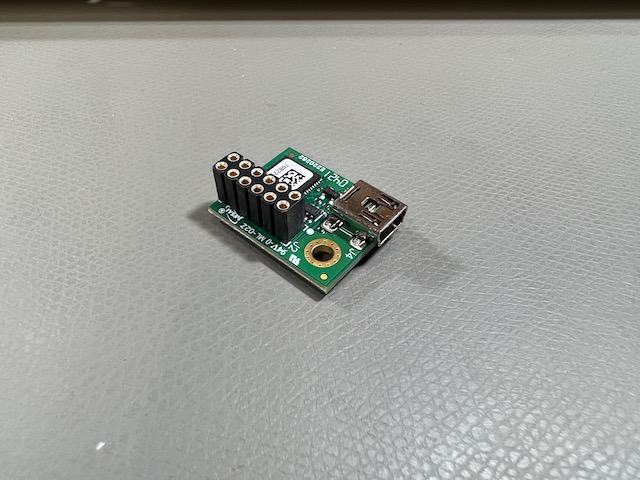
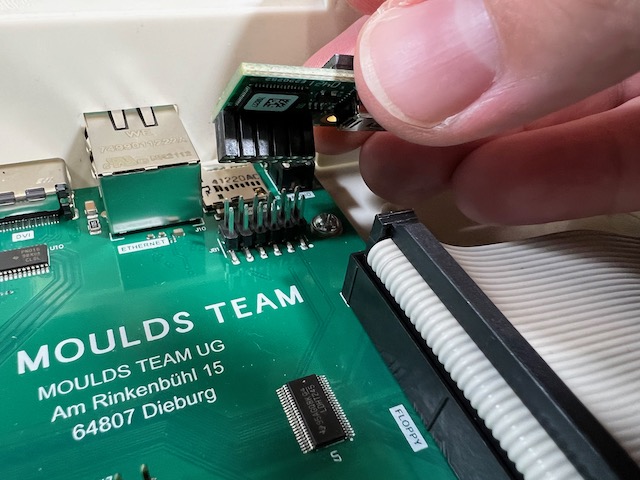
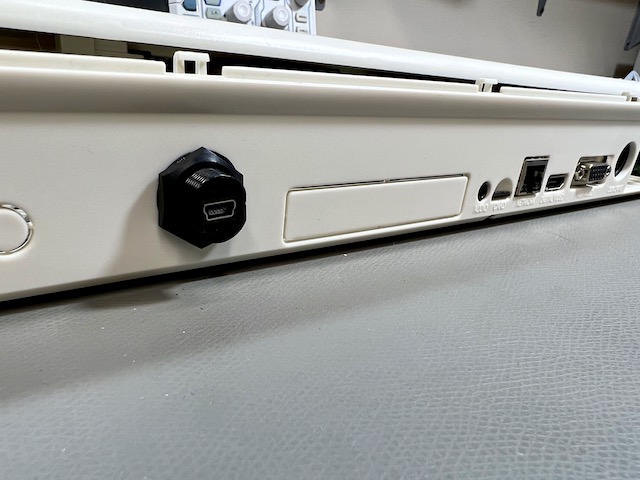
You will have to open the MEGA65 case to connect the adapter to the 12-pin JTAG connector on the main board, in the back right corner. (See Opening the MEGA65 case for an annotated photo of the main board.) The adapter connects with the mini-USB connector facing to the right.
Use a pin or a small screwdriver to set the DIP switches on the connector to 1=on, 2=off, 3=off, 4=on (when read back to front: left, right, right, left), as shown. This configures the adapter to draw power from your PC over the USB cable, which ensures a steady connection.
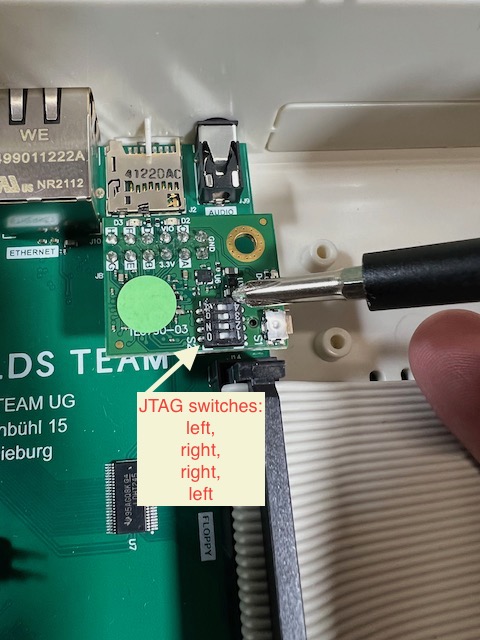
Other documentation suggests 1=on, 2=off, 3=on, 4=off (when read back to front: right, left, right, left), which tells the JTAG to draw power from the MEGA65. With this setting, turning off the MEGA65 disconnects the JTAG from the PC, which is inconvenient for debugging tools.
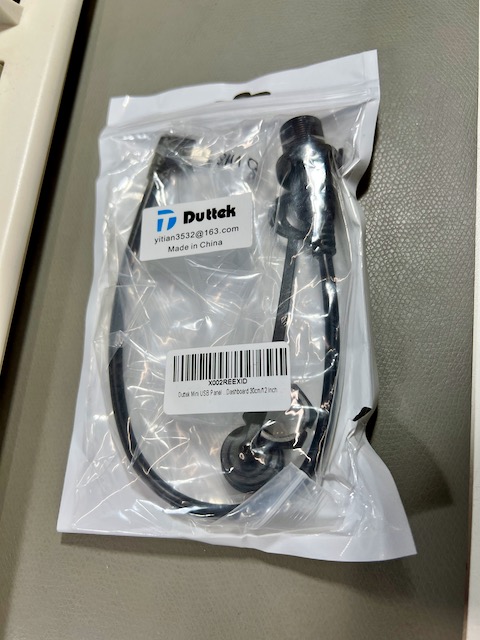
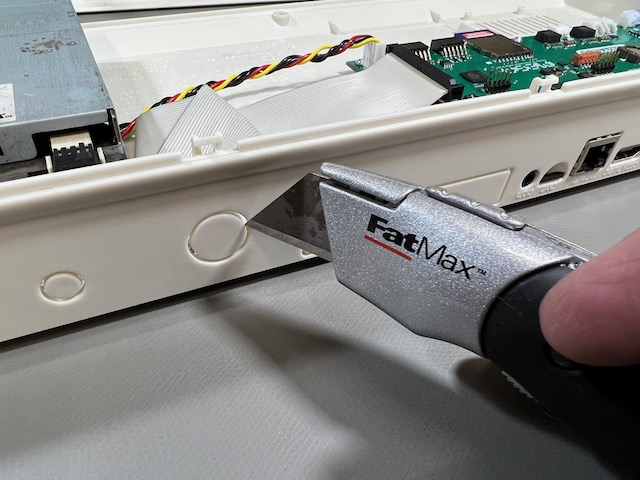
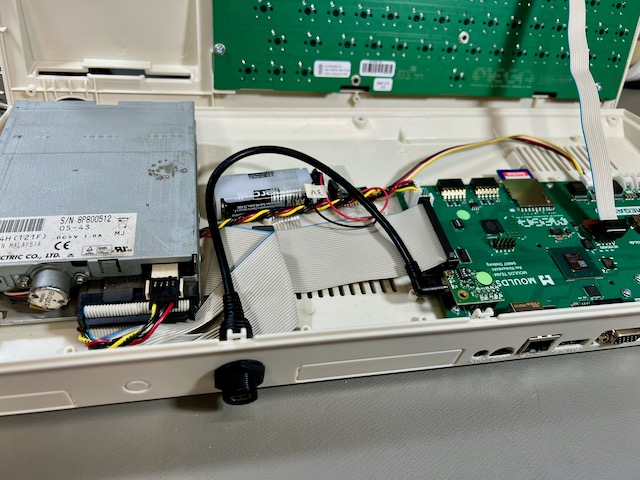
Connect a mini-USB cable to the JTAG connector, and run the cable out the back of the MEGA65 case. You can feed it out the cartridge port (potentially blocking access to the port), or punch out one of the unused port covers in the back case. Connect the other end to your PC.
I used a Mini USB panel mount cable (30 cm/12 in, right-angled) to extend the mini-USB jack to the back of the case, then punched out one of the unused holes for it with a utility knife. The mount cable includes a washer and nut to hold firmly to the 17 mm hole. I then connect it to my PC with a standard USB Mini B Male to USB A Male cable.
Tip
This Ribu mini USB panel socket has a nice metal mount and is more flush with the case than the plastic mount I used. It needs an additional washer to avoid falling into the case.
Using M65Connect over serial
In addition to Ethernet file transfer, M65Connect can also perform certain functions (including file transfer) over a serial or JTAG connection.
If you’re on a Mac, you will need to install a library called libusb. Install the Homebrew package manager if you don’t already have it installed, then run this command:
brew install libusb-compat
If you’re using Linux, open the Help menu and select Manual to view the M65Connect user manual, then follow the instructions in the Requirements section.
To set up M65Connect for a serial connection for the first time:
Turn off your MEGA65.
Connect the MEGA65 to your PC via the JTAG connection and USB cable that you installed.
Start M65Connect. It begins by attempting to identify the serial port.
Follow the prompts. When prompted, turn your MEGA65 on. If everything is working, the Connection Wizard will detect the connection and close the window. If the window doesn’t close in a few seconds, click Abort and proceed with setting up the connection settings manually.
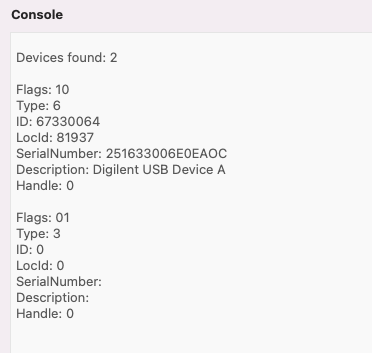
The M65Connect manual has advice on troubleshooting connection issues: go to the Help menu, select Manual. I won’t repeat all of it here, but advice that I personally found useful when doing this on my Mac (M65Connect 1.8, Intel MacBook Pro, macOS 12.3.1):
The Command menu, List FTDI Devices is a good start for making sure the JTAG is connected. Even with the MEGA65 turned off, it should list two devices when connected, one with flags “10” and one with flags “01”. My JTAG device description is “Digilent USB Device A”.
The Settings menu, Connection lets you pick a serial port manually. On my Mac, I have four
/dev/cu.usbserial...devices, some of which have numbers similar to (though not identical to) the device SerialNumber printed by List FTDI Devices.

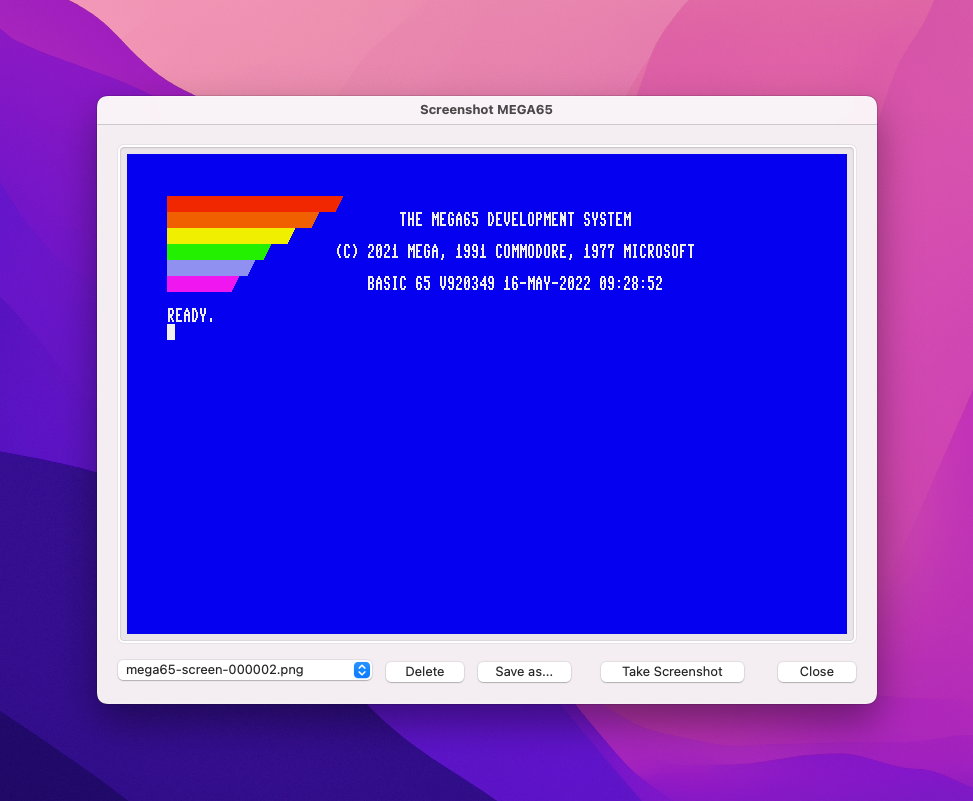
If it looks like it should be connected, use the buttons at the top of the M65Connect window to attempt remote actions. For example,
Screenshotwill ask the MEGA65 to take a screenshot and M65Connect will display it. If it fails, it should print error messages in the main M65Connect window.
Tip
In my case, I discovered that the connection would not work if the USB cable was connected to my USB hub. Connecting directly to the USB port on my laptop resolved the issue.
Sending data to MEGA65
The M65Connect app can send data directly to the MEGA65’s memory. In most cases the data is loaded directly into memory, then used for its intended purpose. The data goes away when you turn off the MEGA65. This is useful for testing, but not useful for permanent installation.
PRG:
Sends a
.PRGprogram file and runs it immediately.M65Connect prompts you with options: whether to run in C64 mode, how it would be loaded from disk, and others.
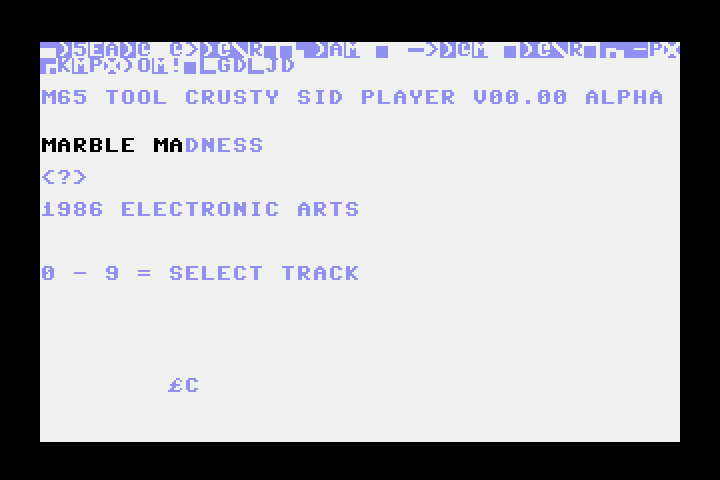
SID:
Sends a
.SIDmusic file and plays it using a built-in SID player.Press number keys to select tracks in multi-track SIDs.
It’s ugly, but it works!
BIT:
Sends a
.BITbitstream file, and resets using this file as the core.Note that this takes the
.BITfile, not the.CORfile. Most cores provide files in both formats.This does not install the core in a slot, it just runs the core for the current session.
HIC:
Sends a “Hickup” file, which temporarily updates the Hypervisor.
Only useful for developers working on the system software.
ROM:
Sends a MEGA65 ROM and resets with it in memory.
BAS:
Sends a text file as if it is being typed into the MEGA65, such as a BASIC program listing.
This capability is limited to a subset of the PETSCII character set. It conflates ASCII letter casing and does not support special characters.
Tip
If you’re developing a BASIC program on your PC to send to the MEGA65 over the JTAG connection for testing, you might prefer converting it to a PRG and sending the PRG instead of trying to send the BASIC program listing. See “The m65 command line tool” below for an example workflow.
Caution
As with Ethernet file transfer, many of these upload actions reset the MEGA65 in the process, and will not warn you. Make sure you don’t have any unsaved data.
Other cool things M65Connect can do
M65Connect can also do these cool things:
Reset the MEGA65 (
RESET).Reset in C64 mode (
Go64).Switch between NTSC and PAL video modes (
NTSC,PAL). This does not reset the machine.Take a screenshot of what is on the MEGA65 display (
Screenshot).Type into the MEGA65 from your PC keyboard. Click “Keyboard,” then type normally, and access the non-standard keys by clicking on the virtual keyboard that appears.
Remote machine language monitoring and debugging. See the built-in manual (Help menu, Manual), Terminal tab.
Tip
For more information, see the M65Connect README.
The m65 command line tool
The m65 command line tool can do many of the things M65Connect can do, and more. It’s a much more technical tool, used by the MEGA65 team and Trenz Electronic to test, troubleshoot, and verify MEGA65 units before shipment. It could also be useful for software developers that want to automate cross-development tasks.
You can download pre-made binaries of the m65 command line tool from Filehost. Search for “MEGA65 Tools Release Package” and select the file for your operating system. You can also get the source code, with build instructions for your platform.
macOS: prepare the tool for use
Getting the downloadable binary to work on a Mac requires a few steps:
Download the MEGA65 Tools package for Mac. Double-click the archive file in Finder to expand it.
Open a Terminal, then navigate to the folder. For example:
cd ~/Downloads/m65tools-master-...-macosRemove the
*.osxfiles from quarantine:xattr -d com.apple.quarantine *.osxOptional: Rename each file to remove the
.osxextension, to match the examples:mv m65.osx m65Optional: Move the files to a location on your command path.
You can now run the m65 command at a command prompt or in a script.
Determining the serial port
The latest version of m65 has the ability to determine the serial port automatically.
To ask m65 to determine the serial port and print its location for use in other tools, use the -j argument: ./m65 -j
As of this writing, other tools such as mega65_ftp need the serial port location provided manually. To specify this, use the -l argument: ./mega65_ftp -l /dev/cu.usbserial...
Running m65
The m65 command can perform a variety of functions determined by command line arguments. Run m65 without arguments to see a list of functions and options.
For example, to get it to type ?TI$ followed by Return (this prints the current Real-Time Clock value in BASIC):
./m65 -T "?ti$"
For uploading programs, m65 just takes the filename, and figures out what to do based on the filename extension. To load a PRG file into memory:
./m65 myprogram.prg
Tip
The petcat command line tool included with the VICE emulator can convert a BASIC program listing in a text file to a PRG that the MEGA65 can run. It supports PETSCII special characters as bracketed labels, such as {clr}, and it knows all about MEGA65 BASIC.
For example, say you have a BASIC program listing named myprogram.bas:
10 screen 320, 200, 5
20 for x=0 to 31
30 pen x
40 circle x*10+10, x*10+10, x*5
50 next x
60 sleep 3
70 screen close
80 color 0
90 print "{clr}{wht}have a {cyn}nice{wht} day!"
To convert this BASIC program listing to a PRG file with petcat, upload it to the MEGA65, then run it (using your actual serial port device name for /dev/cu.usbserial...):
petcat -w65 -o myprogram.prg -- myprogram.bas
m65 mylisting.prg
m65 -T "run"
Finding other JTAG tools
If you’re interested in the debugging programs remotely, download the M65 Debugger app from Filehost (Windows, Mac, or Linux). See the m65dbg README for more information on how to use the debugger, including video tutorials.
You can use the mega65_ftp command line tool to perform the SD Card file transfer functions of the M65Connect app.
Joining the community
Your fellow MEGA65 owners hang out together online. Come join us!
The official MEGA65 support forum is a traditional web forum for discussions and searchable post history. Note that the account system for the forum is separate from the Filehost, so you will need to register a new account to participate.
For real-time chat, the action is in the official MEGA65 Discord server. Join with your Discord account and app.
Once you are on the Discord server, you can register yourself as a proud MEGA65 owner. This changes your username color to blue, and may potentially have other benefits in the future, such as owner-specific rooms.
To register your ownership role on Discord, go to the #general channel and say !register. (Yes, they want us to say this publicly in front of everybody. Be proud.) The @RegBot automated account (“BOT”) will see your request and send you a direct message asking for your registration code. Reply with your nine-character registration code from that piece of paper. RegBot will assign you the ownership role and change your username color.

Caution
Be careful to only reply to RegBot. Don’t post your registration code in a public channel, and don’t reply to anyone pretending to be RegBot. Look for the “BOT” icon next to RegBot’s name.
Video display compatibility
The MEGA65 has two video outputs: one HDMI and one VGA. They mostly work as you would expect, though it may take some fiddling to display the MEGA65 image in a proper aspect ratio. Some vintage displays have caveats.
HDMI (DVI)
If you connect the HDMI output to a modern HDMI-capable monitor, you will have a good time. The MEGA65 assumes a narrow 4:3 aspect ratio, but you can usually adjust the aspect ratio on widescreen displays. Most HDMI displays can handle the “Enhanced (with audio)” signal, even if the display doesn’t have built-in speakers.
Not all HDMI displays can handle both the 60 Hz NTSC refresh rate and the 50 Hz PAL refresh rate. If you are able to test before buying (or can buy one, try it, and return it if it doesn’t work), be sure to test both PAL and NTSC modes, especially if you want to run vintage C64 software or the C64 core.
These photos show the MEGA65 connected to a Dell UltraSharp 27 widescreen monitor configured to use a 4:3 aspect ratio in the display settings. (Use the buttons on the bottom of the monitor to navigate to the display settings menu.)
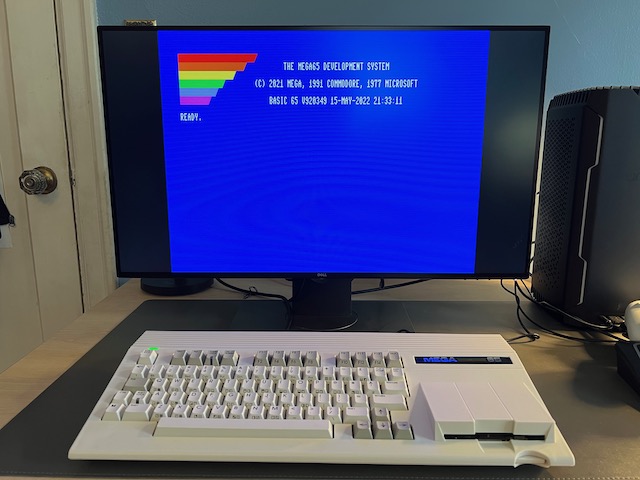
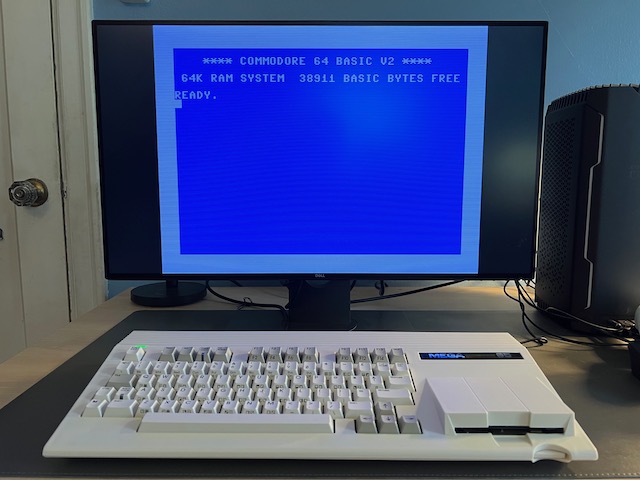
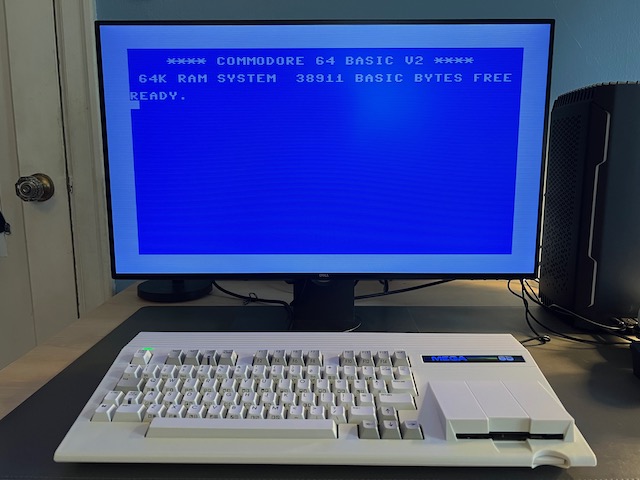
Without setting the aspect ratio, most widescreen monitors will stretch the image horizontally to fit. This is undesirable in most cases, but I actually quite like how 80-column BASIC looks when stretched.

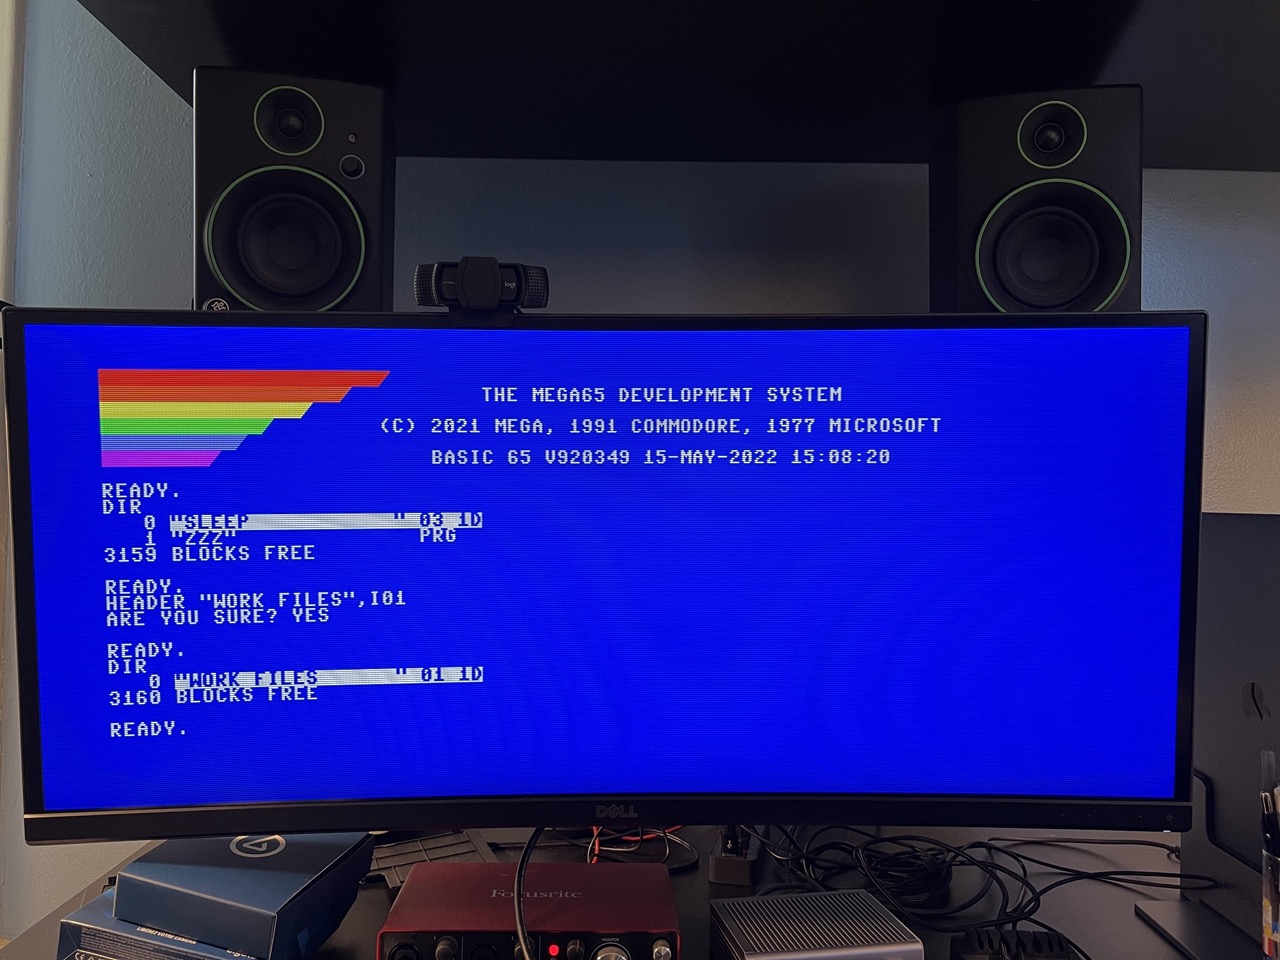
Just for fun, here is what 80-column BASIC looks like stretched on a Dell 34” curved ultra-wide display:
If your HDMI display supports audio, enable “Enhanced (with audio)” mode in the MEGA65 configuration. Otherwise set it to “DVI only (no audio).”
Note
With the older cores, the Hypervisor utility menu, Configuration, SD card utility, and core selection screens use “Enhanced (with audio)” mode by default. This fails on older DVI displays that don’t know how to handle this signal. You may need to use a modern HDMI display or a VGA display to access these screens. This has been fixed in release v0.96.
Tip
Be sure to try “CRT emulation” mode in the MEGA65 configuration with a flat panel display to see if you like it.
VGA
If you connect the VGA output to a vintage VGA CRT monitor, you will have a good time. The VGA signal and the expected aspect ratio go well together. The MEGA65 outputs a VGA image with a 31 kHz horizontal scan rate.
Tip
Be sure to disable CRT emulation in the MEGA65 configuration when using an actual CRT.
4:3 flat panel displays
If you’re looking for the 4:3 aspect ratio of a vintage monitor that won’t distort the MEGA65 image but also want the convenience of a flat panel screen, there are options, with caveats that depend on the model of monitor you find. Flat panel displays of the early 2000’s ushered out bulky CRTs before widescreen aspect ratios came into fashion. Many have both VGA and DVI (HDMI-compatible) inputs.
Dell P1917S
The Dell P1917S is a 19-inch 5:4 aspect ratio flat panel display, with HDMI and VGA inputs. It is my current daily driver with my MEGA65. It works with both PAL and NTSC display modes, and has high quality VGA pixel alignment. Best of all, Dell still manufactures this model, so you can get a new one for $169 USD or a refurbished one for $110.
The only caveat with the P1917S: do not buy the AC511 SoundBar that goes with it. It looks like it will take audio input via the 3.5mm jack, but it requires a USB connection to a Windows computer to operate the volume knob. It’s utterly stupid. I’m currently using a dirt-cheap sound bar from Jeecoo that is USB-powered and has a 3.5mm cable that connects directly to the MEGA65. It sits clumsily under the monitor, but it works.
Dell 2001FP
I have also had great experiences with the Dell 2001FP, a popular choice among vintage computer collectors. The 2001FP is a 20” flat panel display with S-Video, VGA, and DVI inputs. I use an HDMI-to-DVI cable to connect the MEGA65’s HDMI output to the DVI input, with the MEGA65 video configuration set to “DVI only (no audio).” I also use a VGA cable to connect the MEGA65’s VGA output to the VGA input.
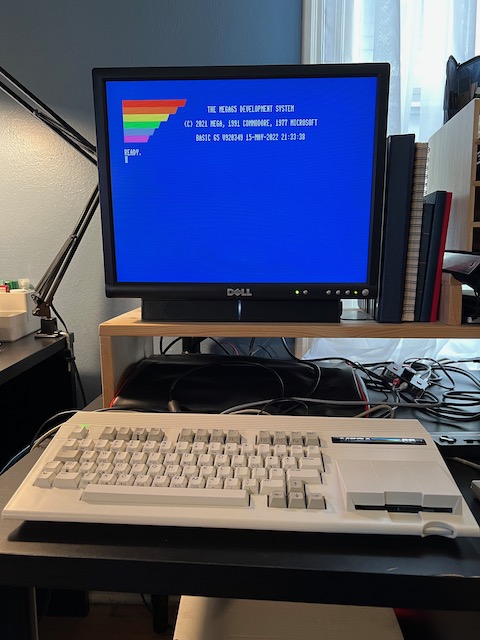
Why use both HDMI and VGA connections with the same display? In the case of the 2001FP, I need both to work around caveats with each mode:
HDMI provides the highest quality display for regular use. With the factory-installed core, some of the utility menus (configuration, core selection) use the “Enhanced (with audio)” HDMI mode, which fails to display through the 2001FP DVI input. These menus work fine over VGA. This is not a problem for all HDMI monitors: it only affects DVI displays that do not support sound over HDMI. (Utility menus were fixed in later cores, but the factory core still gets used in some cases.)
To display VGA, the 2001FP must adapt to the signal timing to present it on the flat panel display. This results in periodic drops of pixel columns. It’s fine for the configuration menus, but it’s a poor experience for regular use.
With both video outputs connected, I can switch the monitor input as needed without too much hassle.
The HDMI-to-DVI cable does not carry the HDMI audio signal, and the Dell 2001FP doesn’t have built-in speakers anyway. I use a Dell soundbar and a separate speaker connection to the MEGA65 audio jack.
Tip
Is your HDMI output not working with a vintage DVI display? Double-check that you have “DVI only (no audio)” selected in the MEGA65 video configuration. (Use a modern HDMI display or a VGA connection to see the configuration screen.) “Enhanced (with audio)” mode will corrupt the DVI-only signal.
Tip
If you want a flexible vintage display that works well with vintage computers that use analog RGB signals such as the Amiga, check out 15khz.wikidot.com for recommendations. The Dell 2001FP almost makes the cut: older versions support a 15 kHz signal, newer ones (like mine, alas) do not. I use the 2001FP with my Commodore 64C and an S-Video cable with great success. 15 kHz support is not required for the MEGA65, it’s just nice to have for some old machines.
Video capture cards
One advantage to having two simultaneous video outputs is you can send one to a monitor and another to a device such as a video capture card. I used VGA to the Dell and HDMI to an Elgato Camlink to take the screenshots in this Guide. (You can also take screenshots with the M65Connect app and the JTAG connection. See Using the JTAG connector.)
I was not able to capture screenshots of the C64 core with the Camlink. The C64 core only knows how to simulate a PAL machine, and the Camlink apparently doesn’t like whatever video signal it produces.
Resolution and aspect ratio
The MEGA65 core produces an image in a resolution and refresh rate that corresponds with the emulated vintage display format: PAL or NTSC.
In PAL mode, MEGA65 produces an image with a resolution of 720 x 576, and a refresh rate of 50 Hz.
In NTSC mode, MEGA65 produces an image with a resolution of 720 x 480, and a refresh rate of 60 Hz.
The MEGA65 image is intended to be rendered in an aspect ratio of 4:3. If you do the math, you may notice that the output resolutions are not 4-to-3: 720:576 = 5:4, and 720:480 = 3:2. In the intended display, the pixels are not meant to be square. The monitor will reshape the pixels to the intended aspect ratio.
This behavior is produced by the MEGA65 core. Other cores may generate images at other resolutions and refresh rates, and may have their own compatibility issues with some displays.
A List of Monitors
We’re maintaining a list of tested monitors in the MEGA65 Wiki. Feel free to contribute your results!
Recently added features
The MEGA65 batch #1 shipped from the factory with ROM version 920287 (release 0.9) and a User’s Guide printed in late 2021. Batch #2 shipped in late 2022 with ROM version 920377 (release 0.95). MEGA65s will continue to ship with the first printing of the User’s Guide until stock is exhausted. Meanwhile, the ROM is considered a work in progress, and the MEGA65 team and contributors continue to enhance it with bug fixes and other improvements.
Below is an incomplete list of features that have been added since the first release. I can’t possibly keep this list up to date, but I wanted to describe a few so you know what you’re getting with the updates. I’m leaving out the many bug fixes, which are valuable in their own right. See the ROM change log and the core change log for a complete list of changes across the versions.
MEGA65 documentation writers are keeping the downloadable PDF version of the User’s Guide up to date with new features. Be sure to download this along with ROM updates.
New features
Some of the new features that have been added in the last couple of years:
Holding RUN/STOP during boot immediately enters the machine language
MONITOR.Filename pattern matching supports
#to match a single number character, and$to match a single letter character:DIR "ME$$*"To toggle between 40-column mode and 80-column mode, press ESC then press X. To go directly to 40-column mode, use ESC then 4. To go directly to 80-column mode, use ESC then 8.
BASIC supports arithmetic shift operators:
<<and>>.PRINT 7<<3Single-letter BASIC variables are “fast” variables stored in fixed memory addresses
$FD00-$FEFF.The
PLAYandSOUNDcommands have improved background playback and use of SID voices, so BASIC games can sensibly have both background music and sound effects.Some disk commands can access files on the SD card directly (and not via a mounted D81 disk image) using the virtual device
U12.DIR U12lists the files on the SD card.DLOAD "FILE.PRG",U12loads aPRGfile.BASIC programs can access screen and color memory via special byte arrays
T@&(COLUMN, ROW)andC@&(COLUMN, ROW). Screen coordinates are intuitive in both 40-column and 80-column modes.If you accidentally hit the HOME key, you can press ESC then HOME to return the cursor to its original position.
You can load a program from disk by using
DIRto view the directory listing, moving the cursor to the program name, pressing/(forward slash), then pressing Return. You can load and run a program in a single step using the ↑ (up-arrow) character (next to the Restore key) in the same way.Ethernet file transfer support; use the new M65Connect app (or command line tools), and see the User’s Guide, 2nd edition, for instructions
New core selection and flashing menu, capable of flashing slot 0 without a JTAG adapter
Can configure core slots to be selected automatically when different types of cartridges are connected, so a C64 cart can auto-boot into the C64 core instead of the MEGA65 core
Core file selector supports long filenames
New hardware typing event queue, enables faster and more accurate typing
Improvements to the chipset, Freezer, SD card utility, and Configuration utility
Fixed mouse handling in port 2
Configuration utility now prompts to power cycle on exit, to avoid confusion
Screen editor and KERNAL use the new hardware typing event queue, for faster and more accurate typing
80 x 50 text mode: press ESC then 5 (press ESC then 8 or 4 to select 80x25 and 40x25)
Default sprite images, including a mouse pointer in sprite slot 0
GO64 mode now displays a custom banner instead of the C64 banner, so it’s easier to distinguish between GO64 mode and the C64 core
Support for booting MEGA65 cartridges, based on the MEGA65 cartridge protocol
Run/Stop-Restore now restores the character set
Improvements to the Monitor, Renumber, BASIC commands, DOS
New BASIC commands
Many new BASIC commands have been added to the factory-installed ROM, or have been added to the User’s Guide since it was printed. See the latest User’s Guide for specifics. New commands include:
Disk commands
MOUNT controls the mounting of disk images and drives to the unit numbers from BASIC, without having to enter the Freezer.
To mount a D81 disk image from the SD card to unit 8:
MOUNT "FILENAME.D81"To mount the built-in physical 3-1/2” disk drive:
MOUNT
FORMAT formats (erases) a mounted disk. This is an alias for HEADER.
To prepare a new disk in unit 8 for use:
FORMAT "DISKNAME",I01To quick-erase a previously prepared disk in unit 8:
FORMAT "DISKNAME"
CHDIR and MKDIR support sub-directories on D81 disks and the SD card.
To change to a sub-directory of the current directory on unit 8:
CHDIR "SUBDIR"To return to the root directory on unit 8:
CHDIR "/"To make a sub-directory on unit 8:
MKDIR "SUBDIR"To change to a sub-directory on the SD card:
CHDIR "SUBDIR",U12To change to the parent directory of the current directory (SD card only):
CHDIR "..",U12
LOCK and UNLOCK set the status of a file on disk so that it cannot be deleted when locked.
To lock a file on unit 8:
LOCK "FILENAME"To unlock a file on unit 8:
UNLOCK "FILENAME"
IMPORT takes a SEQ file of PETSCII text as if typed into the BASIC editor. Unnumbered lines are ignored: it does not run commands in immediate mode.
To import a text file as BASIC:
IMPORT "LISTING"Any BASIC program already in memory will remain in memory, with only the lines in the listing overwriting what is already there. This makes
IMPORTuseful for adding a file of common routines to an existing program.
To export the current BASIC program as a text file that can be imported:
DOPEN#1,"LISTING",W:CMD 1:LIST:DCLOSE#1Every command that outputs text between
CMD 1andDCLOSE#1writes to the file. For example, you can add arguments toLISTto only export a portion of a program:LIST 2000-2999
Graphics commands
CUT, GCOPY, PASTE act on a rectangle of a graphics screen as a clipboard. GCOPY copies a rectangle of pixels to a buffer; CUT copies the rectangle then fills with the color of the pen. PASTE paints the previously copied rectangle onto the screen at a given location. An example from the manual:
10 SCREEN 320,200,2
20 BOX 60,60,300,180,1
30 PEN 2
40 CUT 140,80,40,40
50 PASTE 10,10,40,40
60 GETKEY A$
70 SCREEN CLOSE
DOT draws a single pixel on a graphics screen.
10 SCREEN 320,200,5
20 DOT 100, 80, 7
30 GETKEY A$
40 SCREEN CLOSE
CHARDEF changes the image for a single character based on its arguments. This makes it easy to produce custom fonts or character graphics in a BASIC program.
To replace the letter A with a happy face:
CHARDEF 1,$3C,$7E,$DB,$FF,$BD,$C3,$7E,$3C
To restore the PETSCII font:
FONT C
VSYNC <n> waits until screen drawing reaches raster line n. This is useful for games and graphical demos that need code to run once per frame for smooth animation or effects. This was once only possible with machine language programs, but MEGA65 in 40 MHz mode runs BASIC quickly enough for high speed games.
10 BORDER 0: VSYNC 150: BORDER 1: VSYNC 180: GOTO 10
Memory commands
MEM reserves 8K segments of memory in banks 4 and 5 for use by the program, such that the graphics library does not use them.
To reserve
$40000-$41FFFfor program use:MEM 1,0
SETBIT and CLRBIT set and clear a given bit at a given byte memory location. Bit numbers are 0-7 from least significant to most significant.
Given address
$03FFFcontaining the bit pattern00110111($37), to set bit 6 so it becomes0110111($77):SETBIT $03FFF, 6
WPOKE and WPEEK() write and read, respectively, a 16-bit (“word”) value at two consecutive locations in memory, least significant byte first.
To store the word
$FABCacross byte addresses$0C000(the least significant byte$BC) and$0C001(the most significant byte$FA):BANK 0 : WPOKE $C000,$FABCTo read the 16-bit value stored at
$0C000-$0C001:V = WPEEK($C000)
Other BASIC features
The FREEZER command opens the Freeze menu, as if you pressed Restore for a second.
The INFO command prints useful information about the system and available BASIC memory.
Known hardware issues
Thanks to the tireless efforts of a team of volunteers and patrons over many years, the MEGA65 hardware is of high quality, a device that recalls the vintage 8-bit machines of the 1990’s while retaining modern advantages like quality key switches.
Some minor fit and finish issues were inevitable. Here are a few issues that were reported in the community Discord, and some suggested remedies.
Note
Most of these issues have been fixed in the 2024 MEGA65, including the RTC, HDMI back-power, and RF noise.
The Real-Time Clock doesn’t advance the time
A significant percentage of MEGA65 units shipped with Real-Time Clock (RTC) hardware that stays stuck at the time you set in the configuration and does not advance, or advances slowly or erratically.
If your MEGA65 has this issue, you can request a replacement RTC unit that attaches to the Grove connector on the main board. The MEGA65 team is making these available free of charge. To learn more about this program and to request a Grove RTC:
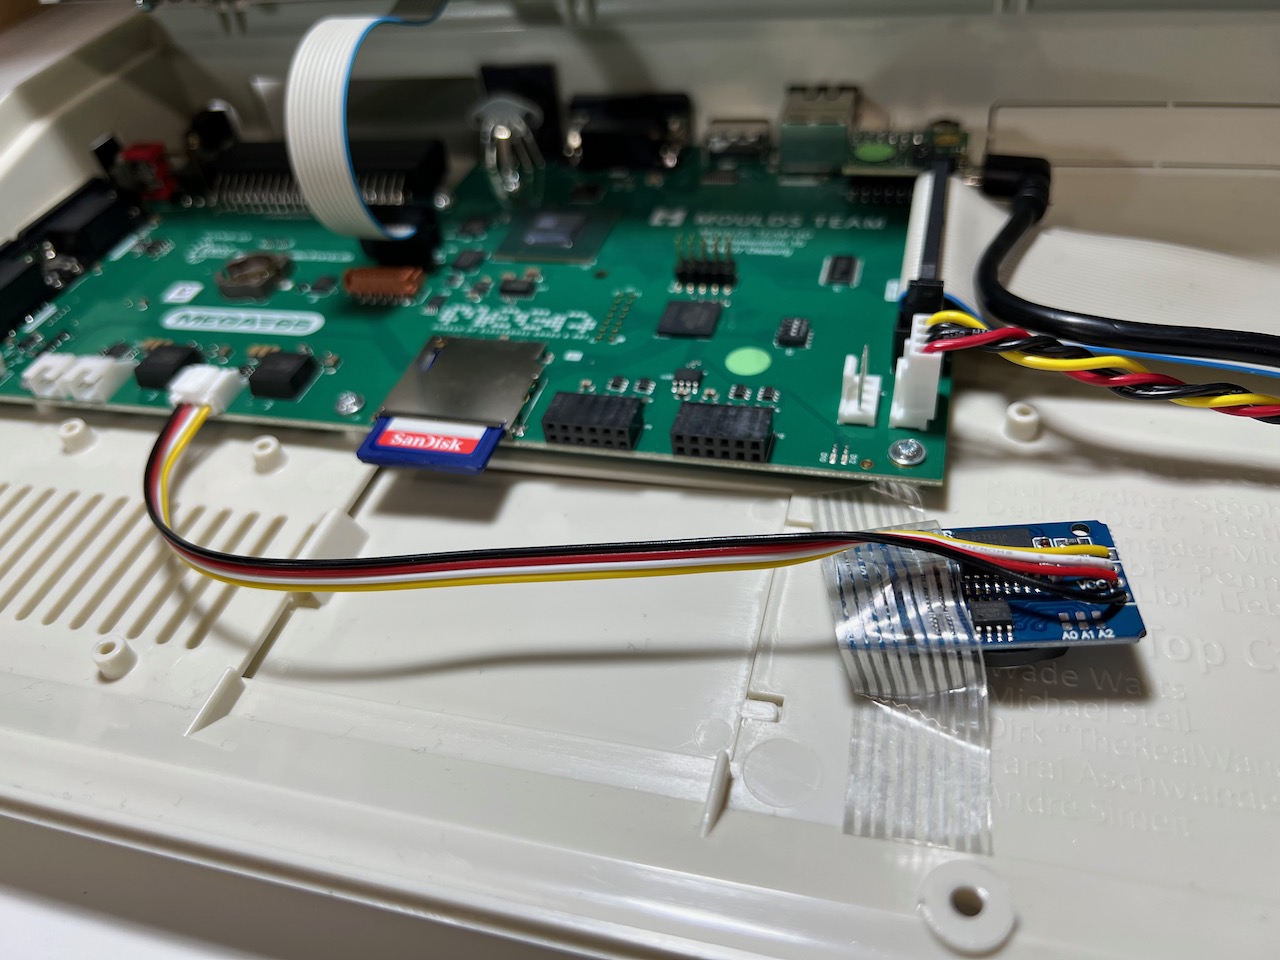
To test whether your MEGA65 is affected, use the MegaInfo utility (available in release v0.95 or higher). Open the Freeze menu (hold Restore then release), then press Help to run the MegaInfo utility. Give the diagnostic utility a few seconds, and it’ll report the “RTC status” of your machine.
My MEGA65 had this issue. Prior to installing the Grove RTC, MegaInfo reported that my built-in (“internal”) RTC was ticking slowly:
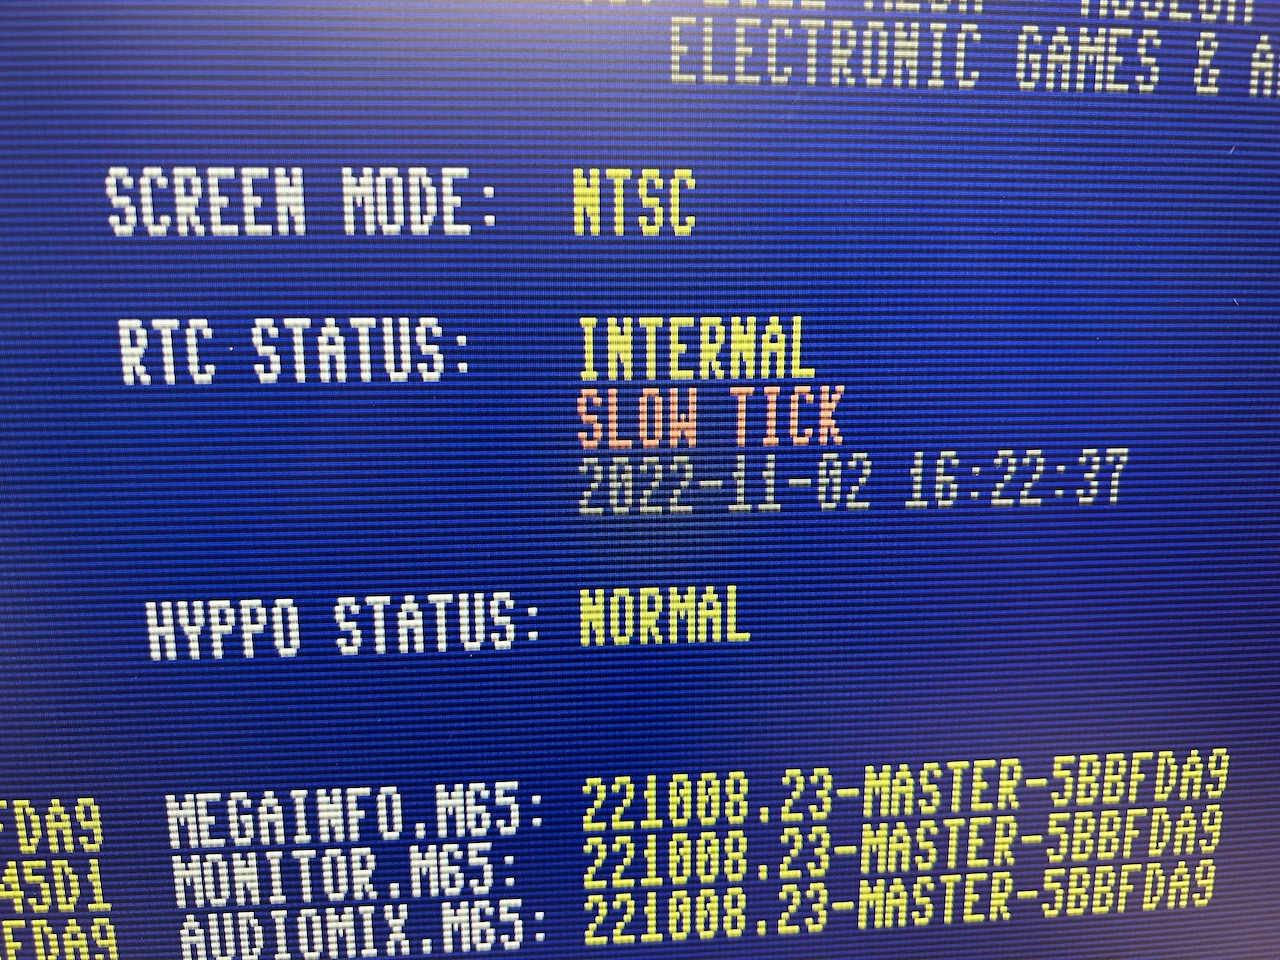
After installing the Grove (“external”) RTC, MegaInfo reported a working clock:
Failure to boot, and keyboard lights glow when off
Some owners have noticed that the MEGA65 fails to boot when connected to certain HDMI displays. If this happens, turn off the MEGA65, then see if the LED lights in the keyboard (power, Shift Lock, Caps Lock, or drive activity) glow or flicker faintly. This represents an issue known as HDMI backpower: the HDMI display is feeding power along the HDMI connection that is confusing the keyboard controller and inhibiting the boot sequence.
To confirm that this is the issue, disconnect the HDMI cable from the back of the MEGA65, turn on the MEGA65, then reconnect the HDMI cable while the MEGA65 is on. The MEGA65 should now be running correctly.
One workaround is to add an inexpensive HDMI switch between the MEGA65 and the display. Cheap switches will block HDMI backpower and allow the video signal. Owners have reported success with these (Amazon.de links):
Case fit issues
In some cases, the top and bottom pieces of the plastic case do not fit snugly. A common symptom is a noticeable slip when applying downward pressure to the back of the top case. One possible explanation is a mild manufacturing error from when the limited run cases were commissioned years ago.
The plastic is bendable and with gentle pressure can be coerced into a tighter fit. On the Discord chat, we discussed the use of a hair dryer to soften the plastic for gentle reforming. Be careful not to apply too much heat! Do not use a “heat gun,” and be judicious when using a hair dryer.
The issue was diagnosed by the manufacturer and will be fixed for future batches. See Issue: The upper case does not properly align with the lower case on the rear side.
Keyboard slouching and sticking Help key
My MEGA65 arrived with its keyboard appearing to slouch below the top case a bit on the right-hand side, and others reported something similar. The spacebar appeared not vertically straight with the top case, and some people reported that the Help and F13 keys get stuck on the top case when pressed all the way down.
I was able to repair mine with a Phillips head screwdriver. I opened the case and noticed that the screws holding the keyboard to the top piece could be driven further. Careful not to apply too much pressure, I tightened these screws to match the depth of the screws on the lefthand side. This repaired the issue for me.
Jammed floppy disk pathway
Some owners reported that a floppy disk inserted into the disk drive gets stuck when ejected with the eject button. I did not personally encounter this issue, but others reported success repairing this issue by tightening or loosening screws, similar to the other case fit fixes.
See Issue: Floppy drive eject button and/or inserting floppy disk stuck for more advice.
Boot failures with blinking blue LED lights
If the MEGA65 fails to boot its operating system, it will blink the LED lights on the machine in a blue color. This may indicate a problem with the core being loaded. Turn off the power, then hold the No Scroll key and turn it on to access the core selection menu. Select a known-good core, such as the factory-installed core in slot 0.
Questions and answers
Here are a few additional common questions about the status of MEGA65 features.
Does the cartridge port work?
Yes! If a Commodore 64 cartridge is in the MEGA65 cartridge port when the MEGA65 is turned on, it will attempt to start in GO64 mode and execute the cartridge.
The latest version of the C64 core supports hardware cartridges. Be sure to enable the hardware cartridge port in the C64 core Help menu.
Starting with release v0.96, with the new core installed in slot 0, you can configure the core selection process to automatically select the C64 core if it is installed and a C64 cartridge is connected. This allows you to play C64 cartridge games with full compatibility, as an optional alternative to GO64 mode.
Also starting with release v0.96, there is a protocol for implementing MEGA65 cartridges. We can look forward to MEGA65 games being published as cartridges in the future.
Does the Ethernet port do anything?
Yes! As we saw in this guide, platform release v0.96 introduces a built-in feature for transferring files over the Ethernet connection.
The Ethernet port can be used by software to connect to other devices and to the Internet. There isn’t much software for it yet.
The MEGA65 WeeIP repo by Paul has active open source projects for a telnet-based terminal program Haustierbegriff (PETterminal) and an HTTP file fetcher. See Paul’s blog entry exploring the technical details. Contributions welcome!
Resources
Want the latest and most fun updates? Subscribe to my newsletter!
Dan’s MEGA65 Digest reports on project status and new software releases, and every issue includes a feature article with a MEGA65 activity or technical topic. There is even a podcast read-aloud version, wherever you find your podcasts!
There are substantial documentation, software, and community resources for the MEGA65, in various states of completion and freshness. While browsing available resources, keep in mind that there have been multiple iterations of the MEGA65 project leading up to the 2022 launch:
Some resources may refer to the DevKit model, a pre-production version of the MEGA65 that sold 100 units (no longer available).
Others may refer to the Nexys A7 FPGA board, an alternate way to run the MEGA65 core and ROM.
Still others may refer to the Xemu emulator platform, which can emulate a MEGA65 on a PC.
The MEGA65 with the injection molded case and mechanical keyboard uses revision 3A of the board and is sometimes referred to as “R3” or “R3A.” The 2024 model is known as “R6.”
Here are some useful next places to visit:
My MEGA65 resources page, including past issues of the monthly newsletter.
Thank you for reading this Welcome Guide! If you have feedback on how I can make this Guide better, or just want to say hi, please report an issue, email me (I’m Dan), or DM dddaaannn#7325 in the MEGA65 Discord.
Welcome to the world of personal computing. Enjoy your MEGA65!
GO 65