Sprite Attack!
Sprite Attack. Dan’s MEGA65 Digest for February 2024.
Spaceships. Aliens. Marios. Goombas. Bullets. Fireballs. Mouse pointers, text cursors. Any of these could be a sprite, a feature of a computer graphics system dedicated to things that move. The sprite capabilities of the Commodore 64’s VIC-II chip super-charged video games and user interfaces beyond a single screenful of character text or a bitmap image. The MEGA65 includes support for VIC-II hardware sprites, and has sprite-related BASIC commands that make them easy to use in your programs.
In this Digest, we’ll review the VIC-II sprite system’s capabilities, try out the sprite features added to Commodore BASIC for the C128, C65, and MEGA65, and step through a development workflow for using sprites in BASIC games. And we’ll try putting these pieces together to make a simple arcade game.
But first…
The User’s Guide, 2nd edition, now available
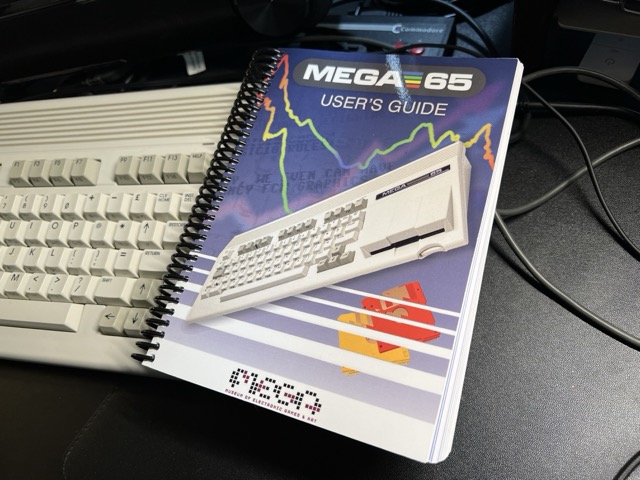
The MEGA65 User’s Guide, 2nd edition.
You can now buy a spiral-bound printed copy of the MEGA65 User’s Guide, 2nd edition!
This new edition has been updated substantially from the 1st edition printing from two years ago. It covers the upcoming v0.96 release, with instructions for new features like Ethernet file transfer, and revised information on important topics like upgrading the firmware and using disks. The BASIC reference has been updated with corrections, polish, and material on new features. And there are handy new appendices on screen codes and system colors.
Whether you have the 1st edition and want to upgrade, or don’t yet have a MEGA65 and just want a useful book to go with Xemu, getting the 2nd edition in print is a great way to enhance your MEGA65 experience.
I wrote a FAQ with more information, including what’s happening with the manuals bundled with new MEGA65s. Let me know if you have any questions.
Release testing update
The v0.96 release package has been in public testing for a month, and we’ve been chasing down issues and polishing it up for factory installation on all of the new MEGA65s. This process should be complete a week or so after you read this. Many thanks to everyone who has contributed to the testing effort!
What happens next: the v0.96 release package will be made official and sent to Trenz for the factory installation on new machines. It will be declared the new stable release for R3A and R6 mainboards, and made available on Filehost. Everyone with the “retail” MEGA65 will be encouraged to upgrade.
DevKit and Nexys board owners will need to wait, just a bit. In order to meet the assembly schedule, we have had to defer preparing new cores for these boards until after this release. The plan is to immediately start work on these deferred tasks, and issue a v0.97 update within a couple of months that includes support for these boards. You’re always welcome to help test along the way, just be aware of known issues with slot 0 flashing on the older boards.
Upgrade party at lydon’s place! 🎉
New Intro Disks!
The new Intro Disk main menu
Gurce has put a ton of work into preparing the new software bundle for the SD card that will ship with the new MEGAs. Current owners are familiar with the “Intro Disk” menu that starts when you first switch on the computer, as well as other bonus goodies that come on the pre-installed memory card. The new bundle includes all of that and much more, a total of 191 (one hundred and ninety one!) menu entries. And that’s not even counting the disk menus themselves, with useful information and musical accompaniment. This compilation starts all new MEGA65 owners off with plenty to do on their first day. Huge thanks to Gurce for his meticulous work on this project, and of course to everyone who has written software for the MEGA65.
You can download the new software bundle on Filehost. (There’s a separate download for registered owners with a more complete version of GEOS.) If you don’t yet have a MEGA65, you can try it out in Xemu—or save it as a surprise for when your MEGA65 arrives!
New on Filehost
Rocket Delivery Service, by fredrikr
Don’t miss these new titles on Filehost:
Rocket Delivery Service, by fredrikr, a new game for one or two players. Navigate your rocket man to pick up and deliver packages, for cash! Each player can use a joystick, or player one can use the keyboard while player two uses a joystick. Written entirely in BASIC!
MJoergen and sy2002 are updating their vintage platform cores for use on the new R6 mainboard. The ZX Spectrum core v1.2 is now available, and there is a beta test version of the C64 core v5.1 (link goes to Discord) to be released soon. The C64 core update also includes a few fixes for all mainboards, and support for using the MEGA65’s Real-Time Clock with the Commodore 64 version of GEOS.
muse has yet another arcade core, and he keeps picking my favorites! Elevator Action (1983), a spy thriller set in a multi-level top secret facility. Infiltrate the building from the roof, avoid the armed goons, collect the secret files, and escape through the parking garage. As with the other arcade cores, you must locate the arcade ROMs yourself, so be sure to follow the installation instructions. Hold the button to jump.
Amiga fans: geehaf has published an ADF disk image utility that can use the MEGA65’s physical floppy drive to make Amiga disks from ADF files, and vice versa. This is a beta release of the tool, so take care to back up important data.
Exploring sprites
The hardware sprites of the VIC-II chip should be familiar to anyone who has written a program for the Commodore 64. The Commodore 64 Users Guide that came with the machine included a chapter on sprite graphics with a type-in demo. C64 programmers may also remember drawing out pictures on graph paper, hand-coding them into decimal numbers, typing them into DATA statements, and messing about with dozens of arcane POKE statements. In later computers and later versions of BASIC, Commodore added a BASIC sprite subsystem with access to most of the VIC-II’s sprite features, driven by a new set of commands. No POKE-ing necessary.
From here on, when I say “sprites,” I’m referring to the built-in sprite features of the VIC-II chip that have carried forward from the Commodore 64 to the MEGA65. Experienced game programmers would want me to point out that the general term “sprite” could apply to any kind of moveable graphics object, and there are, in fact, other ways to accomplish sprite-like effects on the MEGA65. We’ll have to cover those in later issues of the Digest.
The best way to get to know Commodore sprites is to try out the commands! The new v0.96 release version of the MEGA65 ROM includes pre-defined sprite images for a mouse pointer and a simple line pattern, so you can get started without drawing any graphics. If you’re using the previous release, you can still switch on the sprites, you’ll just see a blob of pixels that represents uninitialized memory contents.
Getting a sprite onto the screen
The VIC chip can keep track of up to eight sprites at a time, numbered 0 through 7. Each sprite has a set of modes and flags, including a flag to enable or disable the sprite. You manage these flags with the SPRITE command.
To turn on sprite 0:
SPRITE 0,1
Nothing appears to happen because the sprite starts located off the screen. Let’s move it roughly to the middle of the screen so we can see it (X=160, Y=120):
MOVSPR 0,160,120
While many of BASIC 65’s sprite commands originate with BASIC 7 and the Commodore 128, there are subtle differences. For example, on the C128, sprites are numbered 1 through 8. I won’t describe every difference here, just be aware that they’re not exactly the same on both computers.
Pixels and colors
In the default sprite mode (sometimes called “high resolution” mode), each sprite is 24 pixels wide and 21 pixels high, using a single sprite-assignable color for each “on” pixel (bit 1) and treating each “off” pixel (bit 0) as transparent. This is encoded as three bytes per row (8 bits per byte x 3 bytes = 24 pixels), for a total of 63 bytes (21 rows x 3 bytes per row) per sprite image.
You can set the color of a sprite with the SPRITE command. You can omit any argument you don’t want to change by specifying just a comma. The color value refers to the palette entry, in this case the default system palette. To turn sprite 0 red (palette entry 2):
SPRITE 0,,2
On the MEGA65, you can change the system palette using the PALETTE COLOR command. Each palette entry can be any of 4096 possible colors, with a red, green, and blue component each between 0 and 15. This changes the palette entry for all uses of the color on the screen, not just sprites. To replace the red color at entry 2 with a bright green:
PALETTE COLOR 2,12,15,4
To restore the default palette:
PALETTE RESTORE
Multicolor mode
If you’re willing to use a lower sprite resolution of 12 double-wide pixels per row instead of 24 single-wide pixels, you can set a sprite to multi-color mode, for two more additional colors. The two new colors must be shared by all sprites that are in multi-color mode. In this mode, sprite pixels are encoded as bit pairs: 00 for transparent, 10 for the sprite color, and 01 and 11 for the two shared colors.
Let’s try setting sprite 0 to multi-color mode, using a value of 1 for the seventh argument to SPRITE:
SPRITE 0,,,,,,1
If you’re using a ROM beta version, the default mouse pointer image of sprite 0 might not look that impressive in multi-color mode. Try enabling sprite 1 and moving it to the middle of the screen, then put it in multicolor mode. The default image of sprite 1 is designed to illustrate multicolor mode, with a repeating pattern of 00, 01, 10, and 11 bit pairs. (If you’re using release v0.95’s ROM 920377 or earlier, you’re in luck: the garbage data that’s usually there typically has an interesting combination of bit pairs.)
To set the two shared colors for the multicolor sprites, use the SPRCOLOR command, with the two palette entry numbers:
SPRCOLOR 4,5
Double width, double height
Each sprite can be displayed normal size, double width, double height, or both double width and double height. The double modes don’t give you more pixels: instead, they stretch the existing sprite design in the requested dimension.
These modes can be selected per sprite, and are the fifth and sixth arguments to the SPRITE command, respectively. Try the combinations of 0 and 1 for these arguments:
SPRITE 0,,,,1,1
Sprite priority
Each sprite can be set to appear above the character or bitmap layer, or below it. When above, you can see the character or bitmap through the sprite’s transparent pixels.
Use the cursor keys to move the text cursor to where the sprite is on the screen, then type some characters underneath it. On a blank line, set the fourth argument to SPRITE to 0 or 1, and see what happens:
SPRITE 0,,,1
When sprites overlap each other, lower numbered sprites are always in front of higher numbered sprites. This order cannot be changed. Use SPRITE to make sure two sprites are active, then use MOVSPR to locate them so that their images overlap.
SPRITE 1,1
MOVSPR 1,160,120
Overlapping sprites is a common way to draw a high resolution graphics object using more than one color: just use more than one sprite to represent the object, and allow pixels of lower sprites to shine through the transparent pixels of upper sprites.
Location, location, location
A sprite can be located at any pixel location on the screen. A sprite’s location is specified as coordinates on the screen, where the sprite’s top-left corner is placed at that location. Coordinates extend to locations under the screen border, and a sprite that overlaps the border will be obscured. This allows a sprite to glide off the screen smoothly until it disappears. (Note that double-width sprites won’t fit completely under the left border.)
To place a sprite exactly in the top-left corner of the screen just inside the border, set its coordinates to X=24 Y=50. If a sprite is in its normal display mode (with its double-width double-height features turned off), you can place the sprite’s bottom-right corner exactly at the bottom-right corner of the screen with coordinates X=321 Y=229.
The VIC-II sprite coordinate system is independent of the resolution of the underlying screen mode. The MEGA65’s default 80-column text screen is actually 640 pixels wide. VIC-II sprite coordinates refer to the same locations regardless of the MEGA65 screen resolution. If you switch to the 40-column text mode, the sprites will remain where they are.
Sprite coordinates are the same for both NTSC and PAL video modes. Even though these modes use different dimensions for the full screen, the dimensions inside the border are the same.
We’ve already seen how the MOVSPR command can set a sprite to specific coordinates. This command has several other useful features. To move a sprite to a relative distance from its current location, use a + or - and an offset for the coordinate value (X, then Y):
MOVSPR 0,+20,-10
The MOVSPR command can animate the movement of a sprite at a given speed. This animation happens asynchronously to BASIC program execution, similar to the PLAY command for music: the animation occurs in the background while the rest of your code continues to run. To move a sprite from one coordinate pair to another, use the TO keyword, and provide a speed as a number of pixels per frame. Remember that PAL mode refreshes 50 frames per second, while NTSC mode refreshes 60 frames per second, so the movement speed differs based on video mode.
MOVSPR 0,100,100 TO 250,200,5
Note that the sprite needs to hit the end coordinate almost exactly for the sprite to stop. If the speed is not a multiple of the differences between the starting and ending coordinates, the sprite might overshoot its destination and wrap around the screen until it finally lands where it was told. If there’s a chance of this, you may need to resort to a loop that tests RSPPOS() and stops the sprite with another MOVSPR command when it is close enough.
A sprite can be set to move continuously, with no fixed end coordinate. To do this, provide an angle as a number of degrees, with 0 degrees being “up” and proceeding clockwise, so 90 is right, 180 is down, and so forth. Follow this with a # symbol and the speed.
MOVSPR 0,135#1
The sprite will continue to move at this angle and speed until you set its speed to 0 with another MOVSPR command, or until you switch it off with the SPRITE command.
MOVSPR 0,0#0
When a moving sprite leaves the screen, it will continue to move until its position wraps around to the other side of the screen. If you want to test the position of the moving sprite, such as to stop its motion after it is off screen, use the RSPPOS() function. This takes the sprite number, and an argument identifying the parameter to return: 0 for the X position, 1 for the Y position, 2 for the speed.
Here’s a short program that starts the sprite moving to the right, then stops it either when a key is pressed or the sprite leaves the screen:
10 SPRITE 0,1
20 MOVSPR 0,100,100
30 MOVSPR 0,90#1
40 GET A$
50 X=RSPPOS(0,0)
60 IF A$="" AND X < 345 THEN 40
70 MOVSPR 0,0#0
Collision detection
The VIC chip can report when two sprites have non-transparent pixels on top of each other, or on top of the character or bitmap layer. Your program can use this to detect collisions between sprites, or between a sprite and the background, such as to know when a player’s bullet hits an alien ship, or when the player’s ship crashes into a mountain.
BASIC 7 on the Commdoore 128 introduced an interesting mechanism for handling sprite collisions. To tell BASIC that you care about sprite collisions, you use the COLLISION command to indicate the type of collision (1 = sprite on sprite, 2 = sprite on background), followed by a line number of your BASIC program. At some later point, when the VIC detects the requested collision type, BASIC will stop whatever it is doing and jump to the given line number as if it were a GOSUB subroutine. Your code at this line number should do whatever it needs to do to react to the collision, then use the RETURN command to resume where the program left off.
Your handler subroutine is called for any collision of the requested type. Your code will need to use other tests to determine which collision took place. The BUMP() function reports which sprites were involved in a collision since the last call to BUMP(). You can also use the RSPPOS() function to test individual sprite locations to further determine where the collision took place. See the User’s Guide for information on these functions.
Try to guess what this program does, then type it in and run it:
100 SCNCLR
110 X=0
120 SPRITE 0,1
130 MOVSPR 0,100,100
140 MOVSPR 0,90#1
150 CURSOR 70,6
160 PRINT "XXX"
170 COLLISION 2,220
180 GET A$
190 IF A$="" AND X=0 THEN 180
200 MOVSPR 0,0#0
210 END
220 PRINT "BLAMMO!"
230 X=1
240 RETURN
The VIC’s built-in collision detection is not always the most reliable way to detect game events. Depending on the shapes of your sprites and other factors, you may prefer a different method to detect collisions, such as by testing sprite positions relative to a hitbox. To do this, instead of a COLLISION handler, you’d make repeated tests of RSPPOS() in your game’s main loop.
Another caveat: There is a known issue with the VIC-IV core where sprite collisions are not detected with bitmap graphics (the BASIC 65 SCREEN system). Collisions are limited to sprite-to-sprite and sprite-to-text for now. Of course, there’s quite a bit you can do graphically in text mode using PETSCII graphics, and custom character sets with the CHARDEF command.
Other sprite features?
If you grew up with a Commodore 64, these sprite features probably feel quite familiar. The C128 sprite commands, and the C65 and MEGA65 additions, are handy, but the sprites themselves mostly look like they did on the VIC-II.
For the VIC-III video chip in the Commodore 65, Commodore added no new features to sprites. Sprite colors use the VIC-III system palette, and you can adjust the colors of the system palette to any of 4096 possible colors. Otherwise, they’re basically the same as they’ve always been.
The MEGA65’s VIC-IV adds advanced sprite features, such as a full-color mode with actual-size pixels, four palette banks, a 64-pixel width monochromatic mode, variable pixel height, and high resolution sprites that use the actual pixel width and coordinate system of a 640-wide (80-column) display. BASIC 65 does not yet support any of these features with the BASIC sprite commands. You can adjust VIC-IV registers directly with POKE statements, but this may interfere with the behavior of the BASIC commands. I’m currently working to extend BASIC 65 with official support for VIC-IV sprite features, so stay tuned for updates!
Managing sprite image data
Playing with the built-in sprites is fun and all, but for our own programs, we obviously want to draw our own sprite images.
Using the Sprite Editor
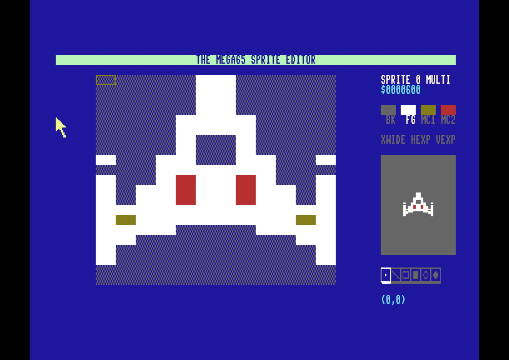
Did you know that the Commodore 128 has a built-in sprite editor? The C128’s SPRDEF command opens a sprite editor that directly manipulates the BASIC sprite image data in memory. For whatever reason, Commodore removed SPRDEF for BASIC 10. The good news is, the MEGA65 has its own sprite editor, “SpritEd,” built into the Freezer.
Hold Restore for one second then release to open the Freezer, then press S to start the sprite editor. This utility edits sprite image data at the BASIC sprite locations in memory.
A word of warning. SpritEd is currently unfinished software. Up to platform release v0.95, SpritEd crashes the machine if you press the Up Arrow key. I discovered this while writing this article, and I committed a fix to prevent this that will be in release v0.96. I recommend upgrading to release v0.96 before doing any serious work in SpritEd.
SpritEd is missing a bunch of its intended features, such as the ability to load and save images to disk. Even without these features, it is about as useful as the C128’s SPRDEF tool, and can edit sprite image data in memory. We’ll see how to get sprite image data from memory into your program in the next section.
Press the Help key for a list of keyboard controls. Briefly, these are as follows:
- To select a drawing tool: P for single pixels, L for a line, X for a box, Shift-X for a filled box.
- Press Space to draw with the selected tool. Del uses the tool with the background component, such as to erase a pixel.
- To erase the entire sprite: Ctrl+N.
- To select a “component” (color) to draw with: + and - rotate through the choices. In monochrome mode, this is just the background (transparent) and foreground. In VIC-II double-width multi-color mode, there are two additional components for the shared sprite colors.
- To change the color of the currently selected component: 0 through 9, A through F assigns one of the sixteen palette entries to the component.
- To select other sprites: comma (,) and period (.) rotate through the eight sprites.
- To change the sprite mode: * rotates through monochrome, VIC-II multicolor, and VIC-IV multicolor modes. Remember that BASIC does not yet support VIC-IV multicolor mode directly, so this last mode won’t be useful until we finish the new features.
- To see what your sprite looks like when expanded horizontally or vertically: use H and V to toggle these modes.
SpritEd supports drawing with a mouse connected to port 1. I discovered a small bug where the mouse can’t draw in the rightmost column, which should be easy to fix in a future version.
To exit SpritEd, press F11 to make sure the current sprite is saved to memory, then press F3 to exit back to the Freezer menu. Each sprite image is saved to memory automatically when you flip between the sprites, so F11 is only necessary on the current sprite, if it was modified. (That feels like something else we can improve pretty easily. Just know that’s how it works for now.)
Storing sprite image data on disk
The gorgeous sprite graphics we created in SpritEd are now in memory, but they’ll disappear forever if we don’t get them out of memory and onto disk. BASIC 65 makes this easy: SPRITE SAVE "filename" saves all eight sprite images to a file on disk. SPRITE LOAD "filename" loads them back in.
This provides a POKE-free workflow for managing sprites for BASIC programs:
- Create sprite images in the SpritEd utility. Press F11, then F3 to exit back to the Freezer menu, then F3 again to resume BASIC.
- Execute the
SPRITE SAVE "filename"command to save all eight sprite images to a file. - Then in the program, use the
SPRITE LOAD "filename"command to load these images.
Animating sprite images
For a game like Space Invaders, a ship can be a single sprite image whose only animation is to move around the screen, such as with the MOVSPR command. For a game like Pac Man, the player sprite should open and close its mouth, which means updating the sprite’s image data. We can’t exactly load a new Pac Man from disk each time he opens and closes his mouth, so we need another way to update sprite data within the program.
The SPRSAV command copies sprite data between sprite slots and BASIC string variables. It takes two arguments: the source and the destination. One or both of these can be a number between 0 and 7 to refer to the sprite image. If the other is a named string variable, the variable is used as either the source or destination.
For example, to copy the image data from sprite 2 to the string variable C$:
SPRSAV 2,C$
To copy that image to sprite 5:
SPRSAV C$,5
Combined with SPRITE LOAD, you can use SPRSAV to load all of your sprite patterns into string variables, then store them back into sprite slots during game play as needed.
You can also use string variables and SPRSAV along with disk operations as an alternative to SPRITE LOAD. For example, you can store more than eight patterns in a single file. Each pattern is 64 bytes in length. See any good reference on disk commands for more information.
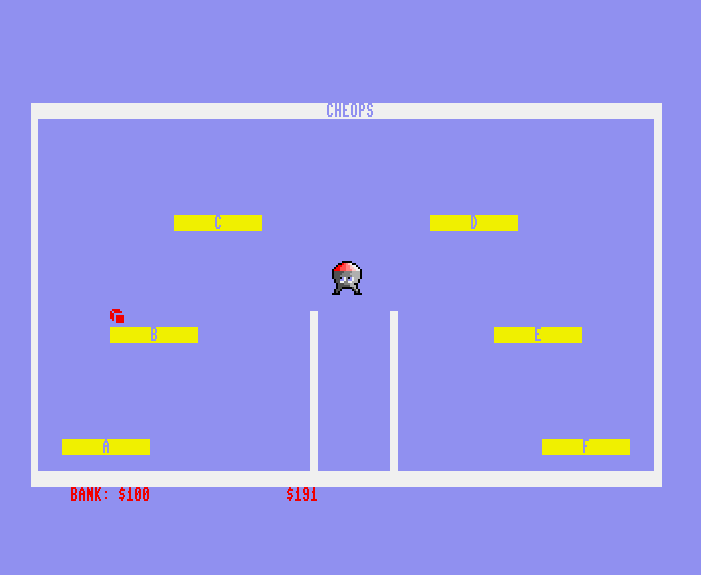
Putting it together
Sprite Attack is a simple game I wrote to demonstrate how the sprite features can be used together. Get it here:
- Sprite Attack: spratk.d81
Try it out with a joystick in port 2. It’s written entirely in BASIC, so type LIST to see the program listing. A few notes:
I used SpritEd to draw eight multicolor sprites: the player’s spaceship, the player missiles, the space alien death ray, four frames of an explosion animation, and the space alien itself. I exited SpritEd and the Freezer, then used the command
SPRITE SAVE "SPRATK.DAT"to save the sprite data to disk. The program starts by loading this file withSPRITE LOAD.I keep the player’s X position in a variable so I can fine-tune the speed that the player moves. Pixel locations are always integers, but sometimes you want a sprite to move in non-integer increments, such as 1.8 pixels per frame. The variable holds the non-integer location, and this value is rounded to the nearest pixel when I pass it to the
MOVSPRcommand.The game loop tests for joystick movement, adjusts the variable, and updates the player location with
MOVSPR. Because the player only moves left and right, I use+0as the Y coordinate argument toMOVSPRso that I don’t have to remember the ship’s vertical position after initializing it.I use the
VSYNCcommand to synchronize gameplay with the frame rate. This makes it easier to tune the movement speeds, and it prevents the sprites from “tearing” by making sure the location doesn’t change while the sprite is being drawn.Player missiles use the movement animation system. The
RSPPOS()with a second argument of2returns the current speed of a sprite, so I can test whether the missiles are moving. If the button is pressed and the missiles aren’t moving, I set their position to just above the player ship and set them moving in an upward motion, then I activate the missiles sprite. I also test once per loop if the missiles have gone off the top of the screen, and if so, I stop their motion by setting their speed to zero.The alien also uses movement animation. If the space alien is ever stationary (speed is 0), the program chooses a new random location, and calls
MOVSPRwith the current location as the origin and the random location as the destination. This gives the alien an evasive behavior that still gives the player a chance to target it with missiles.A collision handler detects when the missiles are in contact with the alien. When the alien is hit, the routine moves the explosion sprite to the alien’s location, disables the missiles sprite, then moves the alien sprite to another random starting point above the screen. It plays out the explosion animation using
SPRSAVto copy in the explosion patterns we saved into string variables earlier, pausing between each frame. This causes all gameplay to pause while the explosion finishes. A more sophisticated game would handle explosion animations in the main game loop, so other events like player movement can take place during the animation.
This game is a little unfair—to the alien. Try extending this program to have the alien shoot back at the player, using its death ray in sprite 2.
VIC hardware sprites and the BASIC 65 sprite commands are a fun and easy way to code video game graphics. Combine them with PETSCII graphics to draw level maps, backgrounds, and informational displays, and you have all of the elements of a great looking game. Be sure to share your games with other MEGA65 owners by uploading them to Filehost!
There are some advanced sprite techniques I wanted to mention here, but they’ll have to wait for another issue. You can help make more issues possible by supporting the Digest on Ko-Fi.
As always, happy coding!
— Dan